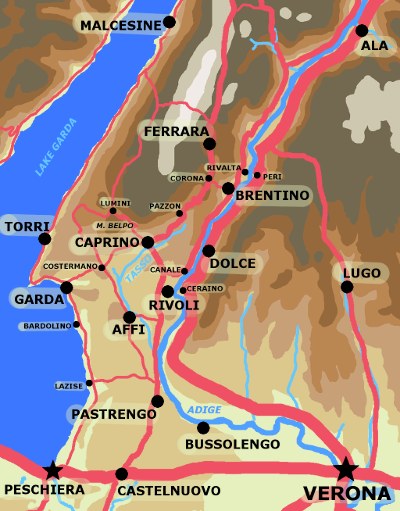
Base Map
12th January 1797
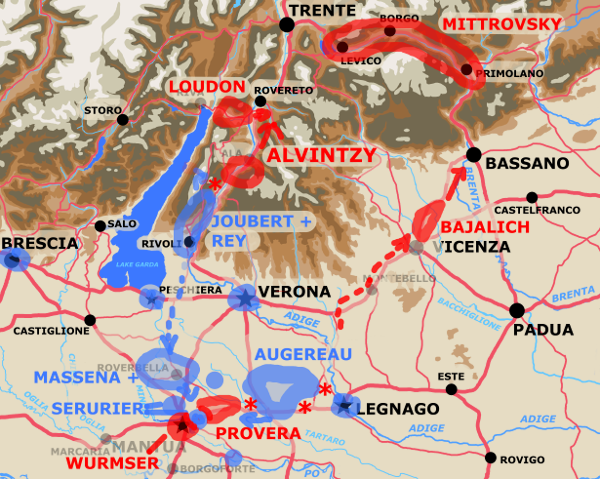
13th January 1797
14th January 1797
The Austrians under Alvintzcy make their last attempt to relieve Mantua.
Map of overall theatre for operations in January 1797
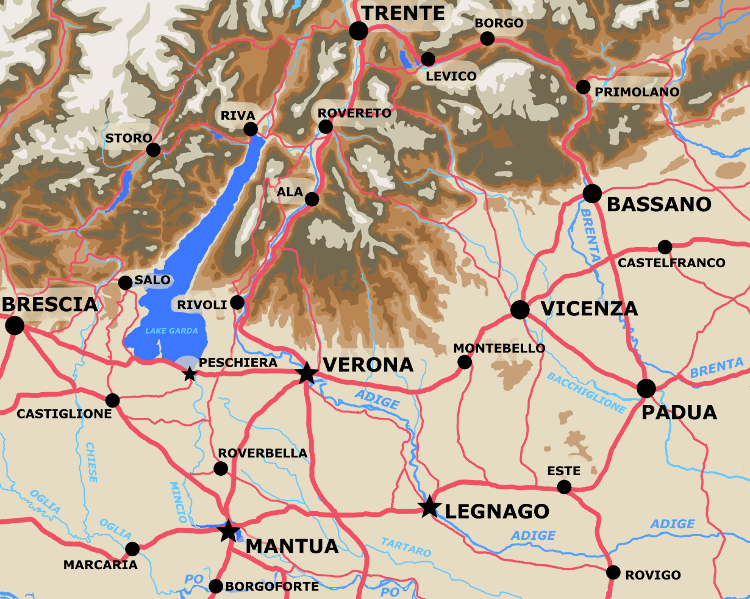
Map Key:
|
|
Map showing army positions on January 8th 1797.
After the close call in the Arcole campaign the French in Italy had been reinforced, and Bonaparte had refined his organization considerably. On the other hand other states in Italy particularily the Papal ones were proving a distraction. A number of high level officers had taken sick but others recovered to take their places. In particular Kilmaine was relieved by Serurier who he'd replaced earlier on. Joubert replaced Vaubois in the Tyrol east of Lake Garda. Rey guarded the routes to the west of Lake Garda.
Massena took a back up reserve position near Verona while Augereau had primary responsibility for holding the line of the Adige. An outlying brigade under Lannes at Rovigo guarded against any Austrian effort to move south of Padua.
Bonaparte in overall command.
The French forces totaled 46,610.
By January 1797 the Austrians had raised their fifth army to face Bonaparte in Italy. Of necessity much of it was composed of raw recruits without much in the way of training or experience leavened by the veteran survivors of the previous campaigns.
Once again although Alvintczy had overall command the Austrian forces were split into several ill co-ordinated parts. The two major parts were the Tyrolean and Fruili Corps. The Tyrolean Corps under Alvintczy's direct command this time was based in the mountains out of Trent. The Fruili Corps sat on the line of the Brenta in two major sub-divisions, one under Bajalich at Bassano and the second under Provera at Padua. A smaller brigade sized force under Mittrovsky in the Val Sugana connected the two main Austrian Corps. The cut off Austrian forces under Wurmser in Mantua were reaching the end of their supplies, Alvintczy had to attack soon.
Alvintczy in overall command.
Note: The above from Boycott-Brown other sources such as Chandler and the West Point Atlas show Column V under Quasdanovich not Reuss apparently after a misreading of Jomini though in truth the Austrian command structure was anything but clear. Boycott-Brown following Schels gives Quasdanovich a sub-command consisting of both Osckay and Reuss's columns. It appears Quasdanovich accompanied Reuss' large column and made many of the critical decisions for it. Alvintczy himself appears to have spent most of his time with columns II and III.
In total the Austrian field army exclusive of Mantua had about 47,000 men.
Manuta's remaining garrison numbered about 15,000 of which maybe 9,000 were effective.
To sum up the Austrian field forces were slightly greater in number than the French forces. The Austrians having in addition 9,000 effectives in Mantua that they could hope would divert up to 10,000 of Bonaparte's men. Any Austrian relief force would of course have to face the those blockading forces likely without effective co-ordination with the defenders in Mantua.
The Austrian offensive began on January 7th. Bajalich marched from Bassano and Provera from Padua.
Provera made the first direct contact on the 8th driving in Augereau's troops before Legnago. However, his bridging train was delayed on the bad roads. It wasn't until the 11th that Provera ordered the bridging of the Adige, and even then he countermanded his original orders to the frustration of his nominal superiors. He did make a fient at Badia further downstream on the Adige which Augereau diverted troops to counter.
In addition to troops at defending at Legnago and Badia Augereau concentrated a force at Ronco poised to strike at either Bajalich or Provera.
Bajalich's troops had made contact with the French on the 9th near Villanova (on the main post road north of Arcole). On the 12th Bajalich attacked Massena at Verona and was repulsed with severe losses (1,000 men, 600 of them prisoner) falling back to Caldiero.
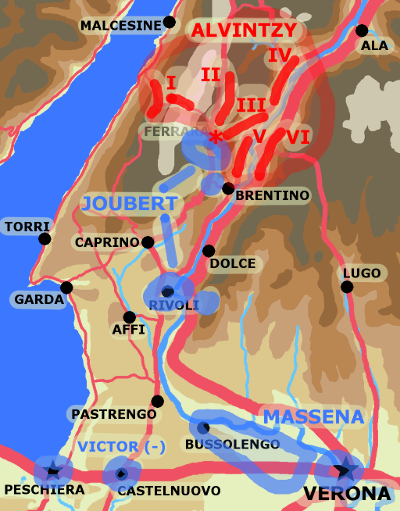
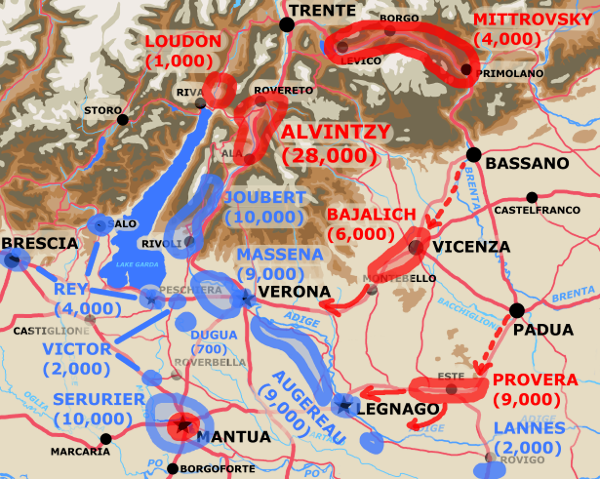
Map of theatre for January 12th
Alvintczy with the Tyrolean Corps marched on January the 11th. Nominally this Corps was probably under the command of Davidovich but we hear little to nothing of him in accounts of the campaign.
Alvintczy left a small detachment under Loudon to guard the northern end of Lake Garda, and Mittrovsky with a brigade to hold the Val Sugana, the Brenta valley between Trent and Bassano, open. He attacked with the remainder of his force in six columns as listed above. These were numbered west to east, one being the westmost and six being the eastmost.
Deeming the mountain paths and roads impassable to cavalry and artillery (some of them being snow covered were difficult even for men on foot) Alvintczy sent the bulk of these arms along with his V & VI columns along the roads in the valley of the Adige. Column VI taking the the east bank and Column V the west.
Columns II, III, and IV took a variety of routes through the mountains between Mount Baldo and the Adige. Column I under Colonel Lusignan swung wide to take the most difficult route furthest to the west between Lake Garda and Mount Baldo. The idea was to flank Joubert forcing him to either retreat or be cut off.
Column III under Koblos made first contact with the French defending Ferrara launching a determined but ultimately unsuccessful attack on January the 12th.
Column II under Lipthay came up on Koblos right flank while he was attacking but declined to join in because of orders to co-operate with Column I under Lusignan which had been delayed by bad terrain and weather.
Bonaparte was in Bologna dealing with the threat the Papal States posed when the campaign opened. The only troops he had to hand was a brigade under Lannes most of which he ordered north via Rovigo to reinforce Augereau holding the line of the Adige below Verona.
Bonaparte was in possession of the Austrian plans but it wasn't clear to him if he could trust this intelligence. He appears to have operated on the premise that the main attack might be becoming from the east by the Fruili Corps, but he also dispatched orders to Joubert to keep him informed in case the real main attack was coming down the Adige valley from the Tyrol. In particular he asked Joubert to inform him if Joubert thought he was facing more than 9,000 Austrian troops.
The repulse of Bajalich's attack and Provera's dithering before Legnago inclined Bonaparte to doubt they represented the main Austrian thrust. News of Koblos attack on Ferrara on the 12th also suggested the main attack might be from the Tyrol. It wasn't until the middle of the afternoon of the 13th after a morning in which Joubert in fear of being flanked retreated on Rivoli that Bonaparte felt this was clear.
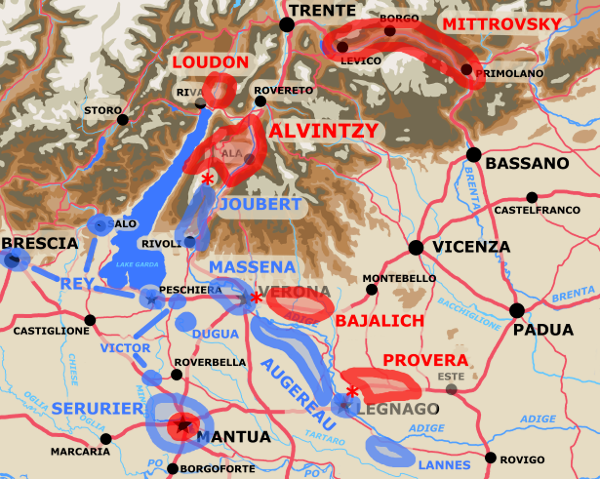
Bonaparte set major reinforcements from all quarters on the road to Rivoli. In particular he dispatched the bulk of Massena's and Rey's divisions to Joubert's aid. He himself arrived on the scene in very first hours of the 14th. Joubert remembered midnight, Bonaparte himself recalled it being around 0200.
Maps showing battle of Rivoli January 12th to January 15th
| Base Map
|
12th January 1797
|
|
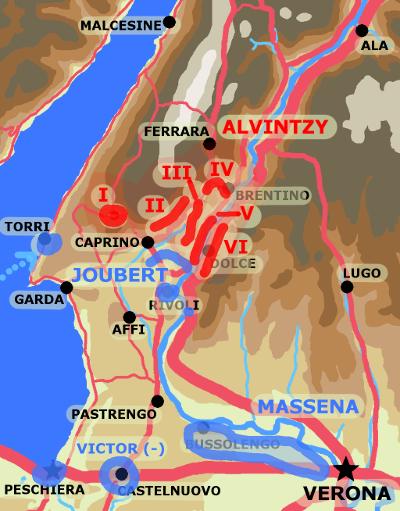
13th January 1797
|
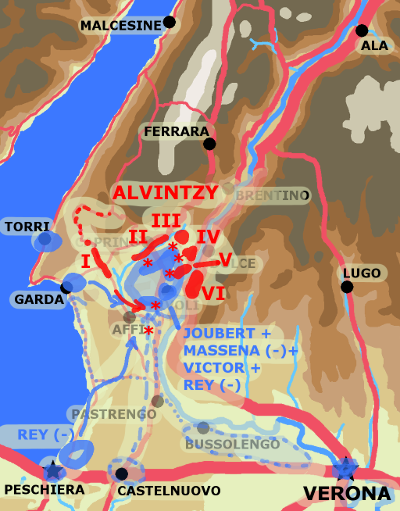
14th January 1797
|
Note: These maps for the area around Rivoli have had an extra elevation indicated at the 100 metre line. There is a brownish tan from 100m to 250 m, and a greenish tan below the the 100m line.
Joubert had successfully disengaged from the middle Austrian columns early on the morning of January the 13th leaving his campfires burning to decieve them and make a clean break away.
When Lipthay and Koblos caught up around midday on the 13th he'd formed a defensive semi-circle to the north of Rivoli around the ground the Austrians needed to capture if they wanted to reunite. Koblos made an unsuccessful attack on reaching the French positions around noon but otherwise the Austrians spent the day maneuvering into place.
The 14th was the key day of the battle of Rivoli. It was critical for the French that they keep the dispersed Austrian columns from joining up in the area just north of Rivoli where the road along the west side of the Adige climbed up from the narrowing river gorge through a ravine and onto a hilly plateau where it joined the various roads down from the mountains to the north and west.
Initially Bonaparte had only Joubert's division of 10,000 men to stop the Austrians who in total numbered 28,000.
The French troops knew reinforcements were coming and they did have some advantages. In particular the almost 8,000 men of column V down in the Adige valley had to fight uphill through a difficult and narrow ravine and could bring only a small portion of their numerical superiority to bear. Joubert assigned just a small portion (about a 1,000 men) of his force to hold them off.
Another two to three thousand of Alvintzcy's men with column VI under Vukassovich were on the other side of the Adige, they provided some artillery support but otherwise could not participate in the battle.
This left approxiamately the 16,000 men of columns I, II, III, and IV to bear the immediate brunt of the battle in the hills north of Rivoli and west of the Adige. Alvintzcy sent 4,000 of these men under Colonel Lusignan commanding column I on a wide flanking movement to the west through Lumini and Costermano. This left just 12,000 Austrians to face the roughly 9,000 men Joubert had available.
These were poor but not impossible odds for the French and they were offset by a couple of other factors.
The Austrians had no cavalry and almost no artillery support. Also they were tired and hungry. Their approach march had been over tough terrain in appalling weather. Their supplies had not kept up with them.
That was the situation early on the 14th when Bonaparte arrived at Rivoli. The French were outnumbered having only two thirds the numbers the Austrians would bring to bear, but they were mostly on the defensive and had more artillery and cavalry. If they could hang on long enough reinforcements would arrive.
Bonaparte's first orders were to attack. The Austrians had taken some positions that would be key to an effective French defense. At 0400 Vial's brigade attacked north past Monte Ceredello and the Pontare, the passage up from the Adige. They were supported by Joubert with the 33rd Line. By 0500 they had taken the chapel of San Marco and established a line along the crescent of hills around Rivoli.
Bitter fighting continued for another couple of hours. Massena's troops started to arrive between 0800 and 0900 and were put into reserve north of Rivoli.
Around 0900 the Austrians numbers began to tell as troops under Lipthay outflanked the left of the French line. Massena's troops counter attacked restoring the situation on the Tromborsore between 1000 and 1030. Massena also had to intervene to save the French center about this time.
The Austrians actually managed to push the French off of the hill line but in the process lost formation. Coming down off the hills into the flat ground of the Rivoli plateau they were charged by French cavalry and retreated in disorder their morale broken.
In the meantime the large Austrian column pushing up the Pontare ravine from the bottom of the Adige river valley also managed to gain the plateau. Infected by fear spread by fugatives from failed attacks of the columns already on the plateau, engaged by the same cavalry that had put those fugatives to flight, and assailed by mass cannon fire the head of column V was forced back to the valley floor.
It'd been a close run thing but by morning's end, the Austrians main force of columns II, III, IV and V had been defeated and the French were back in the defensive positions they'd occuppied at the morning's beginning.
The afternoon saw the French dealing with the Austrian column I under Lusignan which had succeeded in marching wide around their left flank and was now in a defensive position to their rear near Affi. At first attacked just by troops of Massena's from the French main force around Rivoli Lusignan's men gave ground but managed to hold together.
The arrival of French reinforcements from Rey's division in Lusignan's rear changed this picture. As dark arrived Lusignan's troops fell apart. Some successfully fled, others dropped out from exhaustion or were taken prisoner. Lusignan's isolated column was destroyed.
Although they retained substiantial forces on the battlefield the 14th had been a severe defeat for the Austrian Corps of the Tyrol.
Enough so that hearing that Provera had crossed the Adige and was marching on Mantua Bonaparte felt able to dispatch substantial forces to deal with him including Massena with most of his division.
Joubert was left on the 15th with just his own division and that part of Rey's the division that had arrived on the 14th. The remainder of Rey's division would reinforce him during the day. Joubert was given overall command of all the forces facing Alvintczy.
Despite the severe setback and losses they'd had on the 14th these Austrian forces were still intact as the 15th opened. Bonaparte was sufficiently concerned to relent on his earlier decision and leave one of Massena's brigades with Joubert.
With these forces Joubert was able to, just after daylight on the 15th, attack the Austrians. To supplement his frontal attack directly north he sent flanking forces along both the Monte Magnone ridge which overlooks the Adige valley to the east and to the west behind Mount Baldo. These flanking forces converged in the area of Corona and Ferrara to block the retreat of the Austrian forces which Joubert's main force had routed.
The outcome was, to quote the narration of Map 28 of the West Point Atlas, that " Some 28,000 men had advanced with Alvintzy from Roveredo as the new year began; on the 16th, a bare 7,000 streamed frantically back toward the town. Of the remainder, 13,000 were prisoners in French hands; the others were stragglers, deserters, or dead."
See the battles page entry for Rivoli for more details.
Map of area between Legnago and Mantua
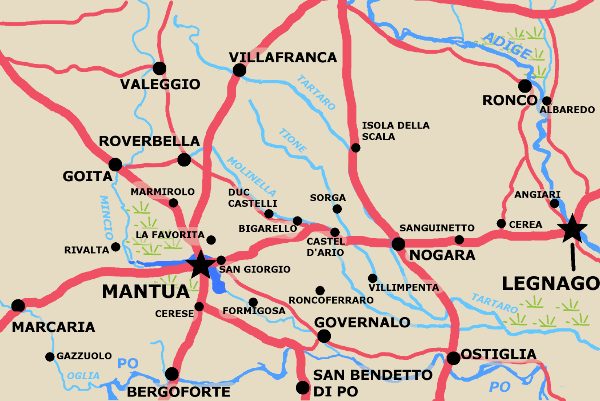
It was on the afternoon of the 14th after the desperate near run repulse of the Austrians around Rivoli that Bonaparte learned that Provera had crossed the Adige and was moving on Mantua with a relief column.
Provera had successfully feinted on the 13th and then bridged the Adige just north of Legnagno across from Angiari on the night of the 13th and 14th. During the day of the 14th a single French brigade under Giueu proved unable to stop him from crossing.
On the evening of the 14th Provera marched for Mantua with 7,000 men. He left 2,000 men and 14 guns behind to guard the crossing at Angiari. He halted for the night at Nogara. Or so it's written in the West Point Atlas, Cuccia has a running battle between Provera and forces under Augereau that lasts the night as Provera marches on Mantua via Cerea, Nogara, and Castel d'Ario.
Both accounts agree that during the night of the 14th and 15th the guard Provera left behind at Angiari was overwhelmed by forces under Augereau.
Bonaparte left Rivoli to deal with Provera during the night of the 14th. Massena's hard marching division was ordered to follow the next morning that of the 15th and march on Roverbella. In addition Bonaparte ordered his cavalry and Victor's brigade to Roverbella. Serurier was to concentrate a garrison under Miollis at San Giorgio. Thus both the northern and eastern approaches to Mantua would be covered.
Provera's advance guard of hussars reached the gates of San Giorgio, guarding the eastern causeway to Mantua, at sunrise on the 15th. Almost admitted to the fortifications by mistake they were recognized just in time by the French and repulsed.
Subsequent attacks by Provera's force against the fortifications later that day met with no more success. In the meantime the concentrated forces under Bonaparte marched for La Favorita near the northern approach to Mantua and Augereau moved on Provera's rear.
Provera managed to co-ordinate a plan for a concerted Austrian attack on La Favorita on the 16th. Wurmser drove one of Serurier's brigades under Dumas out of San Antonio immediately north of Mantua, but Victor's brigade and one of Massena's managed to hold against him at La Favorita.
Provera moving against La Favorita was stopped by another of Massena's brigades under Rampon. With Miollis from San Giorgio attacking his rear, and Augereau's forces finally appearing on the scene Provera was trapped.
This chaotic and bitter battle was given the name of "La Favorita". It ended in the complete surrender of Provera's force, 6,000 infantry, 700 cavalry, three generals, five colonels, and ten majors, numerous flags and guns, Provera's entire baggage train, and a large convoy of wagons with corn and cattle for the relief of Mantua. Overshadowed by the battle at Rivoli it was a major defeat for the Austrians.
The fate of Mantua was sealed.
It took a couple of weeks before the Austrians accepted this. In the meantime Joubert and Massena pursued the Austrian troops retreating north to Roverto and east to Bassano.
Bajalichs around Bassano was caught between converging French columns on the 24th and driven back with severe (1,000 men) losses.
The northern Austrian forces under Loudon attempted to stand at Roverto but Joubert defeated him on the 27th and drove on to Trent.
Augereau moved through Padua and Cittadella and finally on to Treviso.
Bonaparte took a detachment south to deal with the Pope.
Map of theatre for January 15th
Mantua surrendered on February the 2nd.
It's rations had been exhausted by the end of January. The garrison was surviving by eating its horses. They were without firewood as well as food.
Wurmser had first proposed capitulation on the 29th of January.
Bonaparte allowed Wurmser and 700 men to go free under three months parole. The remainder of the garrison were made prisoners of war.
At the time of surrender at 10:00am February 2nd 1797 there remained 13,266 officers and men fit for duty in Mantua.
Large numbers of cannon and other supplies were captured. There were 364 fortress pieces, and 43 pieces of field artillery. Supplies included 17,115 muskets plus the weapons surrendered by the troops, 1,214,000 musket cartridges, 80 tons of lead, 264 tons of powder, 14,746 cannon cartridges, 184 caissons and wagons, and equipment for 25 pontons. It was a rich haul.
Elaborate arrangements had to be made for the movement of the prisoners and to keep them from starving. There were 6,000 sick in the hospitals who do not appear to have departed with their fitter counterparts.
With the French capture of Mantua the campaign in Italy was essentially over.
Bonaparte had defeated six armies; the Piedmontese one, Beaulieu's, two armies under Wurmser and two under Alvintczy.
It had been a close run matter more than once, and even his more overwhelming successes had been carefully calculated and carried out on a shoe string of resources. He had defied and bluffed his own political masters as well as his enemies and often hostile third parties multiple times.
Alvintczy's final campaign in Italy had seen the Austrian forces there destroyed for all practical purposes.
The Austrians would raise more forces and put them under the command of their best general the Archduke Charles, but he had inadequate resources and never posed a serious threat to the French position in Italy.
The question of the next campaign would be whether the French could successfully invade Austria and force the Austrians to conclude a favorable peace.
Note: You will need to cut and paste addresses given into your browser's address line in order to follow them.
Martin Boycott-Brown refers to some articles by J.B. Schels for much of the view from the Austrian side of the hill. These are from the Austrian Military History Journal ( Österreichische Militärische Zeitschrift or OMZ) that was first issued in 1808 and which is still being published. See https://www.oemz-online.at/
They are in German which I'm afraid I don't read, but for the benefit of any of you who do here are the references.
It appears Jomini's "Histore Critique et Militaire des Guerres de la Revolution" Tome Neuvieme, Campagne de 1796 - Seconde Periode, Chez Anselin et Pochard, Paris, 1821 was a primary source for both Chandler and the West Point Atlas. It's in French. Also the digitalization Google did didn't bother to pull out and scan the tables for army OBs. Some of you may, however, find it of use.
As of 2018-01-11 a copy could be found online at https://archive.org/details/bub_gb_G1TJCBH6FKgC
Similarily the correspondance of General Joubert (in French) may be of interest. It can be found online at
https://archive.org/details/legnraljoubertd00chevgoog as of 2018-01-11.
As will obvious to anyone who read the material above I depended heavily on the work of Martin Boycott-Brown who has a website still active on 2018-01-12 with some information not found in his book including biographies and translations of some of both Bonaparte's and Joubert's correspondance. The address is http://www.historydata.com/index.php
Some of the spelling of placenames in Bonaparte's correspondance does not match what you'll find on a modern map in English or Italian. For instance:
This variance in spelling matters because many placenames are very similar. In fact some are exactly the same (multiple Pradellas, Rivaltas, Ospedallettos, Gazzos, etc) and can only be understood in context or by long winded elaboration. Many names are used in a shortened form, that is "Desenzaro" for "Desenzaro del Garda", "Peschiera" for "Peschiera del Garda", "Vallegio" for "Vallegio sul Mincio", "Rivoli" for "Rivoli Veronese", "Castiglione" for "Castiglione delle Stiviere", (there is in fact another Castiglione, "Castiglione Mantovano" north of Mantua not far from Roverbella) and so on.
There is also some variation in the names of people