Battles:
"Battles are decisive"
Revolutionary Wars 1792-1795,
German Front 1796-1797,
Napoleon's First Italian Campaign 1796-1797,
Egyptian Campaign 1798-1801,
Second Italian (Marengo) Campaign 1800,
South German Campaign 1800,
Campaign against Austria 1805,
Campaign against Prussia 1806-1807,
Peninsular War 1807-1814,
Campaign against Austria 1809 ,
Russian Campaign 1812,
Spring Campaign in Saxony 1813,
Fall Campaign in Saxony 1813,
Winter Campaign in France 1814,
"Hundred Days" Campaign in Belgium 1815,
Valmy ,
Jemappes ,
Neerwinden ,
Wattignies ,
Fleurus ,
20 September 1792
|
French Army, the "Armee du Centre", under the elder General Kellerman
had maybe 52,000 men consisting of 35 battalions of infantry, 60 squadrons of cavalry,
and 40 guns. The French consisted of about one third regulars and two thirds
volunteers.
|
Prussian Army under the Duke of Brunswick with 34,000 men and 36 guns.
King Frederick William III was with the army.
|
|
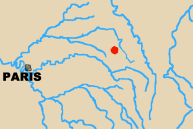
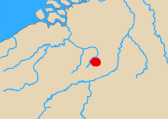
Valmy is about half way along the main road from Verdun to Rheims.
The Prussians had just taken Verdun and were moving on Paris.
The morning being foggy the Prussian didn't get formed up into
line and moving until 1:00 P.M. being stopped very shortly afterward
by French fire. A mutual cannonade continued until 4:00 P.M. when
heavy rain put an end to the battle.
The French casualties were about 300 men.
The Prussians lost 180 men killed and wounded.
Although Valmy was anything but a pitched battle it was nevertheless
extremely important. The Prussian advance which had looked to put an
end to the Revolution was halted and within a month Brunswick was
retreating to the Rhine.
|
6 November 1792
 |
French Army of the North, under General Doumouriezwith 40,000
"hastily gathered and ill-disciplined" men.
|
Austrian Army, under Duke Albert of Saxe-Teschen with 14,000 men.
|
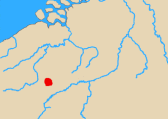 |
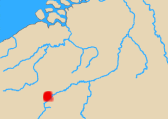
The Austrians were trained troops in an entrenched position at Jemappes west of Mons.
The French were poorly trained but in an enthusiastic attack took the position by storm.
The French certainly took heavy casualties but the exact numbers are unknown.
The Austrians lost about 5,000 men.
This was the first successful attack by French Revolutionary forces. It led to the
taking of Belgium (Brussels falling ten days later) and to Saxe-Teschen's
resignation.
|
18 March 1793
|
French Army of about 45,000 men, mostly raw recruits, under General Dumouriez.
|
Austrian Army of about 40,000 men. Main body under Prince Frederick of Saxe-Coburg.
Advance Guard led by Archduke Charles.
|
 |
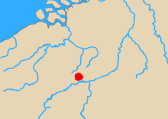
The French deployed on the 16th on some heights near Tirlemont about 35 km, or 23 miles, north-west
of Leige. The Austrians came up and deployed on the 17th. On the 18th the French attacked.
After fierce fighting in the center the French paused to reorganize around noon. However,
the Archduke Charles having won his battle to the north intervened bringing on a French
defeat.
The French lost about 4,000 men.
The Austrians lost about 2,000 men
This defeat shattered French morale and led to their abandoning their attack on
the Netherlands. The Austrians recovered Brussels.
Dumouriez defected to the Allies shortly afterwards.
|
15-16 October 1793
|
French Army of the North under General Jourdan with around 50,000 raw troops.
|
Austrian Army under Prince Frederick of Saxe-Coburg
with about 20,000 men,
several thousand more according to some sources at the battle. Maybe 14,000 maintaining the
seige of Maubeuge.
|
 |
The French were moving on Maubeuge attempting to lift the seige there.
The Austrians deployed on a plateau near Wattignies village, about 10 km from Maubeuge,
in defense of the seige. Initial French attacks on the 15th were beaten off with
heavy loss.
Jourdan, however, redeployed about a fifth of his force during the night and on
the 16th succeeded in turning the Austrian left flank.
The French lost about 8,000 men.
The Austrians lost about 5,000 men.
The seige of Maubeuge was lifted. Critical because it was the last position
the Allies needed to take before being able to move on Paris. Jourdan got to
keep his head.
|
26 June 1794
|
French Army under General Jourdan with about 75,000 men.
|
Austrian Army under Prince Frederick of Saxe-Coburg with 52,000 Austrians and Germans.
|
 |
This was a fight for Charleroi which the French took just before the battle commenced.
The Austrians advanced in several columns on the French redeployed in a defensive
ring with rough entrenchments. Although the central column under the Archduke Charles
did succeed in taking the village of Fleurus, there were further fortifications beyond
it and all the columns were finally beaten off by the French after some six hours of
fighting.
The French lost about 5,000 men, maybe more.
The Austrians likely lost about 5,000 men, but perhaps as few as 2,400.
Though essentially a tactical draw as a battle, Fleurus was a significant
strategic victory for the French. It resulted in the Austrians deciding to
abandon the theatre. As a result the Austrian Netherlands (modern Belgium)
fell to the French.
|
First Battle of Altenkirchen,
Ukerath ,
Kinzig ,
Rastatt ,
Ettlingen ,
Haslach ,
Forcheim ,
Neresheim ,
Friedberg ,
Amberg ,
Wurzberg ,
Biberach ,
Emmendlingen ,
Schliengen ,
Second Battle of Altenkirchen ,
Diersham ,
4 June 1796
 |
French Army of the Meuse and Sambre commanded by General Jourdan
Actual forces engaged were its Northern wing led by General Kleber with around 22,000 men.
|
Left wing of Austrian Army of the Lower Rhine under Prince Wurttemburg with about 24,000 men.
|
 |
The French with three divisions, the center under Lefebvre, Soult on the right, and Ney on left, had
already manouvered the Austrians off the line of the Seig, and out of a position at Ukerath since
the beginning of the month.
The Austrians tried to hold at Altenkirchen but after hard fight were pushed out.
The French losses are unknown but are unlikely to have been great.
The Austrians lost about 1,500 men and 12 guns.
The French pursued the retreating Austrians vigorously; pushing them back to line of the Lahn river 50 km to
the south. The battle also led to their capturing vital Austrian magazines with badly needed supplies.
|
19 June 1796
|
Rearguard of the French Army of the Meuse and Sambre with around 22,000 men, General Kleber commanding.
|
Advance guard Austrian Army of the Lower Rhine under General Kray with about 13,000 men.
|
 |
The Archduke Charles of Austria having marched with reinforcements to the support of the Austrian
Army of the Lower Rhine, Prince Wurtemburg commanding, the fortunes of war turned against
General Jourdan commanding the French Army of the Sambre and Muese.
Forced back from the line of the Lahn the French were in full retreat when General Kleber commanding
their rearguard decided to turn and give the Austrian advance guard under Kray which he
significantly outnumbered a lesson.
As it happened it it was the normally very capable Kleber that received the lesson.
He learned that Austrian troops could indeed fight very hard and that in the pursuit the
Austrian superiority in cavalry was something to be feared.
The French lost about 1,500 men killed or wounded and another 700 taken prisoner.
The Austrians lost 500 to 600 men killed or wounded.
The battle was undoubtly a caution to the French generals and a help to Austrian morale. Unfortunately
for the Austrians, Bonapartes successes in Italy had led to half their Army of the Upper Rhine being
being sent there. This significantly weakened the Austrian position along the southern portions of
the Rhine and General Moreau commanding the opposing French Army of the Rhine and Mosselle was not
slow to take advantage.
The Archduke Charles and the some 25,000 troops he commanded had to hurry south. The situation in
the north reverted back into favoring the French.
|
28 June 1796
|
The French Army of the Rhine and Moselle under General Moreau, actually engaged was the
column commanded by General Desaix with around 34,000 men.
|
The Austrian Army of the Upper Rhine commanded by General (FML) Latour,
forward elements actually engaged commanded by General Sztarry numbered about
17,000 men.
|
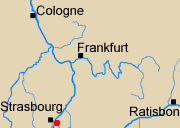 |
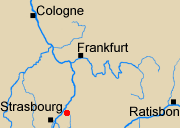
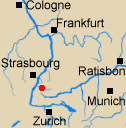
The French under Moreau had stolen a few marchs on the already outnumbered Austrians
under Latour, and managed to take a bridgehead across the Rhine opposite Strasbourg at
Kehl by stealth and daring.
The Austrians fighting in the terriority of wavering allies held a strong position along
the Kinzig River and
so decided to try and hold out until reinforcements arrived despite being heavily outnumbered.
In the event the Austrians were unable to hold and had to fall back
The French losses are unknown
The Austrians lost about 1,800 men.
The Austrians lost what little hope they had of containing the French bridgehead.
A bad situation had become worse.
|
5 July 1796
|
The French Army of the Rhine and Moselle with around 34,000 men engaged, General Moreau commanding.
|
Forward elements of the Austrian Army of the Lower Rhine under General Latour with about 18,000 men.
|
 |
Having failed to hold the line of the river Kinzig the Austrian forces retreated a little north to
the line of the River Murg. Rastatt was one of the main positions on this line. The Austrians
actually managed to hold there, but not elsewhere. Once again they were forced back.
Both sides lost about 500 men
Despite their numerical inferiority the Austrians had hoped the terrain and being on the defence
might allow them to hold the French up long enough for reinforcements to arrive.
Against an opponent other than a French Revolutionary army commanded by General Moreau this might
have worked.
|
9 July 1796
|
The French Army of the Rhine and Moselle with around 65,000 men engaged, General Moreau commanding.
The columns of both Desaix and St. Cyr were present.
|
The Austrian Army of the Lower Rhine with reinforcments around 40,000 men, about half cavalry,
the Archduke Charles commanding.
|
 |
The Archduke Charles having reinforced General Latour's Army of the Upper Rhine the Austrian's
once again attempt to stop the advance of the French under General Moreau.
They faced two of the three "columns" making up the Army of the Rhine and Moselle. That of
Desaix attacked in the center around the village of Malsch. Here the fighting was bloody
but the Austrians held.
The column under St.Cyr attacked the Austrian left and the Austrians were pushed back.
The French lost about 2,000 men.
The Austrians also lost about 2,000 men, half of them prisoners.
Tactically a draw, stategically the battle was a loss for the Austrians. Charles needed to have
defeated Moreau decisively. His line of communications ran east back through
Stuttgart and along the Danube to Austria.
It was threatened locally by the French movement on his left, in his deep rear
to the north it was threatened by the advance of Jourdan's army, and to the south
in the Black Forest it was threatened by the successes of Moreau's
third column under General Frolich.
On July 12th Charles ordered garrisons into forts intended to deny the French
a secure line of communications and fell back on his own.
|
14 July 1796
 |
General Ferino's column of the French Army of the Rhine and Moselle with likely with somewhere
around 20,000 men.
|
A mostly German Allied force under General Frolich with about 15,000 men,
strong in cavalry.
|
 |
General Frolich's Allied force deployed between Kinzig and Elz tried to deny passage of the
Black forest to the French column under General Ferino.
The French succeed in pushing in the Allied center around Haslach and the flanking
Allied forces were forced to retreat.
Losses are unknown, but not likely high as only the center was engaged.
The French sucess in the Black Forest created yet another threat to the Austrian lines
of communication. Frolich and the other Austrian commanders in the south began
to fall back on Danube hoping to concentrate on the Danube along with the forces
of Archduke Charles. The territory of the small south German states was abandoned.
|
7 August 1796
|
The French Army of the Sambre and Meuse with around 46,000 men engaged,
General Kleber commanding, as Jourdan was ill.
|
The Austrian Army of the Lower Rhine with 40,000 men,
General Wartensleben commanding.
|
 |
Given the fort of Forcheim, a defensible river line and the fact that the more numerous French had been
forced to make detachments to defend their communications, an Austrian stand seemed possible.
Kleber, acting as General-in-Chief, sent Lebefvre's division to attack the Austrian right. He sent
Bernadotte's and Championnet's divisions to attack the Austrian right.
He sent Collaud's division against Forcheim in the center. Ney's regiment of this division
suceeded in taking Forcheim, which as well as forcing the Austrian's to retire earned Ney
promotion to Brigadier General.
Losses unknown, French claim to have taken 60 cannon and "many other munitions" in Forcheim.
The Austrians under Wartensleben were forced to continue their withdrawal south and east.
|
11 August 1796
|
The French Army of the Rhine and Moselle with around 50,000 men engaged,
General Moreau commanding.
|
The Austrian Army of the Upper Rhine with about 55,000 men,
the Archduke Charles commanding.
|
 |
Having concentrated all his forces from the upper and middle Rhine, and with the French spread out
and depleted by detachments the Archduke decided to turn and fight.
His plan was one of multiple converging columns. In the event, whether because the plan was too
complex or because of driving rain and muddy roads, the attack was poorly co-ordinated.
The French left gave way but their center and right held.
The Archduke disengaged and withdrew before Moreau could counter attack.
The French lost about 2,400 men.
The Austrians also lost about 1,600 men.
This battle is variously described as a French victory, a draw, or an Austrian victory.
Certainly if the Archduke's intent was to defeat Moreau decisively he failed. If he only wished to
give Moreau sufficient pause that he could disengage, join Wartensleben's forces and fall on Jourdan's
army (which is what happened in the event) then he succeeded.
Most likely he hoped to defeat Moreau decisively, but failing that he put the draw he actually achieved
to good use.
|
24 August 1796
|
The French Army of the Rhine and Moselle with around 53,000 men engaged,
General Moreau commanding.
|
The Austrian Army of the Upper Rhine with about 34,000 men,
General Latour commanding.
|
 |
General Latour attempted yet another corden defense running the length of the Lech river with its
center at Friedberg just east of Augsberg.
Despite the strong position and the Lech being swollen with the run off from recent rains, French
initiative and numbers made themselves felt and the Austrian center at Friedberg was smashed with
considerable loss to the units immediately involved.
Latour was forced to fall back towards Munich and the Isar.
The French likely lost a few hundred men, some drowned in the crossing of the Lech.
Unfortunately, and as usual, the only public reports of the action were French, and, as usual,
they mentioned enemy losses but not their own.
The Austrians lost about 1,700 men and 16 cannons.
Although tactically Moreau won yet another French victory, strategically Friedberg was a mistake on
his part. He was plunging deeper into Bavaria as the Archduke was defeating Jourdan to the north,
and would continue to do so even as the Austrians hounded the Army of the Sambre and Meuse close
to destruction.
|
24 August 1796
|
The French Army of the Sambre and Meuse with around 45,000 men,
General Jourdan commanding.
|
The Austrian Army of the Lower Rhine plus reinforcements with about 63,000 men,
the Archduke Charles commanding.
|
 |
The Archduke fell on Jourdan's right flank and rear as Wartensleben's Army attacked from the front.
Now outnumbered and in a false position Jourdan fell back north and then west on poorer secondary
roads.
Ney showed, for perhaps the first time, the brilliance in rear-guard actions that he later displayed in
Portugal and Russia. The French Army although defeated and involved in a costly retreat did not
disintegrate, and was not trapped.
The French lost about 4,000 men.
The Austrians also lost about 4,000 men.
Amberg and the subsequent Austrian pursuit of Jourdan completely reversed the strategic situation
in Germany.
It was a bold and timely move by a commander that had up to that time been underestimated.
|
3 September 1796
|
The French Army of the Sambre and Meuse with around 40,000 men engaged,
General Jourdan commanding.
|
The Austrian Army of the Lower Rhine with reinforcements for about 44,000 men,
the Archduke Charles commanding.
|
 |
An Austrian column under General Hotze beat the French to Wurzberg. The rest of the Archduke's
army was in close pursuit. The Austrian superiourity in cavalry and light troops, as well as
the fury of the local population at French depredations was telling on the French Army
Jourdan decided to make a stand on the heights on the right bank of Main running between
Wurzberg and Schweinfurt.
In the event he was unable to keep the Austrian columns from crossing the river and
eventually after hard fighting prevailing along his entire front.
The French army was routed.
The French lost about 2,000 men and 7 guns. Graham reports 3,000 taken prisoner
The Austrians lost about 800 men.
Wurzberg sealed the results of Amberg. The French Army of the Sambre and Meuse in Franconia was
defeated and was driven back to its starting positions of the early summer with heavy losses.
Furthermore it was so disorganized as to pose no further threat. Moreau would have to face the
Archduke on his own.
|
2 October 1796
|
The French Army of the Rhine and Moselle with around 40,000 men engaged,
General Moreau commanding.
|
The Austrian Army of the Upper Rhine with about 23,000 men,
General Latour commanding.
|
 |
Moreau's French Army of the Rhine and Moselle was forced to retreat by the Archduke's successes in the North
against Jourdan's Army of the Sambre and Meuse.
Latour's Austrian Army of the Upper Rhine followed.
Near Biberach on the River Riss in the valley of the upper Danube, Moreau decided to pause and
attack Latour so as to gain breathing room.
The French counter-attack was entirely successful, Desaix's column in particular managed to
overwhelm a weak Austrian right wing and penetrate into Biberach itself.
Latour successfully disengaged the rest of his forces by evening.
The French losses seem to have been minimal.
The Austrians lost about 4,000 men, many prisoners, and 18 guns.
Although still threatened by minor Austrian forces, a peasant uprising, and the Archduke on his
northern flank, Moreau had managed to discourage a close pursuit by Latour and gain manouvering room.
|
19 October 1796
|
The French Army of the Rhine and Moselle with around 45,000 men engaged,
General Moreau commanding
|
The Austrian Army with about 35,000 men,
Archduke Charles commanding.
|
 |
Moreau's French Army of the Rhine and Moselle had sucessfully avoided being cut off, but now
faced the majority of the Austrian forces in Germany united under the command of Archduke Charles.
Moreau took up defensive positions along the Elz river. The Austrians succeeded in taking
Emmendlingen in his center and Waldkirch on his right. Moreau defeated, withdrew in the evening.
The French lost around 2,000 men.
The Austrians losses were likely significant, as the narratives have them engaged along a
broad front and the French fighting hard, unfortunately I've not yet found any numbers.
A guess would be 900 to 1200 men. Graham in fact gives French losses as 2,000 prisoners
"and a like number killed and wounded." and goes on to write "The lost of the Austrians was
not the fourth of it."
Moreau was forced to fall back 40km south to Schliengen where he deployed in defence of the
French bridgehead at Hunningen.
The Archduke had succeeded in pushing the French out of all but a small slice of Germany.
|
23 October 1796
|
The French Army of the Rhine and Moselle with around 30,000 men engaged,
General Moreau commanding.
|
The Austrian Army of the Upper Rhine with about 40,000 men,
Archduke Charles commanding.
|
 |
Moreau having sent Desaix across the Rhine and the Austrians having received some reinforments
from the blockade of Kehl, the Archduke Charles had the advantage of numbers for change.
The French, though, were defending and in an excellant position for it.
The Austrians attacked all along the line and pushed the French back along all of it without
making any decisive breakthroughs.
Moreau withdrew during the night.
The French losses seem to have been minimal.
The Austrians lost about 800 men.
The Austrians and French both have monuments claiming Schliengen as a victory.
The French because they were able to withdraw and cross the Rhine without Moreau's army being destroyed.
The Austrians because they were able to force the French into withdrawing across Rhine.
Tactically the side who pocesses the battlefield would normally seem to be the winner.
However, strategically the Archduke had failed to destroy the French, or take their bridgeheads at
Huningen and Kehl. If he had succeeded in this the Aulic Council in Vienna might have been
willing to let him go to Italy with significant numbers of veteran troops.
Napoleon's famous victories in Italy during late 1796 and early 1797 were close run
affairs as it was. Faced with the Archduke and more and better Austrian troops
he may not have won those victories at all. The history books would now read
very differently.
|
18 April 1797
|
The French Army of the Sambre and Meuse with around 70,000 men engaged,
General Hoche commanding.
|
The Austrian Army of the Upper Rhine with about 40,000 men,
General Werneck commanding.
|
| |
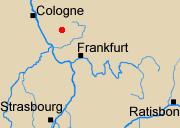
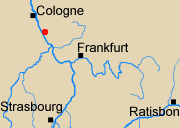
Hoche crossed at both Dusseldorf and Neuwied. He caught Werneck still in the process of
concentrating his troops who'd been spread out in a cordon defence.
Werneck fell back to Lahn.
The French losses were likely minimal.
The Austrians lost about 5,000 men and 27 guns.
The Austrians had been pursued to the gates of Frankfurt when operations were halted on news
of peace negotiations.
|
20 April 1797
|
The French Army of the Rhine and Moselle with around 60,000 men,
General Moreau commanding.
|
The Austrian Army of the Upper Rhine with about 17,000 men,
General Sztarray commanding.
|
 |
Moreau managed to get his advance divisions under Vandammne and Davout across the Rhine in boats.
By the time Sztarray counterattacked sufficient reinforcements had crossed via a pontoon
bridge to hold him off.
The French losses were about 3,000 men.
The Austrians lost about 3,000 men in casualties, and a further 3,000 in prisoners.
In addition to recrossing in the Rhine successfully and establishing himself in superior force,
Moreau managed to re-take the bridgehead at Kehl. If hostilities hadn't been halted by
peace talks it likely would have not gone well with the Austrians.
|
Montenotte ,
Millesimo ,
Dego ,
Ceva ,
Mondovi ,
Fombio ,
Lodi ,
Borghetto ,
Lonato ,
Castiglione ,
Roveredo ,
Bassano ,
Caldiero ,
Arcola ,
Rivoli ,
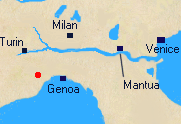
12 April 1796
|
French Army of Italy under Napoleon, then
simply General Bonaparte, with 9,000 men mainly belonging to LaHarpe's division.
Massena led one of LaHarpes's brigades on the decisive
flanking attack while LaHarpe himself conducted the pinning frontal assault.
|
Allied Austrian-Piedmontese Army represented by the Austrian division of General (FML) Argenteau with 6,000 men.
|
|
Argenteau's forces had been pushing back a small French brigade under Rampon throughout the days of April the 10th and 11th.
This was part of a rather ill co-ordinated Austro-Sardinian offensive against Savona and Genoa.
On the 12th the French counter-attacked. LaHarpe's brigade joined Rampon's and did so frontally.
While the Austrians were engaged in defending against this Messena's force flanked them on their rear right.
Given how the mountainous terrain channeled movement and communications the Austrians stood in danger of being totally cut
off.
Their force disintegrated trying to withdraw.
The French casualties were likely about 120 men. Messena's force being known to have lost about 50 men
The Allies lost 700 men killed, wounded, and (mostly) missing according to Austrian official returns
although Napoleon claimed 3,000, and several modern authorities give 2,500. Regardless, more importantly, according to
Argenteau's own account his force was effectively destroyed at the end of the day. His men were exhausted and scattered.
He was left with only 700 disorganized men under his direct control.
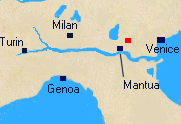
Napoleon had identified a low pass running west and slightly north from the area of Savona through Millesimo and Ceva to the area of Mondovi as the primary
route he needed to open for his Army to able to establish itself in the plains of Northern Italy. Montenotte lay north of this
route's eastern end. Stalling the Austrian threat in this area so he could fall upon the Sardinians under Colli was a necessary
first step in his plans.
So although the actual losses in this series of hard fought but small skirmishs are uncertain and likely not that high, the
undeniable disorganization of the Austrians was a critical precondition to Napoleon's final success.
|
13 April 1796
|
|
French Army of Italy under Napoleon,
forces under General Augereau with two demi-brigades
and Joubert's brigade, about 10,000 men in all, were engaged.
|
Allied Austrian-Piedmontese Army under General Colli, his leftmost Austrian provisional Corps under
Provera with about 2,500 men was engaged.
|

|
The main French attack came on the 13th. The plan had been that it would be spearheaded by Augereau's division
attacking through Carcare from the south and then east along the Savona-Ceva road to Millesimo. As it happened
Carcare was occupied without resistance on the evening of the 12th, but Augereau's main force then got held
up by the castle of Cassario on the 13th. The Sardinians had hastily thrown a picked force of men into it after the Austrian
set-backs of the 12th.
While the French main force made fruitless and costly attacks upon Cassario, a demi-brigade of Augereau's commanded by
Menard by-passed the castle and drove the Sardinians out of Millesimo. Being the day's only French success this is
what made its way into Napoleon's reports and the history books.
The Allied force in Cassario, surrounded and short of supplies, finally surrendered on the morning of the 14th.
The French casualties were likely about 1,200 men, at least 600 at Cassario.
The Allies likely lost about 1,200 men, at least 800 at Cassario
Although it put a days delay into French plans and a dent into their morale the isolated bravery of the
defenders at Cassario failed to affect the campaign's course. By the morning of the 14th the French were
solidly in place to continue their attack against either the Austrians in Dego or the Sardinians at
Montezemolo. Montezemolo which is between Millesimo and Ceva is the highest point in the road between Savona
and Ceva which Napoleon was seeking to capture. Dego was a vital point on the main line of communications between the Austrian and
Sardinian armies.
|
14-15 April 1796
|
|
French Army of Italy under Napoleon, the 8,500 men of
Messena's division were directly engaged initially. Later joined
by perhaps 8,000 men of LaHarpe's division.
|
Allied Austrian-Piedmontese Army under General Argenteau and Colonels Avogadro and
Vukassovich with about 8,000 men.
|

|
Massena attacked Dego on the morning of the 14th with another of his frontal pinning attacks combined
with a flanking maneuver. He took the position rather easily at a cost of about 200 French dead.
The Austrian defending force had about twice as many dead and thousands of them were taken prisoner.
Both the original 4,000 defenders of Dego under Colonel Avogadro and a relief column under General Argenteau
were caught up in the Austrian rout.
At nightfall on the 14th while their cavalry pursued the defeated Austrians the poorly supplied French soldiers dispersed
to forage and loot.
Early the next morning a force of some 3,000 plus Austrians under Colonel Vukassovich surprised the unwary
French routing them in their turn, taking many of them prisoner.
However, by the middle of the 15th Messena and a furious Napoleon were staging yet another counter-attack with both Massena's
own troops and
those of LaHarpe's division. Despite inflicting severe casualities of about 1000 men upon the French Vukassovich
was forced out of Dego. He managed to extricate only a small fraction of his men from the defeat.
The French casualties were somewhere between 1000 and 2000 men, 200 to 400 dead.
The Allies lost 4000 to 6000 men, upwards of 400 dead, but most taken prisoner
Once again the initiative of individual Allied commanders and the bravery of their men was
wasted due to ineffective overall command. The French may have been deeply disturbed by events
at Dego and Napoleon temporarily induced to greater caution, but stategically Napoleon had
succeeded in separating the Austrian and Sardinian armies from each other. He was now free to
fall upon the Sardinians under Colli without fear of Austrian interference.
|
16-17 April 1796
|
|
French Army of Italy under Napoleon, then
simply General Bonaparte, with 24,000 men. Generals Augereau
and Serurier commanded the main two divisions engaged.
|
Allied Austrian-Piedmontese Army under General Colli with 13,000 men.
|

|
Ceva was a fortified location the taking of which had figured largely in Napoleon's planning from the beginning of
the campaign.
Augereau's forces suffered about 150 casualities in an unsuccessful assault they made on the 16th.
The next day they tried again
this time in conjunction with the 9,000 men of Serurier's division coming up from the south.
Colli had already withdrawn the night before. He'd feared being outflanked by Serurier.
The French found that only a garrision in the fortress remained. They occupied
the town and surrounding fortifications without opposition.
Morever although the fortress garrison refused to surrender
it did not harass the main body of French troops that Napoleon ordered to bypass it.
The French casualties were likely about 750 men.
The Allies probably lost about 350 men in actual battle,
but more (up to several thousand) from desertion and straggling
How to take the excellent defensive position at Ceva had been a major concern of Napoleons.
Having mostly neutralized it without having to bring up artillery and making a setpiece attack
was a major stroke of good fortune. It also let Napoleon shorten his extremely
overstretched supply lines as the route to Ceva from the south was much shorter than that through
Savona. Still the French supply situation remained very bad and Napoleon needed to break through to
the wealthy plains of Northern Italy quickly before his army disintegrated.
|
21 April 1796
|
|
French Army of Italy under Napoleon, then
simply General Bonaparte, with 23,000 men
|
Allied Austrian-Piedmontese Army under General Colli with 9,000 men.
|
|
After his withdrawal from Ceva Colli had taken up positions at San Michele several miles east of Mondovi.
This excellant defensive position was covered by the Tanaro river in the north and the Corsaglia river to the south.
On the morning of the 19th Serurier attacked in the south and Augereau in the north. Without artillery support they
took heavy losses and their hungry and undisciplined troops gave up their few gains to Sardinian counter-attacks.
The French spent the 20th re-grouping. The Sardinians spent the day assessing their situation and found they
didn't like it. The Austrians under Beaulieu having regrouped to the north-east and French troops on their
left under Masssena threatening their communications with Turin they decided to withdraw once more.
Destroying the bridges over the Corsaglia they started withdrawing on the night of the 20th.
This time Napoleon did not let them get away. He defeated their rearguard during the night and entered the town of Mondovi
early on the 21st as Colli's army retreated in disorder.
The French casualties were likely about 700 men.
The Sardinians lost about 400 men
As usual in this part of the campaign losses through desertion and straggling dwarfed actual casualities,
both sides suffering badly from poor supplies, bad weather and difficult terrain.
With the capture of Mondovi the path to the plains of Northern Italy lay open.
Of more immediate importance vast supplies of food and equipment the French Army desperately needed
were captured intact. The Sardinian army was a shambles and they'd begun negotiations for a
separate peace.
|
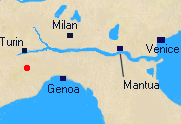
8 May 1796
|
|
French Army of Italy under Napoleon, then
simply General Bonaparte, with 12,000 men actually engaged consisting of an Advance-Guard under General Dallemagne
supported by LaHarpe's division.
|
Austrian Army of North Italy under General Beaulieu.
Left wing detachment of General Liptay with 5,000 men defending, 4,000 of them infantry, 1,000 cavalry.
|
|
After extracting his army from Piedmont, the Austrian general Beaulieu set up a cordon defence of Lombardy behind the flood swollen
Po River. He destroyed all the bridges across it. This made any direct frontal attack by the French problematic, but it also
meant the Austrians were in turn unable to easily interfere with French movements.
Napoleon exploited this by rapidly marching across the Austrian front to their far left wing and crossing at Piacenza on May 7th.
The Austrian force under Liptay that Beaulieu had dispatched to oppose this crossing arrived too late.
Instead reaching the village of Fombio north of the Po near Piacenza it stopped and dug in to await
the French attack. This attack came early on the 8th. By the evening, after heavy fighting the forces under Liptay
had been pushed out of Fombio. They retreated north through the town of Codogno and to the crossing of the Adda River at Pizzighettone.
The French took Codogno but almost lost it again when a column from the Austrian main army stumbled across them during the night.
LaHarpe, the senior French general on the scene, was killed amid the confusion.
The French loss of momentum allowed the Austrian Army to escape intact.
The French casualties were more than 450 men, at least 150 killed.
The Austrians lost close to 1000 men, mostly prisoners
The actions of Fombio/Codogno sealed the success of Napoleon's crossing at Piacenza and doomed the Austrian defence of the
Duchy of Milan. However, they also put paid to Napoleon's hope of either trapping the Austrian Army or at least forcing
it to retreat north and away from its eminently defensible base at Mantua.
|
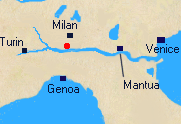
10 May 1796
|
|
French Army of Italy under Napoleon, then
simply General Bonaparte, with about 15,000 men. Advance-Guard under Dallemagne later
supported by Massena's and Augereau's divisions.
|
Rearguard of Austrian Army under General Sebottendorf with 10,000 men total.
|

|
The bulk of the Austrian Army had got across the Adda River on the 9th, but the French caught up with
its rearguard under General Sebottendorf at the Lodi crossing on the 10th. They took the town itself
without difficulty in the morning but the bridge across the Adda was better defended.
Most of the day passed in an artillery duel as the French brought up more guns and men.
Finally around six the Advanced-Guard of 3,500 picked men stormed across the bridge with the
encouragement of many higher ranking officiers including Lannes, Dallemagne, Messena and Berthier. Napoleon
had taken a hand in the laying of the supporting cannon. The first line of Austrians broke and fled.
Faced with the deploying divisions of Augereau and Messena as well as the Advance-Guard the
Austrian rearguard as a whole made an orderly retreat. Apparently the French were too exhausted or it
was too late for them to vigorously pursue the Austrians.
The French casualties were at least 500 men, and likely closer to 2000.
The Austrians lost about 2100 men
Lodi was a French tactical victory. It may have had wider repercussions by cementing the relationship between the
leadership of the French Army of Italy and their troops. However, any hope Napoleon may have had of catching a
retreating Austrian Army and destroying it with a vigorous pursuit were dashed. The Austrians had got away to
fight another day, and would have time to properly garrison Mantua. The French Army took several weeks in which
it occupied Milan, got some deserved rest, and received its first pay in years.
|
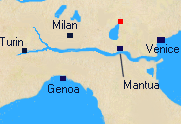
30 May 1796
|
|
French Army of Italy under Napoleon, then
simply General Bonaparte, with 28,000 men
|
Austrian Army under General Beaulieu with 19,000 men.
|

|
After evacuating Lombardy Beaulieu reinforced the garrison of Mantua to the fortress' full capacity of over 12,000 men.
The remainder of his Army he used to form another cordon defence, this time behind the river Mincio.
The Mincio runs from Lake Garda and past Mantua before reaching the Po. There were four bridges across the Mincio
at Peschiera, Borghetto, Goita and Rivalta.
Napoleon carefully designed his approach manoeuvres so as to
confuse the Austrians as to which of these he intended to take.
He launched Augereau at Peschiera in a major diversionary attack.
This may have been wasted effort, as Beaulieu was sick and
the Austrian command riven with dissent.
In any case, when the advance guard of picked men under
General Kilmaine stormed the crossing at Borghetto they quickly took it despite
sharp resistance by the small Austrian force there.
Supporting units beat off the limited Austrian counter attacks and fanned out east of the crossing thereby splitting Beaulieu's field army in half.
The French casualties were at least 100 men likely about 150 men total.
The Austrians lost roughly 600 men
His field force dismembered Beaulieu retreated up the Adige river valley towards Trento.
Napoleon now held Northern Italy with the exception of Mantua. The remainder of
the campaign would consist of his beating off attempts by successive Austrian armies to relieve
the besieged garrison there.
|
31st July to 5th August 1796
|
|
French Army of Italy under Napoleon, then
simply General Bonaparte, actually engaged piecemeal by brigades were the divisions of Despinoy
with 4,000 men.
and Massena with maybe 11,000 men around Lonato
itself. For particular periods Augereau's division also participated in the battles against the Austrian Western column.
Serurier's division gave up two brigades, one each to reinforce
Augereau's and Massena's divisions. The smaller divisions of Kilmaine and Sauret, about 5,000 men each,
also played a role in defeating Quosdanovich's forces. Both of these gentleman fell ill during the campaign and their units
were temporarily commanded by Beaumont and Guieu respectively.
So in summary starting with a weak division of about 4,000 men the French reinforced until
almost their whole army,
something in excess of 30,000 men, was concentrated against Quosdanovich.
|
Austrian Forces western column under General Quosdanovich with about 17,500 men.
Quosdanovich's force was divided into two advance-guards and 4 brigades. The advance guards seem
to have had about 1,800 men each and the brigades roughly 3,500 men each. Much of the hottest action
around Lonato involved Ott's and Ocskay's brigades.
|

|
The week's action in which Napoleon first stopped and then forced back the Austrian western column under
Quosdanovich was a chaotic dogfight of which the two actions at Lonato were only a representative part.
The first of these actions took place on July 31st between Ott's brigade in Lonato and Despinoy with about 4,500 men
who succeeded after a hard fought action in forcing Ott back.
The second action was on August 3rd in which Massena with about 11,000 men managed to throughly maul the much
out-numbered brigade under Osckay.
Overall the situation went from one in which Quosdanovich with the advantages of superior numbers and surprise had
managed to sever the French main line of communications, and Napoleon was seriously considering retreat to Lombardy,
to one where Quosdanovich was retreating north having lost half his men.
Part of the reason for this was a fatal Austrian inability to co-ordinate their various forces, both the main
columns and the brigades within them. But Napoleon's decisive willingness to abandon the seige of Mantua, and
by harsh forced marchs combine his whole army sucessively against the separate columns of Austrians was also key.
The French casualties were likely about 5,000 men over the week.
The Austrians lost about 7,000 men in the same period
Quosdanvich's threat to French communications was beat off and his forces prevented from combining with or
even indirectly aiding the main column under Wurmser. The price the French paid was having to lift the seige
of Mantua and losing their seige train in the bargain.
|
5 August 1796
|
|
French Army of Italy under Napoleon
with about 33,000 men.
|
Austrian main army under General Wurmser
with about 25,000 men.
|

|
Having driven off Quosdanovich's Western column Napoleon now assembled his entire army in opposition
to the Austrian main force under Wurmser.
Napoleon began the battle slightly outnumbered facing Wurmser to the south-east of Castiglione with the
divisions of Massena and
Augereau, as well as his cavalry for a total of about 21,000 men.
His plan was to engage and hold Wurmser with this main force and then with reinforcing forces first
defeat and then destroy the Austrian Army.
In the event the plan didn't quite work.
An initial feigned withdrawal by Messena and Augereau drew the Austrians forward as intended, but
attacks by Despinoy's division arriving from the north-west on the French left, and by Marmont with
a picked assault party and force of horse artillery on the Austrians key position facing the French
right, both met with insufficent success. They pushed the Austrians back but they did not break them
and they did not force the commitment of all the Austrian reserves.
The attack by Sururier's division (temporarily under Fiorella) coming up from the south-east was made
early. Although tactically sucessful it failed in its objective of trapping a completely crushed
Austrian Army.
Wurmser's forces fighting hard were mostly able to retreat in moderately good order to the north-east
aided by a sortie by a force under Bajatich left behind to guard the crossings of the Mincio at
Peschiera.
In addition to their timing and co-ordination problems the French troops were simply too exhausted
from the hard campaigning of the last week to be able to pursue their advantage.
The French casualties were about 1,500 men.
The Austrians lost about 3,000 men; 2,000 killed or wounded, and 1,000 prisoners, as well as 20 guns.
Having defeated the main Austrian Army Napoleon was able to drive it back into the Tyrol and resume
a blockade of Mantua. Since he had lost his carefully assembled seige train a full seige was no longer possible.
|
4 September 1796
|
|
French Army of Italy under General Bonaparte
. Actual battle fought by Massena's division with about 10,200 men.
Divisions of Augereau (10,100 men) and Vaubois (5,445 men)
plus brigade under Guien (2,775 men) in support.
|
Austrian main army under General Wurmser.
Actual battle fought by portion of General Davidovich's wing (25,000 men) of about 14,000 men in strength.
|
|
The major engagement in the opening phase of the autumn portion of the 1796 Italian campaign. Napoleon was
under orders to take the offensive against the Austrians, and for his part Wurmser was making the second
Austrian attempt to relieve Mantua.
Wurmser led off by advancing down the Brenta river valley with 20,000 thousand of his 45,000 men. The idea was
to meet Bonaparte in the plains around Verona rather in the mountainous Adige river valley.
He left 25,000 men under General Davidovich to defend Trent and his supply lines. More than enough he believed given the
mountainous terrain.
Wurmser and the Austrians were very mistaken about this. Although the formidable terrain had the potential to allow small
numbers of men to hold up much larger bodies troops it also greatly amplified the effects of the greater cohesion and
speed of French command, and those of the superiour morale and initiative of the French troops.
As in the spring small bodies of Austrians faced locally more numerous French forces who attacked them
vigorously in the front while at the same time other French forces turned their flank. They rarely managed to
hold or retreat in good order.
And so it was just south of Roveredo on the morning of September 4th. The Austrians fought hard against
Massena's forces, but Vaubois forces threatened to flank them from the west and Augereau's from the east.
Once the retreat began the Austrians proved unable to reform a defense despite very favorable terrain.
The French pursuit continued until they took the vital city of Trent some days later.
The French casualties were a few hundred men.
The Austrians lost about 6,000 men; mostly prisoners, as well as 20 guns.
The French shattered half the Austrian army and secured the Adige river valley for both defensive
and offensive purposes. They were securely in the Austrian rear having cut their previous supply lines
although the Austrians could potentially draw supplies from the east. Napoleon had the choice of
moving down the Adige Valley to defend in the Verona area or of advancing down the Brenta valley in
an effort to take Wurmser's force in the rear.
|
8 September 1796
|
|
French Army of Italy under General Bonaparte
using divisions of Massena and
Augereau with about 22,000 men in all.
|
Austrian main army under General Wurmser with
about 20,000 men.
|

|
The French Army of Italy pursued the Austrians under Wurmser down the Brenta Valley towards Bassano
overwhelming the rearguards of a few thousand men Wurmser had left behind to delay them.
Very early on the 8th of September, with Massena's division on west side of the Brenta River and Augereau's
on the east side, the French caught up with the two rear 'divisions' of the Austrian Army commanded by
Quasadanovich and Sebottendorf near Bassano. The Austrians were not ready. Their supply trains were
blocking the streets of the town and they had at most 14,000 men available, perhaps no more than 7,000.
Whatever the case they were quickly defeated with heavy losses, the survivors split and scattered.
Their supply train fell into French hands.
Wurmser, however, was able to rally a significant number of survivors plus the forces of his
leading division under Meszaros into a body of 10 to 12 thousand men and lead them on a daring march
into Mantua.
The French casualties were a few hundred men.
The Austrians lost about 4,000 men, 35 guns, and 2 pontoon bridges.
Bassano marked the the defeat of the second Austrian attempt to relieve Mantua. It came
very close to resulting in the total destruction of the main Austrian field army in Italy.
In the event, the main surviving fragment of that army and its commander were bottled up in
Mantua. Disease was rampant and supplies short there so its strength began to rapidly waste away.
In practical if not moral effect the Austrians might as well as been killed or taken prisoner.
The Austrian authorities would need to find yet another army somewhere.
|
12 November 1796
|
|
French Army of Italy under General Bonaparte
using divisions of Massena and
Augereau; about 13,000 men.
|
Austrian army under General Alvintzy with
about 18,000 men actually engaged.
|
|
The Austrian army under Alvintzy was advancing from Bassano to Verona in its third effort to
relieve Mantua. Alvintzy pushed his advance guard (8,000 men) under Hohenzollern out ahead to
the Caldiero ridge. Bonaparte determined to attack it with the divisions of Massena and Augureau.
The French march to the attack was delayed by icy weather and was effectively held by the Austrian Advance
Guard long enough for their main body to come to their aid. The French were forced to fall back
with heavy loses for no gain.
The French casualties were in the area of 2,000 men.
The Austrians lost about 1,200 men.
Caldiero was perhaps the first clear defeat the French Army of Italy suffered under Bonoparte.
Already exhausted from almost a year's hard campaigning against successive Austrian armies the
morale of the French troops took a significant hit. Furthermore, Bonaparte faced an Austrian army at
the gates of Verona against which victory in a head-on fight looked unlikely.
|
15-17 November 1796
|
|
French Army of Italy under General Bonaparte
mainly using the divisions of Massena and
Augereau but with detachments from other
formations for a total of about 19,000 men in all.
|
Austrian main army under General Alvintzy with
about 24,000 men total.
|

|
Having failed to defeat Alvintzy's army on its approach march Bonaparte was left facing
a new more numerous Austrian army before Verona in terrain that favoured Austrian
tactics. Morever his troops were tired and their leadership decimated by constant
hard campaigning.
Not wishing to force another head long battle in open terrain he resolved upon a daring
flank attack across a couple of rivers and through marshland. Leaving small forces to hold
Verona and the line of the Adige river near it he marched to Ronco and attacked with the
goal of taking the town of Arcola on the far side of the Alpone river, and an area marshland to
the east and north of the bigger Adige.
Most importantly Arcola was clearly in the rear of any army before Verona and once Bonaparte
had established himself there he'd be a clear threat to the rear and communications of
Alvintzy's army.
At dawn on the 15th of November Massena's and Augureau's divisions crossed the Adige at Ronco.
Messena deployed north west to Belifiore di Porcile to defend Augereau's flank while he attacked
towards Arcola. Despite Bonaparte's direct participation in the fighting Augureau's attack failed.
A smaller French force (Guieu's brigade) did cross in boats and take the town from the south later but
Augereau and Massena had both already withdrawn. Guieu elected to do the same.
So on the ground the first day looked like a tactical failure despite heroic efforts and high losses.
Strategically however it had succeeded in convincing Alventzy to call off a planned attack on Verona and to
withdraw forces to cover the French threat to his flank.
The 16th saw Massena and Augereau repeating their efforts of the 15th. In the process they met
Austrian forces advancing on the French bridgehead at Ronco. The Austrians were severely mauled.
Once again, however, Augereau failed to take Arcola and Bonaparte withdrew his forces to the
bridgehead at Ronco.
During the night of the 16th/17th French engineers built a bridge over the Alpone south of Arcola and just
north of where the Alpone joins the Adige.
On the 17the Massena as well as guarding the bridgehead made a demonstration along the route Augereau had taken the
two previous days. While Messena dealt severe blows to the Austrian forces sent against him, Augereau's division
was crossing the Alpone over the bridge built the night before.
Their flank turned by Augereau the Austrians withdrew after some hard fighting.
The French admitted losses of about 4,600 men.
The Austrians losses exceeded 6,000 men.
The battles around Arcola left the troops of both sides physically exhausted. Morally and strategically
the victory went to Bonaparte and the French. They had stymied the third Austrian attempt to relieve
Mantua.
|
14 January 1797
|
|
French Army of Italy under General Bonaparte
using divisions of Joubert, Rey, and Massena totalling
approximately 21,000 men.
|
Austrian army under General (FZM) Alvintzy with
about 28,000 men.
|

|
Rivoli was the culmination of the Austrian's fourth attempt, the second under Alvintzy, to relieve
Mantua.
Alvintzy this time attacked straight down the line of the Adige from Trent towards Verona.
He did so in several columns which although perhaps close on the map or as the crows flies were
not necessarily in easy communication due to the north-south trend of the mountainous terrain.
In particular the troops marching in the mountain valleys above and to the west of the river
bottom where the road that could take wagons and guns ran were effectively out of supporting
range. The place where the river road and the mountain roads connected again was Rivoli.
And that's where the defending troops of the 10,000 man strong division under Joubert made their
stand on the 13th of January 1797.
This time it had been Bonaparte who'd been caught a bit off guard, but he reacted quickly.
He ordered a variety of reinforcements for Joubert including most importantly, Massena's division
of almost 10,000 men.
Bonaparte himself was present on the battlefield by 0200 on the 14th. He immediately ordered a
counterattack to take key tactical features.
Throughout the morning of the 14th Massena's troop's arrived and were thrown in to save the
desperate French defense. By the afternoon the Austrians were defeated and the French
ready to begin their pursuit.
An attempt by Alvintzy to counter-attack on the 15th was a dismal failure.
The French casualties were some 5,000 men.
The Austrians lost around 14,000 men; many of them prisoners.
The outcome of Rivoli was not just the defeat of the third and last effort to relieve
Mantua, but the destruction of the Austrian Field Army in Italy and the complete demoralization
of its remenants. Mantua surrendered several weeks later. In the spring Bonaparte marched on Vienna.
|
Battle of the Pyramids ,
Battle of the Nile ,
Mount Tabor ,
First Aboukir ,
Heliopolis ,
Second Aboukir,
21 July 1798
 |
The French Army of the Orient with around 28,000 men,
General Bonaparte commanding.
|
A Mameluke commanded Eygptian force with about 24,000 men and 30 guns.
Most of the force was poor grade infantry,
its core was its Mameluke cavalry consisting of at most 6,000 men.
Murad Bey commanded that part of the Eygptian force actually engaged.
|
 |
Bonaparte having made it most of the way to Cairo the Mamelukes resolved to meet him.
They did so on on the west side of the Nile facing north, on their right near the Nile was most of their infantry
and their guns entrenched around and in the the village of Embabeh. On their left was their
heretofore unbeaten Mameluke cavalry.
Bonaparte being vastly inferior in cavalry formed his forces into five large divisional squares.
He integrated his artillery with these squares and kept any vulnerable "rear" elements protected within them
From the left near the Nile to the right on the desert flank these divisional formations were those of
Bon, Vial, Dugua, Reynier and Desaix.
It was mid-afternoon before the Mameluke's cavalry opened the battle with a wild charge at
Desaix's and Reynier's squares. They were unable to make headway against the superior discipline and
firepower of the French and but took heavy losses in ferocious attempts.
In the meantime the divisions of Bon and Vial took the village of Embabeh and slaughtered the
troops there. The day ended with the Eygptians defeated and in flight.
The French losses were about 300 men.
The Eygptians lost about 5,000 men in casualties, many of them Mamelukes.
The previously demoralized and almost mutinous French troops enjoyed much rich looting.
Cairo the key to Eygpt fell to Bonaparte's forces.
|
1 August 1798
|
The British Mediterrean Fleet under Admiral Nelson with
14 ships of the line and 7 frigates.
|
The French Fleet under Admiral Bruey with
13 ships of the line and 4 frigates.
.
|
 |
Nelson had been seeking the French Fleet for some time. He was mortified at having
missed it earlier and having allowed Bonaparte to land in Eygpt.
Coming into sight of it anchored at around four in the afternoon, with less than three
hours of daylight left, the British fleet nevertheless attacked.
By direct order or prearrangement is unclear. Whatever the facts of the occassion
Nelson had long made it explicitly clear that he would immediately attack the French
Fleet when he found it, that he would fight at night if need be (means of identification
and signals were prearranged), and that if he found the French at anchor he would attempt
to pass his leading ships between French ships and the shore.
The British believed "[w]here there was room for a French ship to swing [at anchor] there
was room for an English ship to pass". And having passed they would be able to
engage the closest half of the French ships from both sides; two on one, the leading half of the
British fleet from the shore side, the rear half from the sea side.
And that's what happened. Not without mishap, or notable incidents. One English ship went
aground, and the French flagship exploded in a manner that was spectacular beyond expectation, but
basically that's what happened.
And it worked. The French fleet was all but annihilated.
The British lost 218 men killed, 678 wounded.
The French lost 1,700 men dead and 1,500 wounded, 11 ships of the line,
and 2 frigates.
A couple of thousand French prisoners were released and put ashore.
The fate of Bonaparte's Army of the Orient was determined by this naval battle. The Mediterrean had
become a British lake and his army was cut-off. The French in Eygpt would receive no further supplies
or men, and when they tried to move their heavy seige guns to Syria by sea, those vital strategic assets
were captured and used against them.
|
16 April 1799
|
The French Army of the Orient with around 4,000 men in the end,
an initial 2,000 under General Kleber and another 2,000 in the relief
column commanded by General Bonaparte.
|
The Ottoman Army of Damascus with about 35,000 men,
Achmed Bey commanding.
|
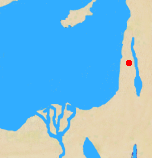 |
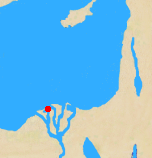
Bonaparte was beseiging Acre, the Ottomans had raised an army at Damascus which was
marching to relieve it. Bonaparte sent Kleber with a very small division to intercept
and defeat this threat.
Kleber intended a night march to surprise the Ottoman force early in the morning while it
was still dark.
He mistimed his movements and ended up encountering the Ottomans after sunrise.
Kleber's heavily outnumbered force spent the day in two small squares sucessfully
beating off every attack but unable to move or break ranks even to reach the
water they could plainly see close by. It was a temporary stalemate that didn't
bode well for the French.
Bonaparte, in the meantime, either hearing the guns or having expected the turn of
events, was marching to Kleber's relief.
He arrived in time around four in the afternoon. A few cannon shots through the
attacking Ottomans into disarray and Kleber and Bonaparte moved together to
inflict heavy losses on their fleeing foes.
The French losses were about 300 men.
The Ottomans lost about 5,000 men.
One of the two main armies the Ottamans had been organizing to retake Eygpt was defeated.
The French seige of Acre continued. In the event, it failed and Bonaparte was forced
to retreat to Eygpt with a much diminished and demoralized army. Without the victory
at Mount Tabor he might not have been even so lucky.
|
25 July 1799
|
The French Army of the Orient with around 7,700 men and 17 guns,
General Bonaparte commanding.
|
The Ottoman Army of Rhodes with about 18,000 men,
Mustafa Pasha commanding.
|
| |
With British help the Ottomans landed the Army of Rhodes at Aboukir overwhelming the
small French garrison that'd been left there. They then dug in to await both their own
reinforcements and the likely French counterattack. They did so in three lines behind
which they held the Fort of Aboukir itself.
Bonaparte rapidly concentrated his forces and marched to the attack.
His infantry with able assistance from his artillery took each line of fortifications in
succession. In numbers they were not far inferior to each successive set of Ottoman
defenders and their organization and discipline were far superiour and their guns much
more ably handled. The newly formed French cavalry turned the Ottoman defeat into a
rout that had no where to go.
The French casualties were about 900 men around 200 killed outright.
The Ottomans lost about 13,000 killed outright, 3,000 prisoners,
and 2,000 missing.
The Ottoman Turk attempts to recover Eygpt were decisively defeated. The French had
been whittled down but faced no immediate threat to their control of Eygpt. It was
not unreasonable to expect that in the event of a general peace they might be able
to retain possession of the country.
|
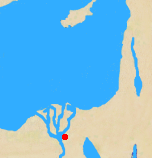
20 March 1800
|
The French Army of the Orient with around 10,000 men,
General Kleber commanding.
|
An Ottoman Army from Syria with about 40,000 men,
Ibrahim Bey commanding.
|
 |
General Kleber, who'd been left to hold Eygpt by Bonaparte, had been attempting to
negotiate the safe evacuation of his Army back to France.
He was facing a very large Ottoman army of at least 40,000 camped just outside of
Cairo at the ancient site of Heliopolis.
For whatever reason, it's still a subject of controversy, the negotiations broke
down and Kleber resolved on a surprise attack at dawn with the aim of removing the
Ottoman threat.
The attack was a success. Only a fraction of the Ottoman army put up a real
resistance and once their camp was taken the Ottoman force disintegrated.
The French casualties were about 300 men .
The Ottomans lost about 6,000 men as a very uncertain estimate, and,
more precisely, 19 guns.
The main and most immediate threat to the French position in Eygpt was removed.
Cairo had to be retaken from a small force that had seized it while the main battle
at Heliopolis was being fought. Other revolts and unrest among the local population
also needed to be supressed, but the Ottomans alone no longer posed a serious threat
to the French control of Eygpt. The British would have to send their own forces
if they wished to contest it.
|
20-21 March 1801, Also known as Battle of Alexandria.
|
The French Army of the Orient with around 10,000 men,
General Menou commanding.
|
A British Army with about 12,000 effectives,
General Abercromby commanding.
|
| |
The British had begun landing at Aboukir Bay on the 8th March, by the 18th they'd
taken Aboukir Castle.
Their main army was at the time in positions just short of 5km from Alexandria.
Menou, who'd taken command after General Kleber's assasination, reached Alexandria
with the main French field force on the 19th. He attacked the British during the
night of the 20th.
General Moore who was in command until General Abercromby's arrival was able to
discern the main French attacks and commit his reserves appropriately. The British,
although hard pressed, managed to hold and inflict heavy casualities on the French.
Their own losses were not light and included General Abercromby himself.
The French suffered about 3,000 casualties.
The British casualties were about 1,400 men killed or wounded.
The British had proven they could meet the French on equal terms
Menou retreated into Alexandria. The British put Alexandria under seige splitting the French forces in Egypt. They marched on Cairo where the largest French presence, some 12,000 men, under General Belliard was.
Menou's Army was intact and still held much of Eygpt but
its position was no longer tenable.
|
Montebello ,
Marengo
9 June 1800
|
The Advance Guard of the French Army of the Reserve with around 8,000 men,
General Lannes commanding.
Later reinforced by General Victor's
Corps of 5,000 men.
|
An Austrian column with about 18,000 men, and 35 guns,
General Ott commanding.
|
 |
The French and Austrian's were both manouvering in confusion and ignorance of each others
positions.
Lannes had crossed the Po and was moving west between its southern bank and the Appennines
towards Voghera when he met Ott's force, which had just taken up positions at Casteggio,
head on.
Initially he was repulsed. But after Victor arrived with reinforcements, he broke Ott's
forces and pursued them through Montebello.
The French casualties were about 500 men .
The Austrians lost about 4,000 .
The French had finally gained some idea of where the Austrian's were.
And if the situation wasn't as rosy as Napoleon had thought, the battle at Montebello did
give the Austrians some pause leading them to undertake a cautious plan of concentrating at
Alessandria rather than attempting something more aggressive.
|
14 June 1800
|
The French Army of the Reserve with around 15,000 men at first
reinforced to 23,000 men. The French likely had 42 guns.
General Berthier
was in nominal command, the actual command was held by
Napoleon who was
technically still just "First Consul Bonaparte".
|
The Austrian Army of Italy with about 35,000 men with 100 guns,
General Melas commanding.
|
 |
Napoleon thought he was pursuing an Austrian Army that was trying to evade him and regain
secure lines of supply, either by passing north of Po and marching east or by marching south
to Genoa where the Royal Navy could ensure its supply by sea.
By the 13th he was facing, if not completely in contact, with the main Austrian army at
Alessandria, between them lay the plain between the river Scrivia and the Bromida river, and
most importantly the Bromida river itself.
At this point he chose to detach two divisions one north and one south to keep the Austrians
from getting away. In the process he reduced his strength to almost half of that of the
main Austrian army and certainly no more than two thirds of it.
As a consequence when the Austrians attacked on the morning of the 14th the French
situation rapidly became serious.
Despite the restriction posed by the bridges over the Bromida and general Austrian
ponderousness by eleven in the morning the French
were being forced back along their entire line and were in danger of breaking.
At this point Napoleon finally realizing his danger sent messages off to recall the divisions
he'd sent north and south earlier in the day. He also ordered his reserves, the Guard and Monnier's division forward.
Conveniently for the French the Austrians chose to take an hour at midday to pause and re-group.
By 1300 their attack had resumed, and by 1400 Victor's position in Marengo was desperate, and an Austrian
Force under General Ott was threatening to turn the French right and cut the line of retreat for the French
center. The bulk of the French army faced annilhilation.
Rather than reinforcing his crumbling center Napoleon deployed his reserves to face Ott on the right.
This prevented an envelopment but between 1400 and 1500 the French were again being forced back all along their line.
Their withdrawal remained orderly, partly because the Austrian cavalry had been completely committed, but they'd
clearly been defeated. At about 1500 the Austrian Commander in Chief Melas, old and battered from a hard day's fight,
chose to turn the pursuit over to his subordinate Zach and leave the field.
At about this point Desaix with Boudet's division which had been sent south close behind him arrived
on the field of battle. He is famously suppossed to have told Napoleon that although one battle
had been lost there was still time to win another.
That the Austrians under Zach took until 1630 to organize their pursuit gave the retreating French
troops time to rally, and Desaix time to deploy Boudet's fresh division south of the road along which
the Austrian pursuit would come.
The Austrian pursuit column in the center essentially walked into a gigantic unexpected ambush.
It broke, and routed, fled. The flanking Austrian forces were left hanging in the air.
The French defeat had become a victory, but a very expensive one. The price included the life
of Desaix who'd been killed leading the counter-attack.
The French casualties were about 7,000 men.
The Austrians had roughly 6,000 men killed, lost 40 guns and had 8,000
men taken prisoner.
As First Consul, Napoleon's political position was still fragile. He had needed victory and
and he took pains to re-write the record to make Marengo appear more of one than it was.
He had planned on annihilating Melas army and was forced to allow it retire more or less
intact; his own army being considerably battered. He was forced to wait most of the year
for Moreau in Germany to achieve a sufficiently great victory at Hohenlinden that the Austrians
were compelled to make peace.
A less than ideal outcome from the First Consul's point of view, first the war weary French were
forced to wait for peace and then it came as the result of the success of a rival general.
Still an outright defeat at Marengo might have ended his career.
|
Second Stockach ,
Hochstadt ,
Hohenlinden
3 May 1800
|
The French Army of the Rhine with around 28,000 men belonging to the
French right wing under General LeCourbe actually engaged,
General Moreau in overall command.
|
The Austrian Army of the Upper Rhine with about 9,000 men of
Prince Joseph of Lorraine detachment actually engaged,
General (FZM) Kray commanding overall.
|
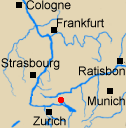 |
Stockach was a major depot on the main Austrian line of communications to its armies on the Upper
Rhine throughout the wars of the Revolutionary and Napoleonic periods. Lake Constance lies just a few
kilometers to the south-east. The upper Danube is 20 to 25 kilometers north of it, in a rougher more
forested area. Stockach was also frequently the location of the Austrian Army's HQ in this period.
In the spring of 1800 the French used their control of Switzerland to flank the main Austrian force
by crossing the Rhine at Schaffhuasen in strength. The fortress at Hohentweil meant to secure the Austrian flank
in this area quickly surrendered.
The result being that on the 3rd of May while the French and Austrian main forces under Moreau and Kray
respectively slugged it out at Engen about 20 km west of Stockach, an Austrian force under the
Prince of Lorraine was overwhelmed by a vastly superior force consisting of the French Right wing Corps commanded by
General Lecourbe.
The French losses were about 2,000 men.
The Austrians lost about 2,000 men.
Although the main action at Engen was at least a draw on hearing of the loss of Stockach Kray ordered an Austrian
retreat that ended in his force being forced all the way back to the fortifications at Ulm. The loss of Stockach
had unhinged the entire Austrian postion. It also directly resulted in considerable losses of stores as well as the rout and
considerable loss to the Austrian forces engaged there.
|
19 June 1800
|
The French Army of the Rhine with around 25,000 men of
General Lecourbe's right wing Corps engaged,
General Moreau commanding overall.
|
The Austrian Army of the Upper Rhine with about 70,000 men,
General (FZM) Kray commanding overall.
Main part of engagement fought by what was originally the Austrian right wing commanded by
General (FZM) Sztarray with about 16,000 men.
|
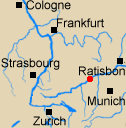 |
General Kray's main force was in Ulm but he was again flanked by Moreau's right wing under General Lecourbe
who managed a surprise river crossing of the Danube some 60km down river near Hochstadt (close to the site
of Marlbourough's famous victory at Blenhiem).
Despite hard fighting by General Sztarray's forces the French managed to gain control of both sides of the river
severing Austrian supply lines once again.
The French losses are uncertain but not likely more than a few hundred.
The Austrians lost about 1,000 men killed and wounded and another "several thousand" taken prisoner.
Kray was forced to abandon Ulm and ulitimately most of Bavaria.
|
3 December 1800
|
The French Army of the Rhine with around 100,000 men engaged,
General Moreau commanding.
|
The Austrian Army of the Upper Rhine with about 130,000 men,
Archduke John commanding.
|
 |
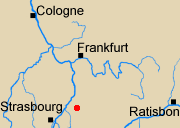
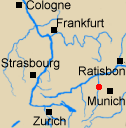
Hohenlinden is about 30km east of Munich near the Inn Valley
The Archduke John thought the French were in retreat and was attacking towards Munich in multiple columns.
It was snowy and the going was bad, the columns made poor time especially the flanking ones, and were out of
touch with each other. In particular his left wing column had become lost.
As result once his center had become involved with the French center under Ney it found itself being
assaulted on its flank and rear by the French division under Richepanse, which it had bypassed and which
the Austrian left had not kept busy.
The Austrian army disintegrated and a major unplanned French victory was obtained.
The French losses were about 5,000 men killed and wounded.
The Austrians lost about 18,000 men.
The victory at Hohenlinden not only ended the campaign in Germany against Austria in the French
favor but caused the collapse of the Second Coalition. It left Moreau with a reputation that would
prove something of a political problem for Napoleon.
|
Ulm ,
Austerlitz
20 October 1805
|
The French Grande Armee with around 210,000 men,
under the command of Napoleon.
|
The Austrian Army of the Upper Rhine with about 40,000 men at Ulm, 72,000 overall,
Archduke John in nominal command.
In fact the Austrians were under the direction of
General Mack.
|
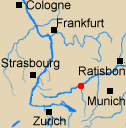 |
Ulm was a manouver and a surrender rather than a battle per se.
Under the defacto leadership of the delusional General Mack the Austrian Army had been
positioned out on limb in the west of Bavaria while Napoleon marched the finest army he
was ever to command to completely surround and cut it off.
The Austrian high command had expected Napoleon's main effort to be in Italy.
Mack had expected the French to follow the traditional invasion route from Strasbourg across the Rhine
and the Black Forest to the upper Danube near Ulm. Instead Napoleon crossed the Rhine further
north and moved along the line of the Main and Neckar towards a section of the Danube between
Dillingen and Inglostadt. That this involved violating Prussian neutrality is one
reason Mack discounted the possiblity, but it was still a major failure of Austrian
intelligence and reconnaisance that the movement was not detected.
The crossing of the Danube by Napoleon's troops was all but unopposed and they proceeded
to sweep around and behind the Austrian main force.
Some hard actions were fought at Haslach (Albeck) and Elchingen as the net closed but
close it did.
Greatly outnumbered as well as completely isolated the Austrians had little choice but
to surrender.
The French losses at Ulm itself were minimal.
The Austrians surrendered about 45,000 men;
27,000 at Ulm, another 12,000 at Neustadt and 6,000 with
Archduke John at Trochtelfingen.
The Russians were still coming, but the Austrians had little to nothing left between
the Grande Armee and Vienna. The boost to French morale was immense. The blow to
Austrian morale close to shattering. The manouver on and capitulation of Ulm to this
day continue to enhance Napoleon's personal reputation.
|
2 December 1805
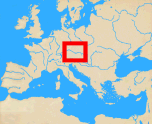 |
The French Grande Armee with around 73,200 men and 139 guns,
under the command of Napoleon.
|
The Austrian and Russian Allied Army with about 85,000 men and 278 guns,
General Kutuzov in command.
|
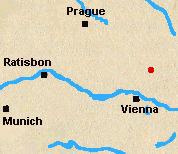 |
Napoleon and his Grande Armee had pursued Kutuzov's Russians across most of Germany and
Austria. The French supply lines were stretched and two possible threats were forming to
them. The Archduke Charles forces in Italy threatened them from the south and Prussia
looked ready to intervene from the north.
So when Kutuzov received reinforcements it was mixed news. Particularly because those
reinforcements included the Tzar Alexander who was spoiling for a fight and had the
power to override the decisions of his general Kutuzov. The battle Napoleon wanted
now looked possible.
Napoleon did everything he could to encourage the Allies to attack. He gave up the very
defensible Prautzen Plateau west of the village of Austerlitz and allowed the Allies to
occupy it. He kept Davout's and Bernadottes' corps presence hidden, and resorted to a
variety of other diplomatic and operational stategems.
It worked. The Tzar overruled Kutuzov and ordered an offensive battle. The plan that
Kutuzov's Austrian Chief of Staff Weyrother, a massive sweep south and then north again
by the Allied left wing, was very close to what Napoleon had hoped for and expected.
While Davout's forces held this attack in the south, Napoleon waited until the
Allied center on the Prautzen was fatally weakened and then attacked with Soult's Corps.
Lannes Corps in the north on the French left wing, in the meantime, kept the Allied
right busy.
Soult's attack succeeded despite some good battlefield decisions by lower level
Allied leaders and considerable bravery on the part of Allied soldiers.
Seeing the hole Soult's Corps had opened in the Allied center Prince Constantine commanding
the elite Russian Guard formations that constituted the Allied reserve attacked.
His attack was only beat off with the help of the cavalry of Napoleon's own elite
Imperial Guard and the infantry of Bernadotte's Corps. The fighting ended with the
thorough defeat of the Russian Imperial Guard.
The French having
shattered the Allied center were now positioned to take Allied left in the rear flank.
The southern Allied forces had only a narrow route through which they could
retreat.
Soult's hard fighting troops, especially those of Vandamme's division, swung south and
closed the trap. Some Allied soldiers escaped, but they were in no shape to continue the fight.
The French losses were 1,300 men killed, 6,400 wounded, and 500 missing.
The Allies lost about 16,000 men killed or wounded, 11,000 men taken prisoner,
and 180 guns.
Austerlitz was Napoleon's finest victory achieved by the Grande Armee at the heights of its
power. It forced the Austrians to make peace and thus ended the Third Coalition.
|
Jena ,
Auerstadt ,
Eylau ,
Friedland
14 October 1806
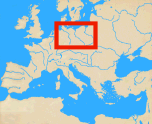 |
The French Grande Armee (minus Davout's and Bernadottes Corps) with around 90,000 men,
under the command of Napoleon.
|
The Prussian Army with about 35,000 men under
Prince Hohenlohe initially engaged,
plus a further 15,000 reinforcments under
Ruchel.
|
 |
The battle took place on an open plateau north west of Jena in the valley of the Saale river.
The Prussian Flank guard under Hohenlohe, guarding the retreat of the main Army under Brunswick north-east,
was already present on the eastern part of this plateau.
The French, on the other hand, were faced with crossing the Saale largely through Jena and climbing steep
closely wooded slopes before reaching that small part of the plateau that the Prussians had left
unoccupied.
Napoleon thought he was facing the main Prussian army under Brunswick, Hohenlohe thought he was just
dealing with a French flank guard.
As a result Napoleon spent the night of the 13th/14th getting Lannes Corps up onto the plateau before ordering it to attack
as early as possible (0630) on the morning of the 14th. He feared that allowed the initiative the Prussians
might drive Lannes back off the plateau and trap him against the Saale. Hohenlohe to the contrary not
taking the French presence seriously failed to commit even to a full out defence at first.
By mid-morning Lannes attack had secured more room for the full French army to deploy and leading
elements from the corps of Augereau (on the left), Ney (between Augereau and Lannes), and Soult
(to Lannes right) had done so. Ney on arriving had attacked prematurely and finally provoked
Hohenlohe into a serious counter-attack that caused something of a crisis for the French center, but
by noon the situation had been retrieved and the full strength of four French corps, the Imperial Guard,
and Murat's cavalry were available for the general attack that Napoleon launched at 1300.
The Prussian right and center were routed. Ruchel's forces arrived on the right and counter-attacked but
were then themselves caught up in the general defeat. The Prussian left although originally retiring in
good order got caught in the rout of the main army from its own defeat at Auerstadt to the north.
The French losses were about 5,000 men.
The Prussians lost about 25,000 men.
Together Jena/Auerstadt knocked Prussia out of the war. They also revealed the bankruptcy of the existing
Prussian Army organization and system of tactics. Until Jena the Prussian Army had still enjoyed
a formidable reputation based on the successes of Frederick the Great.
|
14 October 1806
|
III Corps of the French Grande Armee with around 27,000 men,
General Davout commanding.
|
The main Prussian Army with about 60,000 men, senior officers present were
the Duke of Brunswick and
King Frederick William III.
|
| |
Davout's task was to, with Bernadottes assistance, flank the main Prussian Army as it fought Napoleon and
to block its retreat.
Block it he did, without any help from Bernadotte's Corp, and without its having been first defeated by
Napoleon.
The battle began early on the 14th (0600) as a meeting engagement in the strategic pass of Kosen.
Basically Davout got his smaller force up faster and fought it in a disciplined and co-ordinated
fashion. The Prussians on the other hand launched a series of piecemeal and ill-coordinated
attacks.
Ill-coordinated in two senses in that they failed to apply all their strength at the same time and
in that the various arms the cavalry, infantry and artillery failed to work together.
When Blucher's cavalry attacks forced the French into squares there was no infantry or artillery
present to take advantage.
Davout's superbly drilled soldiers efficiently adopted whatever formation was necessary to defeat
the current Prussian attack.
All hopes of any proper tactical or operational co-ordination by the Prussians likely died mid-morning with their
leader the Duke of Brunswick. His death was not the only one among the Prussian leadership and
it was slow in being reported, but even after taking over command the King Frederick William
failed to effectively co-ordinate his forces.
By 1230 Davout was deploying to envelope the larger Prussian force on both flanks and his
counter attack then drove them back against the remenants of Hohenlohe's men routing from Jena.
The French losses were very roughly 11,000 men.
The Prussians lost about 13,000 men and 175 guns.
Jena was a severe defeat for the Prussians, but it was Davout's blocking action at Auerstadt that
turned it into the destruction of the Prussian Army. Auerstadt was also a convincing demonstration
of the French Army's superiority operationally and tactically to the Prussians and of Davout's own
skill as a general.
|
7-8 February 1807
|
The French Grande Armee with around 45,000 men and 200 guns initially,
under the command of Napoleon,
later reinforcements in the form of Davout's
and Ney's Corps
numbered around 26,000 men.
|
The Russian Army with about 67,000 men and 460 guns
General Bennigsen in command.
a further 9,000 men later arrived under General Lestroq.
|
 |
Napoleon's army had already been in winter quarters for most of a month when, during late January, the Russians launched an
unseasonal and unexpected offensive through East Prussian and towards Danzig.
Contrary to Napoleon's claims at the time and to that of some later historians this was not likely
in response to aggressive foraging by Ney's Corps but rather a deliberate plan by the Russians
that had been arrived at some weeks earlier.
In the event both the Russian offensive and Napoleon's countering attempt to trap them failed to come off
successfully. The Russians were retreating when Bennigsen decided to turn his army and face
the pursuing French at Eylau.
The initial part of the battle seems to have begun by accident on the evening of 7th.
Napoleon's original plan having been to
draw up his army on the heights to the west of Eylau itself and there await the attack of the Russians
until Ney turned up on their north flank and Davout on their southern one.
Apparently the French train (including Napoleon's own personal staff) got lost and attempting to set up
in Eylau became involved in an action with Russian outposts that rapidly escalated out of control as
both sides fed troops into the battle.
The struggle ended with the Frenchmen of Soult's, Murat's, and Augereau's Corps in control of the village, perhaps
at least some of them enjoyed a somewhat more sheltered night because of this, but losses on both
sides had been heavy.
The 8th opened with snowstorms, and an immense artillery duel, soon followed by Soult's Corps attacking
in the center with the intent of pinning the Russians until Ney's and Davout's flanking Corps could
arrive.
The Russians obliged with a counter-attack that resulted in Napoleon committing Augereau in the south
center in hopes of taking the pressure off of Soult. Unfortunately for the French Augereau's
Corps got lost in the blowing snow and stumbled into the artillery duel between the grand batteries of both
sides and was mauled past usability by a combination of heavy fire from the Russian guns and their
own artillerymen firing blind.
Napoleon had to commit his last reserve, the cavalry under Murat, to restore his center and save
the remenants of Augereau's men. Murat succeeded in this; breaking the Russian center and taking a
battery of 70 Russian guns, but at the cost of 1,500 troops out of 10,000.
When a stray Russian column threatened Napoleon's HQ in Eylau the Guard infantry itself had to be
used to restore the situation.
So after a desperate morning for the French center,
Davout was finally fully in position on the southern Russian left flank,
and Napoleon ordered his attack for 1300. By 1530 the Russian line had been pushed back into a great
right angle and was about to break when reinforcements in the form of Lestocq's 9000 Prussians arrived from
the north and marching across the rear of the Russian forces formed on their far left.
Davout was outflanked on his right by these new forces and the battle seemed to be favoring the Allies when
Ney in his turn arrived, by 2000 (8:00pm) he was successfully attacking the Russian left flank in the north.
The Allied counter-offensive on the opposite flank ground to a halt around 2200 (10:00pm).
Dark and exhaustion closed the battle without any decisive result despite bitter losses for both sides.
Bennigsen withdrew his forces during the night.
The French losses were about 4,000 men on the 7th, and a further 10,000 on the 8th.
The Russians lost about 4,000 men on the 7th and maybe about 25,000 on the 8th.
As the French held the field afterwards they could claim a victory. The general consensus since is that
Eylau was a horrible and costly draw and the first major exception to Napoleon's long
record of victories.
|
14 June 1807
|
The French Grande Armee with around 80,000 men and 118 guns,
under the command of Napoleon.
|
The Russian Army with about 60,000 men and 120 guns
General Bennigsen in command.
|
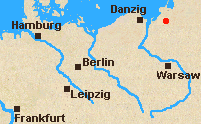 |
Late on the 13th of June forward cavalry elements of Lannes Corps were pushed out of the vital river crossing of
Friedland by the much stronger cavalry of Bennigson's Russian Army.
Learning of Lanne's presence, apparently alone and isolated, Bennigson saw a chance to
catch and destroy a major sub-element of the French army. He gave orders to concentrate his
whole army there throwing extra pontoon bridges across the Alle river and into Friedland during the night.
During June the nights are short in Northern Europe, dawn came around 0300 and the guns opened up and the
skirmishing began. Lannes reinforced with Grouchy's cavalry had about 9,000 infantry and 3,000 cavalry,
he faced three times as many Russians. Nevertheless, he managed to hold his line until around seven in the
morning when reinforcements in the form of Mortier's VIII Corps began arriving. The French now had close to
numerical parity with the Russians and were able to beat off a major Russian attack around 0900.
Bennigsen then slacked off his pressure but remained in postion throughout the morning.
Around noon Napoleon arrived with substantial reinforcements (the corps of Ney and Victor, Oudinot's division,
and the Guard) following close behind him. By 1700 the, now numerically superior, French were fully deployed and
ready to attack. Ney's forces on the southern flank forced the Russians back into the town of Friedland, and
aggressively handled French artillery took advantage of the resulting congestion to inflict severe losses.
By 1900, after severe fighting, Friedland was cleared of Russians, the battle continued to the north until dark
around 2230. Many Russians there died fighting or by drowning, and many more, although disorganized and demoralized,
managed to escape. Very few surrendered.
The French losses were about 9,000 men.
The Russians lost about 20,000 men and 80 guns.
Friedland was a sharp defeat for Russia's best field army; it was the victory Napoleon needed
to force the Russians to make peace. That peace was negotiated at Tilsit the next month.
It is usually considered to mark the height of Napoleon's power.
|
Medina del Rio Seco ,
Baylen ,
Vimeiro ,
Corunna ,
Oporto ,
Talavera ,
Bussaco ,
Fuentes de Onoro ,
Albuera ,
Salamanca ,
Vitoria ,
Battle of the Nivelle ,
Toulouse ,
14 July 1808
 |
French with around 14,000 men and 40 guns initially,
under the command of General Bessieres.
|
The Spanish with about 23,000 men and 30 guns
General Cuestra in overall command, although almost 16,000 of the Spanish
force was from General Blakes Army of Galacia.
|
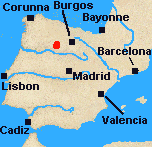 |
Cuestra being senior despite commanding only about 6,500 newly raised and untrained men was able
to summon Blake's intact force of regulars to assist him in attacking the French in Castile.
In the event it was the French who took the intiative. The Spanish chose to defend on a
low plateau to the east and south of Medinia. Their two forces deployed separately; Blake's
Army of Galacia along the top of plateau's south east slopes, Cuestra's Army of Castile
to the north and west beyond and behind Blake's northern left flank.
The French approached from the east and attacked Blake's center while turning that northern
left flank. Cuestra's Army for whatever reason did not interfere, and Blake's Army was rolled
up and defeated.
Instead of a launching sustained pursuit the French sacked Medinia committing atrocities there that
did nothing to help their political position in the Peninsula.
The French losses were about 105 men killed and 300 wounded.
The Spanish lost about 2,300 men, 1,200 of them having surrendered, and 13 guns.
As well as opening the road to Madrid, Medina del Rio Seco was an important boost to French
(especially Napoleon's) morale. They'd met Spanish regulars for the first time in pitched
battle and scored an easy and dramatic success.
Baylen would come later, and would it also later become clear that beating Spanish armies wasn't
the same as destroying Spanish armies or forcing the Spanish people to surrender, but at the
time Medina del Rio Seco seemed like a positive omen of French success.
|
22 July 1808, shocking set back to French arms.
|
French with around 14,000 men and 40 guns initially,
under the command of General Dupont.
|
The Spanish with about 23,000 men and 30 guns
under General Reding.
|
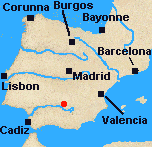 |
Dupont had been charged with taking Andalusia. The French, Napoleon in particular, having been
grossly over-optimistic he'd been given wholly inadquate forces both in number and quality for
the task.
Forced back to the upper Guadalquiver River valley and then reinforced with Vedel's division to
almost double his previous numbers Dupont waited, not wanting to retreat over the mountain passes
to the north and abandon Andalusia, but uncertain of his ability to maintain himself there safely let
alone to go on the attack.
The Spanish did not wait. Combining regular forces from both Andalusia (Castanos) and Grenada
(Reding) as well as various bands of popular irregulars they attacked.
Dupont was deployed along the northern bank of the Guadalquiver from Andujar east, his own main
force being in Andujar itself, Vedel's division to the east both holding the river line and the
line of communications that ran north-east back through the towns of Baylen and La Carolina to
the passes through the Sierra Morena. The Spanish plan was that Castanos would pin Dupont
at Andujar while Reding flanked him upstream crossing the river and descending on his left rear.
It can't be said that the Spanish plan worked out as intended, but in a sense through a combination
of their own errors and confusions and much worse ones on the part of the French matters worked out
better than they could have realistically planned for.
Reding was able to occupy Baylen without a fight because Vedel had marched away to meet an illusory
threat at La Carolina. At the same time with no idea what had happened Dupont evacuated Andujar
and marched for Baylen with only a weak advance guard, his wounded and loot in the center of his
column, and a strong rear guard intended to hold off the attacks from Castanos that were his main fear.
It was dawn on the 19th when Dupont's advance guard discovered Redings troops in Baylen.
Reding had time to deploy properly across the road into town as well to leave a detachment to delay
Vedel should he arrive. Dupont in contrast worried about being attacked in the rear threw his
tired and not very good troops into a series of piecemeal attacks. The last of these came close
to success but failed. With that failure the morale of the French troops broke completely and
they refused to make further efforts. Dupont was trapped between two Spanish armies with no
way out, he had to make terms. Worse for the French once Vedel had awoken to the situation and
marched on Baylen, Duponts cornered soldiers were used as hostages, Dupont was pressured into
ordering Vedel to surrender his undefeated troops and Vedel felt compelled to follow those orders.
The equivalent of an entire French Corps had been totally defeated.
The French losses were about 20,000 men, about 18,000 having surrendered.
1,200 Swiss deserted to the enemy, the rest were dead either in battle or from the rigors of
campaigning.
The Spanish lost about 1,000 men.
Baylen not only shook the French hold on Spain forcing them to retreat to north of the Elbro, it
shook the French hold on Europe. French armies had earned a ruputation for invincibility at
Marango, Austerlitz, Jena and Friedland, Baylen gave that reputation the lie.
|
21 August 1808, future Duke of Wellington defeats Junot
|
French with around 13,000 men and 24 guns,
under the command of General Junot.
|
The British and Portuguese with about 16,000 men (about 2,000 of them Portuguese)
under General Arthur Wellesley.
|
 |
Wellesley had drawn up his troops north of Lisbon in and around the villiage of Vimiero. Junot
resolved to attack him before he could get any closer to Lisbon itself.
Junot's plan was a combined pinning effort against Wellesley's center and flank attack against his left.
Wellesley's well drilled redcoats were easily able to re-deploy to meet this, and Junot's
columns got to experience the future Lord Wellington's tactics of hiding his main infantry line
behind terrain and heavy screens of skirmishers for the first time.
Just as they did for the last time at Waterloo, these tactics, when first used at Vimiero, resulted in
the French being repulsed with heavy losses.
Wellesley's intent to pursue the beaten French army was countermanded by his newly arrived
superior General Burrard.
The French losses were about 2,000 men and 14 guns.
The Allies lost about 730 men.
The result of Vimiero was a French surrender, but Wellesley's newly arrived superiors granted such
favorable terms that both of them and Wellesley himself were recalled to England for an enquiry.
|
16 January 1809
|
French with around 16,000 men and 40 guns,
under the command of Marshal Soult.
|
The British with about 15,000 men
under Lieutenant General Sir John Moore.
|
 |
Having been pursued across most of Castile and Galacia Sir John Moore's army, representing most
of Britain's effective land forces, finally reached the sea and a rendezvous with an evacuation
fleet at Corunna.
However, needing time to embark his forces Moore elected to offer battle a few miles down the main road south
from Corunna. The position he chose was on a hill called "Monte Mero",
his line ran east to west from a point north of the village of Piedralonga to
a point north of the village of Elvina. The east of the line was held by Hope's strong three brigade division and
the west by Biard's strong division also of three brigades.
This position was strong to its front but had some weaknesses being lower than the Heights of Penasquedo
a long cannon shot to its south, and having a weak open right flank on the east around Elvina.
There was not a lot Moore could do about the first problem, but to address the second he positioned two
weak divisions behind his right flank, Paget's to his immediate right rear and Fraser's further to the east
and north almost as far back as Corunna's outer fortifications. These units were out of French sight.
Soult drew his forces up south of the British on the Heights of Penasquedo. The eastern part of the line
was held by Delaborde's division with Lorge's cavalry on its flank, next in line to the west was Merle's
division, Mermet's division on Soult's left formed the western most part of his main line. Further west were
the cavalry divisions of La Houssaye and Franceschi.
Soult's plan was that while the presence of the divisions of Delaborde and Merle held the British in place, that
Mermet's men would attack and turn the British right flank under Biard. His artillery would render direct assistance,
and the cavalry under La Houssaye and Franceschi indirect assistance. La Houssaye would swing wide around the
British right flank, Franceschi wider.
In the event after bitter fighting in and around Elvina, and losing both Baird and Moore himself to the supporting French artillery,
the British right managed to hold.
Paget's forces saw off both the leftmost units of Mermet's division and La Houssaye's cavalry.
Fraser's brigade prevented Franceschi from succeeding in his flanking effort.
Tactically the British had won. Operationally they were able to get their army off during the night, somewhat
more tattered, but still intact.
The French losses were about 1,500 men.
The British lost about 900 men.
The exact impact of the retreat to Corunna and the subsequent battle there are still debated.
There's no doubt the British were chased out of Spain and badly battered in the process, but they
did escape, despite being heavily outnumbered by the best soldiers in Europe under experienced
leadership.
Moreover, a good argument can be made that Moore's campaign distracted Napoleon's forces in Spain at
a critical time, preventing his overrunning the entire country in a timely manner, and allowing
breathing room for the Spanish revolt to gather strength.
|
12 May 1809
|
French with around 11,000 men,
under the command of Marshal Soult.
|
The British and Portuguese with about 18,000 men
under General Arthur Wellesley.
|
 |
The total French forces in the peninsula overwhelmingly outnumbered the British and Portuguese, but as well as
facing numerous Spanish regulars, they were dispersed holding down hostile populations. The various
French Corps were also largely out of communication with each other and therefore unable to provide
mutual support. Soult's Corps was the only one actually occupying Portuguese territory so it
was Soult that Wellesley picked to attack.
Soult himself was headquartered in Oporto with about half of his Corps, the rest being dispersed trying
to keep the countryside down and his lines of communication (and potential retreat) open.
Wellesley tried to keep his attack a surprise, but in the event Soult received at least a days warning.
This was long enough for him to begin preparing his withdrawal, to pull his forces north of the Douro
river, to destroy the bridge across it at Oporto, and to either sink all the boats on the river or at least
move them to its north side. Soult's main concern seems to have a British attack from the sea or across the
Douro's wide estuary and he deployed his forces in Oporto and to the west to watch against this possibility,
leaving the river to east poorly watched. He, not unreasonably, seemed to expect it would take the British at
least a few day's to organize a river crossing.
He failed to allow for Wellesley's intiative or the considerable help he received from the supportive local
population. A local barber pointed out some unsunk and unguarded barges just a little upstream from Oporto and
helped in sneaking them across to the river's north side.
The location was perfect, high ground on the south bank kept that part of the river out of sight from downstream
and formed a location where artillery could be placed to dominate the north bank. Furthermore on the north bank was
a large and eminently defensible seminary.
Wellesley assigned Paget the command of the troops that would attempt to cross and hold the seminary. He placed
a division under Sherbrooke to hold the river bank facing the city, and finally he sent several battalions under
Murray to cross the river a few miles upstream and create a diversion.
The troops starting slipping across the river to the seminary at 10:00am on the 12th, by the time the French noticed
at 10:30 several hundred had got across and established themselves. Aided by heavy fire from their guns on the
south bank the British beat off all the French counter attacks. Paget was wounded and command went to Hill, but
overall the losses were disporportionately French.
When Soult pulled his troops out of the city to meet the British threat some of the population rioted, but others
boarded their boats and started helping Sherbrooke's troops across the river.
Mid-afternoon saw the French in full retreat to the north east.
Murray's force watched this retreat but did not try to intervene, and Murray has been critized as having thrown away
the chance to actually cut off and destroy Soult's forces, but given the disparity in numbers and the rough handling
some dragoons who did attack the retreating French received, this might not be entirely fair.
The French losses were about 600 men and 6 guns in battle,
plus another 1,500 sick wounded in Oporto hospitals and 52 originally Portuguese seige guns .
The British lost 123 men.
Soult's forces were harried into Galacia losing their baggage and guns on the way. Portugal was
free of French invaders for a while at least. Wellesley might have been somewhat disappointed not
to have actually cut-off and destroyed Soult, but given the rough equivalence between the regular
forces involved he could not have been too surprised at the outcome.
|
28-29 July 1809
|
French with around 46,000 men and 80 guns,
under the command of King Joseph Bonaparte, General Jourdan advising.
|
The British and Spanish with about 52,000 men (incl. 32,000 Spanish of General Cuesta)
General Sir Arthur Wellesley in
overall command.
|
 |
Having chased Soult out of Northern Portugal Wellesley next moved to central Portugal with the
aim of meting out the same treatment (in conjunction with Cuesta's Spanish army of Estremadura)
to the French 1st Corps under Marshal Victor.
If Victor had remained in place in the frontier province of Estremadura facing Cuesta, Wellington
would have fallen on his rear or flank and the outnumbered French would have doubtless taken a
severe drubbing leaving the road to Madrid open.
In the event Victor fell back to Madrid well before hearing of Wellesley's advance because his
soldiers had been starving. They'd stripped Estremadura, a poor province in the first place, of all
sustenance.
Given his own problems with supply and co-ordination with the Spanish Wellesley's efforts to take
Victor at a disadvantage failed. The 27th of July saw the Allies at Talavera de la Reyna
several marchs west of Madrid facing not just Victor's 1st Corps,
but the French reserves from Madrid under King Joseph (with Jourdan advising) and the 4th Corps of
Sebastiani. The plan had been that Spanish Army of La Mancha under Venegas would keep Sebastiani
busy, it hadn't worked.
Talavera lies on the river Tagus, in 1809 there were still several miles of open plain between it
and the hills to the north. The Spanish defended the town and part of the plain to it's north,
the British defended most of the open plain and the first major hill, the Cerro de Medellin, to
its north. A small valley to the north of that before the Sierra de Sequirilla was watched by cavalry.
The British had four divisions, three of them in line, Campbell in the south, Sherbrooke in the
center and Hill in the north holding the Cerro de Medellin, with Mackenzie in reserve behind Sherbrooke.
The French deployed their forces almost entirely against the northern British held part of the Allied line.
Some of the northernmost Spanish battalions faced French infantry but most of the Spanish Army was screened with
cavalry. The northern right part of the French line was made of of Victor's 1st Corps, from north to south the
divisions of Ruffin, Villatte, and Lapisse. To their south the line was composed of Sebastiani's 4th Corps,
He directly commanded his northernmost 1st division of Frenchmen, Laval's 2nd division of Germans formed the
far left of the French infantry line.
The evening of the the 27th saw some accidental skirmishs embarrassing to the British but without serious
results, and one serious night attack ordered by Victor and carried out by Ruffin's division against
Hill's division holding the Cerro de Medellin. Victor had indentified it as the key to the Allied position.
Two of the three columns committed became lost, and although the third column succeeded in surprising
the ill prepared British division and both sides lost heavily in the sharp and confused action that
resulted, the night ended with the British still holding the position.
At five in the morning, dawn saw a better organized repeat of the effort, this time the better prepared
British sent Ruffin's troops reeling back with heavy losses amounting to a quarter of their entire force
all lost in less than an hour.
Their initial efforts stymied the French paused for several hours before trying again. This time
their intent was to hold the British by a broad front attack especially against the British right and
and center in the plains, and to send Ruffin's and Villettes on a flanking movement to the north.
Cerro de Medellin they decided to let be until success elsewhere.
Seeing the French re-deploying for their flanking movement Wellesley asked for and received
Spanish help, Bassecourt's infantry division, a heavy artillery battery, and Albuquerque's cavalry
division. Wellesley also redeployed his own cavalry and what he coould of Hill's artillery on
Cerro de Medellin.
At around two in the afternoon the French guns opened up, completely overpowering the Allied
artillery, they took a terrible toll especially on the exposed troops in the British center.
The first infantry attack was made by Laval's Germans around 2:30 (1430). It was driven back with
heavy losses by Campbell's division which made a limited counter attack and then re-formed its lines.
Some part of this attack also engaged the northern Spanish battalions which, giving a good account
of themselves, held.
Three in the afternoon (1500) saw Laprisse and Sebastiani's divisions attacking Sherbrooke's lines
in the British center. Once more British volley's decimated the front ranks of their attackers and
a counter attack sent them fleeing. Unlike Campbell's division, however, Sherbrooke's men did not
rally and return to their defensive lines, rather they continued their counter attack until they
ran into the second line of the French forces and were countered attack and forced to flee in return.
This disaster was redeemed by the committment of Mackenzies brigade strength division and a strong battalion
(the 1/48th) Wellesley detached from Hill's division. The survivors of Sherbrooke's ill fated counterattack
rallied behind these fresh troops.
While this drama unfolded in the center, Campbell's division beat off a second attack by Laval at around four
in the afternoon.
The losses had been terrible on both sides, including both generals Mackenzie and Laprisse, many more junior
officers, and between a quarter and a half of the men involved. This was the battle's crisis and it
had come and gone. The British had won although at a terrible cost.
The situation to the north saw the flanking manouver of Ruffin and Villate fail, forced into squares by
the presence of Allied cavalry and then enfilated by Allied artillery fire, facing the infantry of
Bassecourt to the north and Hill's to the south, and with the central attack having failed, they gave up
their movement as a lost cause despite their troops being relatively fresh and undefeated.
Surveying the situation, Jourdan and Joseph, despite strong presentations by Victor declined to commit their
reserves in a final effort.
The French losses were about 7,268 men and 20 guns.
The British lost about 5,365 men, the Spanish about 1,200 men.
Talavera saw an Allied army face the French in open battle and hold while inflicting heavy losses.
It gained Wellesley a peerage, he became Lord Wellington. It did not make it easier to sustain
his Army in Spain, shatter the French forces, or improve co-operation with the Spanish forces.
Nevertheless for a few days Wellesley comtemplated operations designed to liberate Madrid. That was before
learning Soult was moving from the north against his communications with a force at least equal to his
own.
The Allies had thought Soult's Corps a shattered remenant without equipment or artillery,
that Mortier's Corps was spread throughout Leon, Castile and the Asturias holding them down, and
that Ney's Corps was similarly occupied in Galacia. In fact, the French had evacuated both
the Asturias and Galacia and concentrated Ney's and Mortier's Corps under Soult's command, and
Joseph had sent Soult an artillery train to replace that he'd lost and ordered him south against
the Allied rear. Soult had three Corps and about 50,000 men, more then the equal of both
Allied armies together.
By the time Wellesley and Cuesta realized this they barely had time to escape to south across the
Tagus river into a country naturally harsh and already denuded, their armies suffered
terribly in the process. Many of the British wounded were left behind to be captured at Talavera.
|
27 September 1810
|
French with around 62,000 men and 114 guns,
under the command of
Marshal Massena.
|
The British and Portuguese with about 52,000 men (25,000 Portuguese)
under General Sir Arthur Wellesley.
|
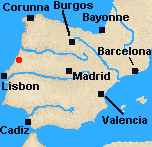 |
The frontier fortresses having fallen "The Army of Portugal" over 60,000 strong under the
justly famous Marshal Messena marched into Portugal without any serious opposition from the
Allied army of Wellington.
Wellington was not eager to meet French veterans with mostly untried troops in the open field.
Moreover, the French had the advantage in both artillery and cavalry.
The rough line of the French advance was parallel to the Valley of the river Mondego to the
city of Coimbra, and from there south parallel to the coast to Lisbon.
Wellington expected they'd take the good road that ran south of the Mondego and planned to meet them
around Ponte Murcella along the line of the river Alva close to Coimbra.
To his pleasant surprise Messena without good maps, or good guides, and,perhaps, aware of the
Wellington's preparations to meet him along the southern road instead moved his Corps along
a very bad northern road through Viseu north of the Mondego. At Viseu he could have struck for
the coast directly but instead he moved towards Coimbra and the long ridge of Bussaco that
lies north and east of it.
It was at Bussaco that Wellington prepared to meet the French. The ridge's slopes forced a
stiff climb on any infantry attacking and rendered Messena's cavalry and artillery largely useless.
Wellington placed Cole's 4th division northmost on his far left flank, south of Cole across the main
road he placed Spencer's 1st division, Picton's 3rd division held the center, Leith's 5th division
the right center, and Hill's 2nd division the far right.
In front of Cole's right and of Spencer, covering the main road, he placed from north to south
Campbell's independant Portuguese brigade, then Crauford's Light Division, and then the independant
Portuguese brigades of Coleman and Pack
The French 2nd Corps under Reynier arrived first and moved off south to face the Allied center,
Ney's 6th Corps remained in the vicinity of the main road facing the Allied left, and Junot's
8th Corp remained to the rear.
It's hard to be certain but the French seem to have believed that they only faced a rearguard
and furthermore one with it's right flank opposite Reynier's location. They had not yet
learned of Wellington's proclivity for deploying troops out of sight, and were unaware both
of Hill's and Leigh's divisions on the reverse slopes of the southern portion of the Bussaco
ridge and of the many troops in the forward line below the ridge's crest in the vicinity of
the main road.
At any rate Messena's plan was that Reyniers 2nd Corps should attack first, and upon gaining
the ridge's crest re-form and attack northwards, Ney was to launch a frontal attack along the
line of the main road when he saw Reynier had reached the crest. The Allied troops would
find themselves faced with a simultaneous attacks from the front and their right rear.
Junot was to be the French reserve.
On the morning of the 27th Reynier launched his attack as soon as it was light enough.
Heudelet's division attacked on the left (south) and reached the Allied line first.
The packed French columns were driven back by concentrated volley fire from units of Picton's
division.
Merle's division on Reynier's right (to the north) actually set off before Heudelet, but
had the tougher climb, and took longer to get to the top of the ridge. They found it
unoccupied and had a moment of triumph but not time to deploy before Picton brought reinforcements
to bear on both thier flanks, which pouring volley's into the disorganized French masses forced
them back off the ridge.
There was one more French attack to come in this sector. The brigade under General Foy
which belonged to Heudelet's division had through some misunderstanding failed to attack
with the rest of the division. Reynier discovering this sent them forward. Like Merle's
men they penetrated to a part of the ridge uncovered by Allied troops, and like Merle's
troops were forced back before they could establish themselves by reinforcements.
This time those reinforcements were units from General Leigh's division and were commanded by
him.
With Foy defeated Reynier was left without fresh troops, his attack had failed.
Unfortunately for the French Ney saw Reynier's troops reach the ridge's crest without
realizing they would be forced back and subsequently launched his own attacks further north.
His northernmost column consisted of Loison's division, mercilessly harassed by skirmishers and
artillery, it advanced until it reached Crauford's hidden main line which rose and blew away
the column's head with close range volley fire.
One battalion of Loison's drifted off its correct line of advance to receive similar treatment
from Coleman's Portuguese.
Ney's southern division under Marchand had a slightly less difficult approach, but the attack
ended in front of Pack's brigade the same as had all the others, stopped by close range volley fire.
It was only eight in the morning but the French had had enough.
Messena called off any further attacks and sent out scouts to find a route
around Bussaco. They found a mountain road to the north. Noon on the 28th saw the French army
on the move again.
The French losses were about 4,500 men.
The Allies lost 1,252 men.
Wellington didn't stop the French at Bussaco, but he'd taught them to be more cautious in the future,
and given his men, especially the untried Portuguese units cause for confidence.
When Massena came into sight of the Lines of Torres Valles both sides knew he had no chance
of forcing them. Basically unable to take Lisbon by assualt and unable to starve it out, it was
in fact the French Army in danger of starving, all Messena could do was wait and hope for something to
happen. Hope the British government would overreact and evacuate, or that Wellington would offer
battle in the open, or that one of the other French armies in the Peninsula would come to his assistance
and open a proper supply line in the process. Hope is not a strategy, however, and none of these
things happened.
After weeks of privation the much diminished French Army had to retrace its tracks. The third and
last French invasion of Portugal had failed.
|
3-5 May 1811
|
|
French Army of Portugal with around 47,000 men, 4,600 of them cavalry, and 38 guns,
commanded by
Marshal Massena
.
|
The British and Portuguese with about 35,000 men, of which 2,000 were cavalry, and 48 guns
under
Wellington
.
|
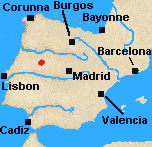
|
Materially it did not take Messena long to put the French Army of Portugal back into fighting trim.
Morale and relations among the senior commanders, however, remained poor.
Still facing Wellington's Anglo-Portuguese Army in the open on the Spanish-Portuguese border between
the fortresses of Almeida and Ciudad Rodrigo, Massena had every right to expect the more numerous French could
beat the Allies. With superior cavalry he could hope that any such victory would be decisive. So although we
have no actual record of Massena's intent, it seems likely his main goal when he attacked in May 1811 was the not
the relief of Almeida, but rather the destruction of Wellington's army.
By May 3rd Massena had driven Wellington's screening forces back upon the main Allied position.
The French immediately attacked the key village of Fuentes de Onoro, in fact, taking it from its garrison of picked
British troops and wounding the garrison commander Colonel Williams in the process. Wellington ordered a three
regiment counterattack that re-took most of the village including the key high ground. The British lost 259 men to
the French 652.
The 4th of May was spent by the French on reconnaisance and manouvering. Massena having learned Wellington's right flank was largely open past Fuentes de
Onaro settled on a plan to outflank him there. An assault by picked troops would take the village unhinging the Allied flank just as it was being turned.
During the night of May 4th Wellington, anticipating a possible French flanking move, but not its size, moved his 7th Division into the village of
Pozo Bello on his far right. He covered the gap between Pozo Bello and Fuentes de Onoro with cavalry. Wellington also moved troops
, most notably the Light Division, from his left and center to the north to reserve positions on the plateau behind Fuente de Onoro.
Massena's cavalry attacked at dawn. The Spanish cavalry to the south on Wellington's farthest right was driven off. The 7th division was in danger of being cut-off.
It was forced out of Pozo Bello by two French infantry divisions (supported by third). A courageous and disciplined covering action by the greatly outnumbered
British cavalry and horse artillery
kept it from being overwhelmed long enough that Wellington was able to send the elite Light Division to cover its further withdrawal to the far right of
a new line. This new line formed by the the 1st and 3rd divisions met the old Allied line at right angles at the key village of Fuente de Onoro.
It was at Fuente de Onoro that Massena launched the second, and as it developed, bloodier, prong of his attack. This attack was led by picked grenadiers and
strongly supported by the available French artillery. If successful it would unhinge Wellington's entire position by flanking both his wings, while Massena's
own strong left wing to the south lay poised to contest the Allies' main line of retreat.
In the event the British Highlanders and Irish proved a match for the best the French could throw at them. The village was mostly lost at one point but
retaken in a counter-attack. Unusually, thanks to its losses in the invasion of Portugal, the French artillery was weaker than the British and unable to
blast a way open for the infantry.
By mid-afternoon it was clear to Massena that both his attempt to disorder and destroy part of the Allied right wing, and his attempt to unhinge the
Allied position by taking Fuentes de Onoro, had failed. There was no point in wasting more lives and he called his attack off.
The French losses were about 2,192 men.
The Allies lost 1,542 men.
Fuentes de Onoro was an attempt to severely defeat, likely even destroy, the Anglo-Portuguese army. It was the first battle that army fought against
the French in the open. Massena had every right to expect success. He knew he was one of the best generals in Europe, his infantry the equal of any, and
his cavalry and artillery had proven themselves superior to every foe previously encountered.
In the event, Wellington proved himself Massena's match, and furthermore so did his infantry of all nationalities, his much maligned cavalry (for once
its discipline was superb), and his artillery.
If the Wellington's Army had been badly defeated it would have ended the last major threat to French from regular formed troops in the Peninsula. The French would have
been free to disperse their troops to suppress the guerillas and properly occupy most of Spain.
Fuentes de Onoro was the watershed of the Peninsular War. From that point on it was all downhill for the French, they never had enough troops to face both Wellington and the Spanish.
Substantial reinforcements, the presence of Napoleon himself to co-ordinate operations properly, or a later decisive defeat of Wellington
might have changed the situation, but none of those happened.
|
16 May 1811
|
|
French with around 25,000 men and 48 guns,
under the command of
Marshal Soult
.
|
The Allies with about 35,000 men (12,000 Spanish) and 50 guns
under
General Beresford
.
|
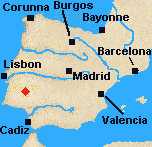
|
While Wellington dealt with Massena's Army of Portugal on the northern route into the country,
Beresford was left on the southern one beseiging the key fortress of Badajoz.
Marshal Soult, commanding in Andalusia, on hearing of the threat to Badajoz concentrated his scattered
garrisons and marched to its relief.
Beresford lifted his siege and gathered his troops to meet Soult south of Badajoz on the main road from Andalusia around
the village of Albuera. He expected an attack straight up the road, through the village and the center of his position.
It was therefore on a line centered on Albuera that he positioned his Anglo-Portuguese divisions during May 15th.
When the Spanish army under Blake arrived that night he positioned them on his southern flank. Following Wellington's
example he kept his main line, both British and Spanish, out of sight behind the crest of the high ground his dispositions followed.
Because of this, and the late arrival of Blake's troops, when Soult came up he failed to realize that Blake had already
joined Beresford. Individually Soult out numbered both Beresford and Blake, against them together he was significantly
outnumbered. It was therefore a primary goal of his strategy to prevent their joining and in order to achieve this he
planned a massive outflanking attack around what he thought was Beresford's southern flank in order to split him from
Blake.
In fact, when Soult launched this flanking attack with three-quarters of his infantry early on the 16th, he was attacking
the southern flank of Blake's already arrived Spainards.
Beresford and Blake were both caught off guard. A single brigade of Zaya's division was left to take the brunt of the
French attack while Beresford marched his 2nd division to its support.
Fortunately for the Allies Zaya's was one of the best divisions in the Spanish army and these troops held steadfast for
a prolonged period time
despite being outnumbered several times to one.
Their ordeal did not end with the arrival of the first British troops. Colburne's brigade, the first of Stewart's 2nd division to
arrive, counter-attacked wheeling in line to pour fire into the flanks of the French columns attacking the Spanish, only to
be flanked and attacked by French lancers who all but destroyed the Brigade. Seventy percent losses were inflicted in few minutes.
Zaya's troops, however, continued to hold. The other two brigades of the 2nd division arrived in time to meet a renewed assault by
the second wave of French columns. The casualities in the head on collision were horrendous on both sides.
The situation was critical when General Cole commanding the 4th division, which Beresford was holding in reserve,
decided on his own to attack, This despite the presence of considerable French cavalry.
Soult by this time had realized that Beresford and Blake were united, that he was outnumbered and his flanking attack had failed.
Still faced with Cole's attack he had to send in his reserves under Werle in order save his already committed and battered infantry.
Werle's brigade slightly outnumbered Cole's entire division having nine battalions to Cole's six and a bit. Moreover, Cole had to
deploy Harvey's Portuguese brigade to fend off the strong French cavalry. Werle, however, was under the handicap of attacking
British troops in line with columns. The slaughter on both sides was again extreme, British musketry decimated the French columns
but the British follow-on charge was blown away by supporting French artillery.
The action between Cole and Werle was the last major action of the day. The French infantry had been beaten and was in full retreat,
but the Allied infantry had taken horrendous casualities and were in poor shape themselves. The French cavalry and artillery were
intact and deployed to resist any Allied pursuit. Beresford allowed Soult to retreat largely unhindered.
The French losses were about 7,000 men.
The Allies lost about 6,000 men (roughly 4,000 British, 1,400 Spanish, 400 Portuguese).
Tactically Albuera was a disaster for both sides. As Soult retreated without relieving Badajoz it can be considered an Allied Phyrric
victory. In conjunction with Fuentes de Onoro it meant French commanders would be very circumspect about meeting an Anglo-Allied army
on anything resembling even odds in the future.
|
22 July 1812
|
|
French with around 49,000 men and 78 guns,
under the command of
Marshal Marmont
.
|
The Allies with about 49,000 men and 60 guns
under
Wellington
.
|

|
Wellington was on the strategic offensive. His target was the French "Army of Portugal" under the command of Marshal Marmont.
The "Army of Portugal" was, in fact, dispersed through out north-west Spain in
Leon and Old Castile due to problems of supply. If Wellington could beat this force then the French communications to Madrid and Andalusia
would be threatened. He could hope to force an French evacuation of most of Spain south of the Ebro.
But although he was on offensive strategically, tactically Wellington hoped to fight a defensive battle.
Marmont didn't oblige. Many long weeks of manouver passed. Marmont gathered reinforcements until his army was the equal of Wellington's in everything but cavalry.
Wellington missed his chances to attack at an advantage, but neither did he fall into any of the traps Marmont set him. Finally Wellington learned (but Marmont didn't)
that King Joseph was marching from Madrid with all the troops he could spare. Marmont was about to be reinforced to the point he'd enjoy a definite superiority.
Wellington prepared to retreat.
It was the 22nd of July and both the armies had been in close contact for days. They were now deployed just south of Salamanca around the village of Los Arapiles.
The village was named for two significant hills, the "Lesser" Arapile to the north and the "Greater" to the South. Both armies were laid out in a fallen-over
"L" shape, with long legs running east-west and shorter ones north-south. The British lines lay to the north-west of and within the French ones, between the
French and Salamanca. The corner of the British lines was anchored on the "Lesser" Arapile, that of the French on the "Greater" Arapile.
Wellington knew this, but Marmont was only able to see some of the Allied forces as Wellington had hide many of them in the dead ground behind the "Lesser"
Arapile and its associated high ground.
The first part of the day passed as days before had with skirmishing and manouvering, Marmont extended his left west and Wellington matched him extending his right west also.
Neither commander proved willing to bring on a general engagment. Wellington is believed to have been on the verge of attacking when he uncharacteristically allowed Beresford
to talk him out of it. Both commanders had late lunches. Wellington in a famous (but variously recorded) incident was still in the middle of his sometime around three in
the afternoon , when Marmonts leftmost divisions
began to extend themselves excessively to the west, marching separated with their flanks exposed to the British.
Marmont later denied it in his battlefield report, but the most plausible explaination for this is that Marmont seeing the dust from Wellington's withdrawing
trains thought it was in fact the better part of the Allied army retreating, and furthermore, thought that Wellington was a hopelessly defensive minded
general who Marmont could take liberties with and that therefore the French Marshall directed his leftmost divisions to manouver to cut off the retreat of what he
supposed was only the Allied rearguard.
Whatever the case it was the opportunity Wellington had been waiting for. He threw his lunch away and galloped to his 3rd Division. The 3rd Division was positioned in
reserve behind Wellington's right
flank. He ordered it and the accompanying cavalry to immediately attack the leading French division. This division was Thomiere's.
That done Wellington dispatched the 5th Division next in line to attack the French division following Thomiere's, that being Maucune's. Again he followed up the infantry
attack by that of a brigade of cavalry.
Due to the rolling terrain the French divisions of Thomiere and Maucune failed to see the British attacks coming until the last moment and were caught in the flank
while almost completely unprepared. They were routed by the infantry and kept from rallying by pursuing cavalry. A third French division, Brennier's, following the first two
was caught up in the attack and crippled. It's leading battalions also routed but others managed to stay in formation and fight back.
The French having had three of their eight divisions mauled, and their left flank compromised were well on their way to losing the battle. It was for the time being
though not Marmont's problem, both he and his second in command, Bonet, had been badly wounded by a British shell. It fell to General Clausel commanding one of the
center French divisions to take overall command more than an hour after the action had begun and try to save the day.
Clausel's division and the next one in line, Bonnet's, managed to defeat the third phase of Wellington's assault that being the attacks of the 4th Division and
Pack's brigade in the British center. Clausel then chose to counter-attack and after severely punishing the 4th Division ran into the British 6th Division
which had followed up behind the 4th. Repulsed to its front the French center was also flanked on its left by the 5th Division and the 7th Division following on behind the 5th.
At some cost the Allies had now shattered five of the eight French divisions. Of the remaining three, Foy's facing the Allied Light Division was so far away on the
French right to the north and east as to be out of the fight and Sarret's on the left was fighting a stubborn retreat covering the routing remenants of the divisions shattered there.
Only Ferrey's division in reserve behind the French center was fresh and available. Clausel ordered it to fight a rearguard action and cover the French retreat at all costs.
Time had to bought so that the rest of the army could get away.
And buy time Ferrey did. Eventually his division was forced back and then routed, but not before inflicting crippling losses on the opposing 6th Division, and having
bought enough time for dark to fall and bring an end to the battle.
The immediate Allied pursuit of the defeated French was not vigorous and remains a matter of controversy. Wellington thought a Spanish garrison was occupying
Alba de Tormes blocking one main route of retreat, and he ordered the reliatively fresh 1st Division to cut off retreat along the other. The Spanish garrison
wasn't there as expected and the 1st Division failed to do much. The same was true of the battered 6th division which was ordered in direct pursuit of the fleeing
French. Why the cavalry or the mostly unscathed 7th division weren't used in the direct pursuit is a question the historian Oman asked a hundred years ago, and
others asked a hundred years before at the time. The answer is likely some combination of fatigue after a day of battle and days before that of hard marching, maybe
of some lack of personal initiative by some generals, and without doubt just the plain fog of war.
The French losses were about 14,000 men and 20 cannon.
The Allies lost 5,214 men .
Napoleon was pre-occupied marching his Grande Armee into Russia at the time of Salamanca and his having withdrawn troops from Spain to aid in his Russian
campaign was doubtless a contributing factor to making the Allied victory at Salamanca possible. His losses in Russian and Eastern Europe during the next
couple of years would dwarf those in the Peninsula.
Nevertheless Salamanca was a decisive battle. It unhinged the entire French position in the Peninsula and invalidated Napoleon's
strategy there. The French could not both occupy all of Spain and contain Wellington's army, not with the resources they could realistically afford
given their problems elsewhere in Europe.
The immediate results of Salamanca were that French evacuated both Madrid and Andalusia concentrating the Army of the Center and the Army of the South
in Valencia. Thus concentrated they were able to counter-attack and push Wellington back into Portugal, but the political damage both in Spain and the rest
of Europe had been done, and it was considerable.
In the longer run Wellington and the Allies had proved they could attack and defeat a French force of equivalent size, and Napoleon was deprived of
hundreds of thousands of veteran French soldiers he dearly needed elsewhere.
|
21 June 1813
|
|
French with around 50,000 men and 153 guns,
under the command of
Marshal Jourdan
.
|
The Allies with about 70,000 men and 90 guns
under
Wellington
.
|

|
The spring of 1813 saw the French strength in Spain depleted by the withdrawal of troops to make up the losses Napoleon had
suffered in Russia the year before. What strength they had was concentrated in northern Spain to defend their supply
lines to France. Being concentrated in a country never rich and further improverished by years of war, and fighting a
guerilla war amidst a hostile population they were very dependant upon those supply lines.
On the other hand they knew Wellington was also very dependant on his own supply lines which stretched back to Lisbon and
would only grow longer as he advanced. What they didn't know was that Wellington had prepared a switch of his
supply base to Santander a port on the north coast of Spain, and that Spainish guides had provided him a route
that would allow him to completely outflank the planned French lines of resistance.
In the space of four weeks from late May on Wellington forced the French back, taking Salamanca, Valladolid, and Burgos, and
crossing both the Douro and Ebro without fighting a major battle.
Wellington finally caught up with the retreating French, and a hugh convoy of loot and civilians, at Vitoria.
Vitoria lay in a valley followed by the great road to Bayonne, the main line of communication to France.
The French were deployed in a series of lines across this valley. Unfortunately for them Wellington did not send
his most of divisions straight up the road along the valley bottom.
Rather while the Light Division and the 4th Division entertained the French directly Wellington sent most of his
forces on three great outflanking manouvers. Hill commanded a force three divisions strong charged with taking the long hill to the south
of the valley. Picton and Dalhousie with their divisions were to outflank the French from the northern hills.
Graham also led a strong force of four divisions around the north of the French. Wellington's objective for Graham was
not to just outflank the French, but to actually get into their rear and block their retreat.
The battle began with Hill's troops around eight morning pushing both up the valley directly and against the heights to the south of it.
Much hard to and fro fighting for the duration of the morning resulted in a stalemate in the valley but the Allies gained the heights
of La Puebla to the south and began to push the French there east thereby outflanking the forces the in valley.
Graham had made contact with the Army of Portugal defending the French communications by noon, but the north central forces under Dalhousie
failed to come into action as Dalhousie waited for some tardy brigades to come up. Picton commanding the "Fighting" 3rd Division took
it upon himself to attack without orders.
Attacked on their northern flank, and front, and outflanked to the south the French fell back in increasing disorder. By mid-afternoon
the allies had won and the fleeing French, their main line of retreat blocked by Graham, were forced to abandon their guns and baggage
and make their way over a secondary route towards Pamplona.
Again the aftermath of Wellington's victory was controversial. His troops stopped to loot the incrediable wealth of the
French convoy rather pursuing the beaten French and fully capitalizing on their success.
The French losses were about 5,000 men and 151 cannon.
The Allies lost about 5,000 men .
Vitoria ended French power in the Peninsula. Moreover, it had a profound effect on wider European opinion likely destroying any
chance Napoleon had of keeping Austria from joining the Allies, or of negotiating a peace that left him in power.
|
10 November 1813
|
|
French with around 60,000 men,
under the command of
Marshal Soult
.
|
The Allies with about 82,000 men
under
Wellington
.
|

|
Soult had disposed his somewhat demoralized forces in a very strong defensive line along the river
Nivelle. He expected an attack near the coast and placed most of his forces there.
Wellington, in fact, attacked in the center sending a strong force under Beresford against
the hill strongpoint of La Petite Rhune. The attack began at six in the morning and by
mid-afternoon had broken through thereby unhinging Soult's defense.
Soult managed to withdraw most of his men, but lost many guns.
The French losses were about 4,450 men and 70 cannon.
The Allies lost 2,265 men .
Southern France was a sideshow to the main event in central Europe, but tying down
French troops and some of Napoleon's best officers, worsening Napoleon's political
situation and preventing any counter offensive into the Peninsula were all worthwhile
achievements.
|
10 April 1814
|
|
French with around 42,000 men,
under the command of
Marshal Soult
.
|
The Allies with about 49,000 men
under
Wellington
.
|
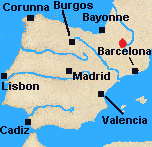
|
Wellington continued to hunt Soult's force not knowing that Napoleon had abdicated several
days earlier. Soult's men were outnumbered but defending a partially fortified city.
Toulouse lies on the river Garrone, its suburb St.Cyprien is on the west bank and the main
city is on the east, further east lie the Heights of Calvinet. The heights dominate the
city and were Wellington's main objective.
Hill with two divisions was to launch a diversionary attack against St.Cyprien.
The 3rd and Light Divisions on the other side of the river attacked the city's northern
defences. This was also supposed to be a diversion but Picton who was commanding became
heavily engaged and took heavy losses. A further diversion was made by two Spanish
divisions against the northern part of the ridge formed by the Heights of Calvinet.
They too took heavy losses.
Beresford, with the 4th and 6th divisions, launched the main attack from the south east
after a long flank march. Their fight was bloody. It took them two attempts to gain
the heights and then further hard fighting to secure them.
Early evening saw Soult evacuating his remaining forces on the heights, the city
now being untenable he abandoned it, along with most of his guns and wounded,
in the late evening.
The French losses were 3,236 men, plus 1,600 wounded and most of their guns.
The Allies lost about 4,500 men, about half of them Spanish.
In hindsight Toulouse might seem a pointless bloodbath. It however tied down critical miltary resources
and if Napoleon had not already been defeated in the north he would have had a serious problem in the
south with Soult's army basically a spent force.
|
Teugn-Hausen (or Thann) ,
Abensburg ,
Landshut ,
Echkmuhl (or Eggmuhl) ,
Aspern-Essling ,
Wagram
19 April 1809
|
|
Austrian Army under
ArchDuke Charles
with about 80,000 men.
|
French III Corps under
Marshal Davout with roughly 47,000 men.
|
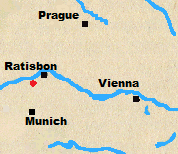
|
Due to some confusion of orders Davout's III Corps was deployed in and south of Ratisbon in a position that left it isolated and in danger of being cut off.
Davout knew this. By the 18th of April Charles had figured it out too.
What Charles didn't know was exactly where Davout was or where he planned to move. Davout intended to join with Lefebrve's VI Corps of Bavarians near Abensburg
by marching along the south bank of the Danube.
Both armies started moving on the morning of the 19th, but Davout moved sooner and faster. His III Corps was also mostly concentrated into four large columns his vulnerable
trains on the good river road, while the infantry and cavalry moved on poorer forest roads inland. Charles was slower off the mark and spread his Corps out in a wide net
moving on Ratisbon from the south. He had not figured out where Davout was. Just the same he almost caught him. His westernmost Corps, the Austrian III under Hohenzollern encountered
Davout's rear flank between the villages of Teugn and Hausen as the French made their way through the narrow defile between Abbach and Saale on the Danube.
The French division of St.Hiliare, but also that of Friant and Montbrun's cavalry put up a ferocious fight. Hohenzollern committed what forces he had piecemeal and was outfought by
the expert French skirmishers in the largely wooded terrain.
Charles failed to support, apparently because with fighting breaking out along a considerable length of his front (Montbrun's and Friant's work) he failed to discern where
the main weight of Davout's Corps was. Not seeing his chance he missed it and Davout managed to get his trains and the unengaged bulk of the French III Corps back in communication with
the VI Corps and the rest of the French Army.
The Austrians lost about 3,800 men.
The French casualties were about 4,500 men.
If Charles had been quicker and reached the road along the Danube before Davout, or if he had recognized that the action at Teugn-Hausen represented the flank of Davout's entire
escaping Corps he could trapped Davout and with a numerical advantage of close to two to one, against a foe whose supply lines had been cut, he could have expected to at least have
administered a severe drubbing. Davout had proven he could fight and win against the odds at Auerstadt, but still the odds would have been against him. Charles missed his best
chance of beating the French at Teugn-Hausen.
|
20 April 1809
|
|
French Army under
Napoleon
with about 113,000 men of which about 55,000 men in Lefebrve's VI and Lanne's Provisional Corps were actually engaged.
|
Austrian Army under
Archduke Charles with about 161,000 men of which maybe 12,000 men in screening brigades detached from III and V Corps took the main weight of the initial French attack,
later joined by the roughly 25,000 men of Hiller's VI Corps who halted the pursuit.
|
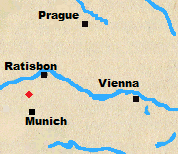
|
Charle's attack northward on the 19th with the bulk of his army left its left wing exposed and in danger. The more so that he failed to to prevent Davout's divisions from connecting up
with the rest of the French Army.
The Austrians had two Corps covering their left flank, Hiller's VI Corps farthest to the south around the headwaters of the Abens near Au, and Archduke Louis V Corps holding the line of the
Abens opposite Lefebvre's VI Allied Corps of mainly Bavarians. Louis and Hiller were not in contact and only a thin line of detached brigades connected Louis' Corps with the main army.
Charles, recognizing his danger, ordered Louis to march during the night of the 19th and 20th to join the main army and Hiller to move to take up the line Louis had been defending.
Charles plan was to concentrate south of Ratisbon and change to a line of supply running through it rather than Landshut.
Hiller and Louis failed to follow Charles orders.
The next day, the 20th, the French took advantage. Lefebevre left a single division to occupy Louis and he and a provisional Corps under Lannes (consisting of the half of Davout's Corps that
had successfully eluded Charles the day before plus a heavy cavalry division) attacked the thin screen joining the main Austrian army with its left wing.
It was a rout. A single brigade, Thierry's, was left to bear the brunt of the French attack. It was all but destroyed.
Louis position was flanked and he was forced to retreat. Hiller came up in time to stem the pursuit. But the situation of the VIth and Vth Corps was untenable. Rather than retreating on the
main army as Charles had wished Hiller decided to retreat on Landshut with the aim of covering the direct road to Vienna.
The Austrian Army was split.
The French and Allied casualties were about 2,000 men.
The Austrians lost about 6,700 men, roughly half prisoners.
Abensburg split the Austrian army into two pieces and left the French between them and superior in numbers to both. The Austrian offensive had been defeated. It only remained to see what they could
salvage from that defeat.
|
21 April 1809
|
|
French Army under
Napoleon
with about 60,000 men mainly from Lannes Provisional Corps and Lefebrves VI Corps.
|
Left wing of Austrian Army primarily VI and V Corps under
FML Hiller with about 35,000 men.
|
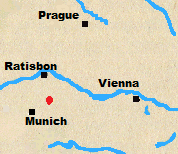
|
It had been the Archduke Charle's intention that his extended left wing under Louis and Hiller should rejoin the main army. Their disregard of his orders
had likely made that impossible by the middle of the 20th. Hiller's and Louis' Corps would have had to have marched north with a strong French force under Napoleon
on their flank. Instead on the night of the 20th/21st they decided to fall back directly to their rear to a position around Landshut where their supply lines crossed the Isar river.
Early on the 21st Hiller, now in over all command of the southern part of the Austrian army, learned that the Isar river position had been flanked by a strong French force under
Massena that had reached the Isar at Moosberg to the south of Landshut. He could no longer hope to make a stand at Landshut it was now merely a question of how much of his army could
escape.
In the event, despite French stories about their heroics and undeniably severe losses to both Austrian fighting units and their trains, it took until around one in the afternoon for
Landshut to fall, and most of the Austrian army escaped intact.
The French and Allied casualties were very roughly about 3,000 men.
The Austrians lost about 9,000 men and a considerable part of their train including guns, many ammo and supply wagons and a pontoon bridge the French later put to good use.
Landshut completed the isolation of the southern portion of the Austrian Army under Hiller from the main part to the north under the Archduke Charles. The losses to the Austrian trains were a boon
to the French. The Austrian forces under Hiller, however, escaped to fight on other days. Some of them like that of Aspern-Essling not such good ones for the French and their Allies.
|
22 April 1809
|
|
French Army under
Napoleon
with about 100,000 men.
|
Main Austrian Army in Germany under
Archduke Charles with 80,000 men.
|
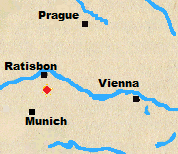
|
Both Napoleon and the Archduke Charles spent the 21st of April badly mistaken about their enemy's positions.
Napoleon thought it was the Austrian main army that he'd defeated at Abensburg and then driven through Landshut. He didn't realize
he'd once again left Davout's III Corps to face the major portion of an enemy's strength.
The Archduke Charles on the other hand thought that Davout's force in the area south of Abbach on the Danube was the main
French army. He planned to attack it and decisively defeat it on the 22nd, but given the long distance some of his troops had
marched delayed the planned time of attack until early afternoon. If Napoleon had given Charles the time even the formidable Davout would
have been in serious trouble.
Unfortunately for the Austrians an emissary from Davout managed to reach Napoleon in the early hours of the 22nd and convince him
of the danger Davout's force was in. Napoleon immediately arranged reinforcements for Davout and began to plan a switch of direction
for his main army. He would attack north from Landshut with the objective of destroying the Austrian main force under Charles.
The Austrian forces were deployed in a line that ran roughly north-south. Their south flank lay in the area of Eckmuhl. The northern
part of their force was the strongest as Charles hoped to flank the French there. It was the weak southern flank that Napoleon intended to fall
upon while Davout kept the Austrians pinned in place to their front.
A strong provisional corps under Lannes was dispatched to lead the attack. Napoleon followed with Massena's corps.
The Austrians received their first warning around seven or eight in the morning when the first cavarlry clashes occurred. Rosenburg commanding
the Austrian IV Corps that constituted most of their south flank heard about these around mid-morning. By mid-day it was clear to him he was
facing a major attack from the south. He took precautions and sent word to Charles.
Charles received the notice sometime between one and two in the afternoon just as his offensive against Davout was getting started. He'd been caught
badly off guard. His decided that the best he could realistically achieve was a successful withdrawal on Ratisbon. He sent word to most of his
forces to begin that retreat. Rosenburg he sent word that he would was on his own and would have to act as rear-guard for the whole army.
Rosenburg with his own IVth Corps and that part of the III Corps that hadn't followed Hillier to Landshut had about 18,000 men in all to hold off the
the 90,000 men that Napoleon would eventually bring to bear.
By three in the afternoon the main French attack was underway. By four Eckmuhl was taken and the French were advancing on a wide front. However,
despite scarificial last stands by some units and others being cut off and taken prisoner the Austrians mostly managed to withdraw in good order, fighting
hard where they needed to.
A huge cavalry clash at Alteglofsheim in the last hours before dark, was another defeat for the Austrians. A defeat that kept the French cavalry from
interfering with the rest of Austrian army's retreat.
The day ended with Charle's Austrians camped immediately south of Ratisbon. They were defeated, mauled, dispirited and disorganized, but not routed. The Austrian Army was still largely
intact. During the wee hours of the morning Charles successfully marched it over the Danube using both the Ratisbon bridge and a pontoon bridge he'd had
built to the east.
The French and Allied casualties were about 6,000 men.
The Austrians lost about 12,000 men.
Napoleon had planned to destroy the main part of the Austrian Army. He had failed to do that. He had defeated the Austrian invasion of Bavaria. He split the Austrian forces
into two parts, neither of them in any shape to face his main force which held the central position.
The Austrian Armies in Germany, however, were still intact and would fight, and fight hard, in the days to come.
|
21-22 May 1809
|
|
French Army under
Napoleon
with about 80,000 men.
|
Austrian Army under
Archduke Charles with 100,000 men.
|
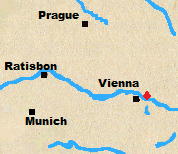
|
By mid-May of 1809 Napoleon had taken Vienna on the Danube's south bank and was wondering when and how to cross to the great river's north bank.
Somewhere to the north of the Danube lay the main Austrian Army commanded by the Archduke Charles. Napoleon's intention was to bring the Archduke, and
the Army he commanded, to battle, to defeat them, and to end the campaign.
All the normal crossing places were being closely watched by the Austrians. Napoleon looked for other ones.
He settled on a place a little to the east of Vienna, where the Danube was wider but slower, and where a large wooded island, called Lobau, lay close to the river's north bank.
Lobau would serve as a safe staging ground. A French Advance Guard established itself there on May 19th.
By mid-day on the 20th a bridge to Lobau was complete. Massena's IV Corps began to cross.
The river's north bank opposite Lobau was dominated by the villages of Aspern and Essling. Both were composed of stone houses surrounded by stone walls and ditches.
Both had buildings that would serve as strongpoints.
Aspern to the west was the larger village and had a church and a walled cemetary on its west side. Essling had a large granary with thick walls on its north side.
A road and ditch lay along the line joining the villages.
The French bridge over the Danube broke during the night of the 20th and 21st. Still by the morning of the 21st Massena had managed to get three of his four infantry divisions across. Molitor's division was holding
Aspern with Legrand's in support. Boudet's division was holding Essling. Marshal Lannes took command of Essling's defense so that Massena could concentrate on Aspern.
The area between the villages was held by cavalry. Lasalle's Light Cavalry Division had crossed the day before. Marulaz's Light Cavalry Brigade and d'Espagne's Heavy Cavalry Division
had crossed first thing in the morning over the newly repaired bridge. Napoleon was planning on the pursuit of a retreating enemy.
The Austrians, in fact, had been marching most of the night in order to be in place to attack. They intended to launch a massive four Corps, five columns converging atttack on the French bridgehead.
In the event it wasn't until early afternoon that the French first saw the attacking Austrian columns, and it was almost three before the first serious attacks were made.
By 4:30pm the Austrian's had taken the church and cemetary at Aspern and most of the rest of the village. Molitar had lost about half his men in the process. French reinforcements from Legrand's
division forced the Austrian's back and for the next couple of hours control of the village passed back and forth in a vicious see-saw. Finally the arrival of Massena's fourth division
under St.Cyr managed to stabilize the situation with the French controlling part of Aspern and the Austrians the rest.
The Austrian attacks on Essling were ill-coordinated and much later the last one not going until 9:00pm and fighting continued until around 11:00pm. As at Aspern they had only
partial success after heavy fighting that cost both sides heavily.
The French had only had limited reinforcements during the day because of breaks to their bridge, during the night of the 21st/22nd they got the Guard and the
the three infantry divisions of the II Corps across more than doubling their infantry strength. Napoleon prepared to cross over III Corps as soon room had been
made to deploy it.
The fighting, as intense and vicious as before, started up again around 4:00am, by 7:00am the French held both villages. The three divisions of Lanne's II Corps, their flanks secured,
attacked in the center. The Austrians, however, supported by their superior artillery held, by 9:00am Lannes attack had stalled. The bridge failed again removing any
chance of reinforcements and by mid-day the French had been forced back to line between Aspern and Essling. By 1:00pm the Austrians held Aspern again despite part of
the Young Guard having been committed there. By 3:00pm the Austrians had managed to retake Essling only to be pushed again by a counter-attack of the Guard.
Both the Austrian's and the French decided they'd had enough. Napoleon began to organize a retreat to Lobau and Charles settled for harassing the French with a massive
artillery bombardment.
The French and Allied casualties were about 23,000 men.
The Austrians also lost about 23,000 men.
Truth is the first casualty of war. Both sides lied about Aspern-Essling, the French claiming a minor setback caused by the flooding of the Danube and only admitting to at most
a fifth of their true losses, and the Austrians claiming they'd destroyed the entire French army under Napoleon.
In fact it'd been a severe blood letting for both sides. The Austrians had caught a portion of the French Army across river and mauled it severely, and then repulsed a major attack
by some of the best soldiers the French had. A number of French divisions lost half to a third of their strength and officier losses, including Marshal Lannes and
several division commanders, were high. On the other hand this had cost the Austrians dearly despite their numerical superiority and they had not managed to out right destroy any
portion of the French army let alone all of it.
Politically Aspern-Essling was a major set-back for Napoleon. It was clear he'd met some sort of repulse, in person, and with heavy losses. The air of invincibility he'd once
worn had been diminished.
|
5-6 July 1809
|
|
French Army under
Napoleon
with about 180,000 men and more than 500 guns.
|
Austrian Army under
Archduke Charles with about 140,000 men and maybe 450 guns.
|
|
|
In his second attempt to cross the Danube Napoleon again chose to use the island of Lobau.
His preparations were this time more careful. He built multiple bridges of improved design and ensured they were properly protected from floating missiles.
He greatly increased his artillery using many pieces looted from Austrian stores.
He gathered together his full strength calling in significant reinforcements that included Eugene's Army of Italy, Davout's III Corps, and Bernadotte's IX Corps of Saxons.
Also this time except for a feint by Legrand's division of Massena's Corps, Napoleon attacked from the South-West corner of Lobau not the North-West one.
The attack began on the night of the 4th July at 11:00pm amidst icy rain, and the thunder of both storm and artillery. It took only five minutes for the French to swing
a pre-prepared pontoon bridge over the last stretch of water and for Massena's troops to begin crossing.
By nine in the morning on July 5th Massena's troops had forced elements of Nordmann's Advance Guard out of Gross Enzersdorf north of the main crossing. By ten the three leading French Corps
of Massena, Oudinot and Davout, were
deployed on line between Gross Enzersdorf and Wittau covering the crossing of the remainder of the army.
Around two in the afternoon the French began to roll North and West. Massena atacked west, taking Essling by 2:30pm and wresting Aspern from Klenau's VI Corps by 4:30pm.
Oudinot and Davout marched north to a line on the Russbach between Wagram and Markgrafneusiedl.
These movements opened a gap between Massena and Oudinot which was filled by Bernadotte's IX Corps and Eugene's Army of Italy.
By 6:00pm the entire French army had successfully deployed in a great arc that ran on a line from Aspern north to a point just south of Wagram and then east to Markgrafneusidl.
It was late but, to the Austrian surprise, Napoleon decided to attack. Despite heavy see-saw fighting near Wagram
these late attacks on the 5th failed.
On the next day, July the 6th, Archduke Charles seized the initative with an attack around 4:00 am in the morning by Rosenberg's Austrian IVth Corps against Davout's French III Corps
on the French right near Markgrafneusidl.
Rosenburg enjoyed some initial success, but other Austrian attacks that were supposed to be occurring at the same time against the French left, were delayed and Napoleon was able to
deploy his reserves to bolster Davout and finally push Rosenburg back.
Meanwhile the delayed Austrian attack on the French left flank was getting underway. It was Charles main effort and he committed four Corps to it, from north to south these
were Bellegardes I Corps, Lichtenstein's Reserve Corps, Kollowrat's III Corps, and Klenau's VI Corps. Bellegarde got sucked into a bitter fight for Aderklaa with Bernadotte's and
Massena's Corps. Initially he had considerable success routing Bernadotte's Saxons, but Napoleon was able to redeploy his reserves and re-gain the village. Concerned with their
flanks Lichtenstein and Kollowrat did not push their Corps beyond a line with Bellegarde's. Klenau VI Corps which faced only Boudet's divison of Massena's Corps enjoyed
greater success and had reached Essling by around 09:00 am. The Austrian's were in the French rear but Lobau was no soft target, in fact, the artillery massed there inflicted
considerable damage on Klenau.
Back on the French right flank Davout launched a carefully prepared attack on the Austrians near Markgrafneusiedl around 10:00am .
At about the same time Napoleon sent Massena's Corps, covered by cavalry and Grand Artillery battery, on a march south across face of the Austrian III Corps and Grenadier Reserves to counter-attack Klenau.
With Massena having pushed back Klenau and Davout making progress on French right the battle the climax of the battle had been reached.
Napoleon prepared to crack the Austrian center south of Wagram. He chose MacDonalds Corps of the Army of Italy to make the attack.
MacDonald's troops pushed forward in a great hollow oblong, with heavy support from the Guard artillery, they managed to split the Austria army.
The cost was very heavy, only 1,500 men of an original 8,000 were left standing.
Learning reinforcements under his brother the Archduke John would not arrive in time, Charles realized he'd lost the battle and began a phased retreat around 2:30pm
The French and Allied casualties were about 32,000 men killed and wounded, and an additional 7,000 men as prisoners. They lost about 40 guns.
The Austrians lost about 23,000 men killed and wounded, 7,000 prisoners, and 10,000 men missing many of whom later returned to their units.
They lost about 20 guns
Wagram was a French victory. After a vigourous French pursuit and further fighting at Znaim the Austrians sued for peace
It wasn't a victory in the old style though. It wasn't gained by rapid manouver against superior numbers and didn't result in the disintegration of the opposing forces.
Napoleon assembled superior numbers of men and guns at Wagram, and he used them in costly, bloody frontal attacks. Despite heavy losses the Austrian army remained intact and retreated in good order.
Although it was a French victory, after Wagram the leadership of Europe could envision a day when properly organized forces, superior in numbers, might beat the French in the field.
|
Smolensk ,
Borodino ,
Maloyaroslavets ,
Beresina Crossing
16-18 August 1812
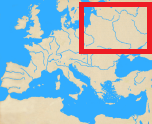
|
French Grande Armee under Napoleon
had about 175,000 men.
|
Russian Army of the West under Barclay de Tolly with 50,000 men.
|
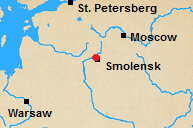
|
Smolensk lies about halfway along the road from Vilna to Moscow. It's an ancient border fortress on what was long the border between Poland-Lithuania and Russia.
The town was not, given the military technology of 1812, particularily defensible and it is north of the road to Moscow rather than right on it. Napoleon could have masked it and marched east to cut
the Russian line of retreat.
Instead he chose to make a direct assault on the town itself with three of his Corps. They faced a single Russian Corps originally commanded by Raevski, but later
taken over by Docturov. Both put up a determined defense.
The bulk of the Russian forces, the now combined 1st and 2nd Russian armies of Barclay and Bagration, were mainly on the heights north of the city across the river Dneiper.
A detachment to the east held the crossroads on the way to Moscow.
Napoleon at great cost, both to his own troops and the city itself, duly took Smolensk, and Barclay, his hand forced by Bagration, continued the retreat to Moscow stealing away on the night of the 18th.
Russian disorganization provided the French a chance to cut the Russian retreat off. However, Junot, the Corps commander given the task of doing so, failed to act with sufficent dispatch.
The French casualties were about 10,000 men.
The Russians lost about 11,000 men.
A deep emotional blow to the Russians the loss of Smolensk was technically a Russian defeat. In truth it marked a significant strategic failure on Napoleon's part, Smolensk
was as far into the Russian Empire as Napoleon had originally planned to go. He was not unaware of the logistical problems in plunging further into Russia. His plan
was to have met and decisively defeated the Russian Army well before reaching Smolensk. To have reached Smolensk and have still not inflicted a major defeat upon the
Russians was strategic failure.
Napoleon had two choices; one, to consolidate his gains of 1812 and winter his army in Lithuania and Western Russia then resume the campaign the next year, or, two,
to lunge for Moscow seeking to force the Russians to stand and fight, to defeat them roundly, take their capital and force them to the negotiating table.
Napoleon chose the lunge for Moscow. It was a fatal choice.
|
7 September 1812
|
|
French Grande Armee under Napoleon
with about 133,000 men and 587 guns.
|
Russian Army of the West under Kutuzov with 120,000 men and 640 guns.
|
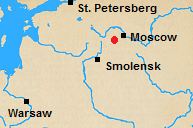
|
Borodino is about 70 miles or 115 kilometers west of Moscow along the road from Smolensk and one of the few places a large army
could deploy in defense. The Russians felt unable to surrender Moscow without a fight and it was at Borodino they chose to stand.
The Russian left to the north was covered by a river obstacle, the village of Borodino lay in the center, field fortifications
helped cover the center-right, and finally, the far right was anchored in woods occupied by irregulars.
Napoleon decided to ignore the northern flank and launch a massive in-depth attack on the Russian center and right. He sent a single Corps under
Poniatowski to attempt an unflanking movement around the Russian southern flank.
The main battle in the center began at 5:00am and proved to be one of brutal attrition. Kutusov drew on his unengaged left as a source of reserves
to bolster his center time after time. A Cossack led flanking manouver to the north proved no more than a distraction. At great cost
the French managed to take almost the entire Russian line. The Russians, however, remained unbroken having merely retreated to the next ridge line.
By mid-afternoon everyone in the center had had enough. By 5:00pm twelve hours after the battle had begun even Poniatowski's efforts on the flank had petered out.
The French casualties were about 33,000 men.
The Russians lost about 40,000 men.
Borodino might be considered another technical victory for the French in that they had inflicted heavier losses on the Russians, and in that they had forced the Russians to retire
and eventually to abandon their former capital of Moscow. The Russians, however, could better afford the losses than the French and strategically Napoleon had
needed a decisive victory, something in the nature of the total destruction of the main Russian force. He hadn't got that. The gamble he'd made after Smolensk had failed,
although it took him some while to realize that.
|
24 October 1812
|
|
French Grande Armee under Napoleon
had about 90,000 men; Eugene's IV Corp the force actually engaged had about 15,000 men.
|
Russian Army of the West under Kutuzov with maybe 110,000 men; Docturov's Corp with 20,000 men bore the brunt of the fighting .
|
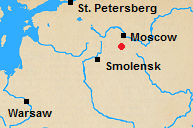
|
Maloyaroslavets is some 110 kilometers south west of Moscow. It lies where the "New" Kuluga Road crossed the River Lusha. The "New" Kaluga road being the first link of the southern route from Moscow
to Smolensk. Napoleon had decided to take the southern route, undevestated by the march on Moscow, back to Smolensk and he needed the bridge at Maloyaroslavets.
Kutusov sent Docturov and his Corps to hold Maloyaroslavets. Napoleon sent Eugene and his Corps to take it.
They fought the entire morning of the 24th. Only reinforcements from Raevski's Corps let Docturov hang on as long as he did, but by mid-day Eugene held the village and bridge.
The Russians didn't go far though. They remained deployed on a ridge within artillery distance of the bridge. Eugene had captured the bridge but not a crossing, and the rest of the
Russian army was coming up.
On the 25th Napoleon decided against bringing on a major battle and turned the Grande Armee north-east back to the devestated northern route to Smolensk.
The French casualties were about 5,000 men.
The Russians lost 6,000 men.
Some commentator's claim that taking the northern route back to Smolensk sealed the Grande Armee's fate as there was no sustenance there. Others retort
that there was no sustenance anywhere in Russia for a large army, that any large army needed proper magazines filled via a proper supply line and that the closest thing
the French had to a supply line lay along the main northern route.
Most likely at this remove there is no resolution possible to this debate. Still it seems hard to believe that there weren't some advantages to the undevestated route, fewer
angry peasants, more unburnt huts to shelter in, and some food supplies that had escaped pillage. Napoleon seems to have thought so and to have only given the advantages up
when it was clear his now outnumbered men would have to fight a pitched battle with the Russians to gain them.
|
25-29 November 1812
|
|
French Grande Armee under Napoleon
had maybe about 45,000 effectives and 250 guns, plus in the neighborhood of 40,000 stragglers.
|
The Russian Army of Moldavia under Chichagov with 34,000 men was Napoleon's main opponent.
The Russian I Corps (in effect the Army of the Dvina) under Wittgenstein with 30,000 men pressed the rear-guard.
The Russian Army of the West under Kutuzov with 65,000 men was a passive threat not an active participant.
|
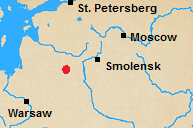
|
Admiral Chichagov had unexpectedly marched from the south and severed Napoleon's supply line by taking Minsk. The Admiral attempted to deny Napoleon the route to the next French depot
at Vilna by deploying forces along the Beresina river, the main obstacle lying in the French path. At the same time Wittgenstein's Forces were closing on Napoleon from the north.
Kutusov with the main Russian Army trailed Napoleon at a distance. All the Russian generals at this time mistook the large number of French stragglers for effective troops and
thus underestimated the numerical advantage they enjoyed. They also retained a healthy respect for French military ability. Napoleon's in particular.
The Russians held the main crossing of the Beresina at Borisov securely, but Napoleon learned of a possible crossing at the village of Studienka to the north of Borisov and decided to attempt it.
A fient by Oudinot's II Corps succeeded in drawing away the Russian force that had been guarding it and by early afternoon on the 26th two bridges, one for vehicles, had been built and Oudinot
was across the river and had secured a bridgehead with his 11,000 men. Oudinot spent the 27th defending that bridgehead.
On the other side of the river Victor's IX Corps held off Wittgenstein's attacking forces allowing Eugene's IV Corps and Davout's I Corp to cross. By the evening of the 27th non-combatants
were being allowed across. By the morning of the 28th Wittgenstein's Russians were within artillery range of the bridges. They broke the larger bridge and worked havoc among the stragglers
and non-combatants. A stampede clogged the bridges. Still most of the rear-guard got across on the night of 28th and 29th. At the nine on the morning of the 29th the French burnt their bridges.
The French losses, especially among the stragglers and non-combatants, had been severe but a signficant portion of Napoleon's Army escaped the Russian trap.
The French lost about 25,000 effectives, 25 guns, and maybe 30,000 stragglers and refugees.
The Russians lost about 20,000 men.
Some call the Beresina Crossings an outstanding victory for Napoleon in that he managed to save a significant portion of his army from certain surrender or annilhation, but under any other
circumstances the losses the French took at the Beresina would have been considered a horrible disaster.
In the event many of the rank and file saved died on the bitterly cold road back to Germany and Poland, but Napoleon did manage to preserve a substantial core cadre of officiers and NCO's
around which he built new armies. If neither he nor that cadre had made it out of Russia it's hard to see how the Napoleonic Wars could have lasted another three years.
|
Lutzen ,
Bautzen
2 May 1813
|
|
French Grande Armee under Napoleon
eventually gathered about 110,000 men on the field.
|
The Allied Army under Wittgenstein with 73,000 men and 500 guns.
|
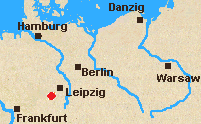
|
It was spring and Napoleon had raised a new Army.
It was the beginning of May to be precise and Napoleon was marching that new army back into Germany, in an attempt to restore the situation there. His
Corps were strung out in long columns along the road to Leipzig in central Saxony.
Lauriston's V Corps was in the lead approaching Leipzig, MacDonald's XI Corps was next, the Guard was near Lutzen as were three divisions of Ney's five division III Corps.
Mormont's VI Corps was marching towards Lutzen on the road from Weissenfels. A few miles south-west of Mormont Bertrand and his IV Corps were marching north-east to right rear of the main
army and parallel to its route.
Two of Ney's divisions, Girand's in Starsiedel south-east of Lutzen and Souham's around Gross-Gorschen south of Lutzen, formed the army's right flank guard.
The Allies, with Wittgenstein at least nominally in command, had decided to counter attack. They massed south west of Leipzig and then marched north west
against the French right flank, towards roughly the middle of the long strung out column the French Army formed. The Allies intended to defeat what they believed to be
a weak flank guard south of Lutzen, split the main French army around Lutzen itself, and then in succession engage the French Corps to the east, rolling them
up against the Elster river. The defeated French would be trapped by that river.
Wittgenstein had planned to launch his attack at 7:00am, but it was almost noon before the initial attack under Blucher went in. Blucher hit Souham
in the Gross-Gorschen area and the surprise was mutual. The French surprised at being attacked at all, the Prussians at encountering a whole division.
They'd only expected a couple of thousand men.
Napoleon was a few miles away at Markranstadt, roughly half way between Lutzen and Leipzig. He heard the cannon fire from Blucher and Souham's fight and quickly realized what was happening.
His reaction and orders were immediate. Ney was to hold, Mormont would form on his left, MacDonald on his right. Bertrand was to flank the Allies on their left, the best part of
Lauriston's Corps would flank the Allies on their right.
Around Gross-Gorschen the fighting was vicious, each side feeding in troops for counter-attacks as they arrived. Ney led his divisions that been around Lutzen in the
first set of French counter-attacks, then Girard freed by Marmont's arrival at Starsidel was fed in. Still by the time Napoleon arrived, around 2:30pm, Ney's troops were faltering and
the situation was critical for the French. By personal intervention and with the help of the Guard, Napoleon managed to stabilize the situation.
The battle continued to ebb and flow as each side fed in new troops, but by 6:00pm Napoleon was ready to launch his decisive counter-attack. He began by massing a battery
of 70 guns, moving it to within canister range of the Allies, and blowing their center out. He committed the Guard as well as the III Corps against the resulting hole.
The attack became general as the French attacked all along the line.
Despite being greatly outnumbered and attacked on both flanks the Allies, very much superior in cavalry, managed to withdraw intact.
The French lost about 20,000 men.
The Allies lost at least 11,500 men, maybe as many as 20,000.
Lutzen was tactically a French victory and showed neither Napoleon nor his new army were to be trifled with. It was not, however, decisive as Napoleon
had neither the cavalry nor the hardened hard marching veterans to launch one of the decisive pursuits that used to be his trademark.
|
20-21 May 1813
|
|
French Grande Armee under Napoleon
had about 155,000 effectives and 150 guns. Ney brought a further 96,000 men to the field.
|
The Allied Army under Wittgenstein with 96,000 men and 450 guns.
|
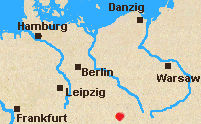
|
By the 15th of May the advance guard of Napoleon's main army had reached the river Spree near the town of Bautzen, some 60km east of Dresden. The Allies under Wittgenstein had decided to concentrate there.
Ney, effectively in command of a second French army of about half the strength of the main one, was concentrating to the north around Luckau about half way to Berlin.
Neither side was clear about what the other was doing, or about their own plans.
In the event the Allies decided to remain together and to give battle behind the Spree at Bautzen. Napoleon discerning this planned to attack frontally with his main army to pin them, and
to bring Ney down from the north to attack the Allied right flank and communications.
Unfortunately for the French Napoleon settled on this plan only after sending Ney orders that meant he wouldn't be able to concentrate his full forces for the projected flank attack and without
fully informing Ney of the situation at Bautzen. So Ney thought the Allies were further west on the left bank of the Spree and Napoleon was expecting Ney's full army. Both in error.
This confusion was to cost the French dearly.
Ney having informed Napoleon that he would arrive in force on the Spree by the 21st, Napoleon duly launched his main attack at noon on the 20th concentrating on the Allied left.
Oudinot's attack there with his XII Corps made good progress exacerbating Allied fears for that flank.
Later attacks by MacDonald's XI Corps and Mormont's VI Corps to the north also succeeded in pushing the Allies back and gaining footholds on the east bank of the Spree.
The 20th ended with the main French army, at some cost, having fixed the Allies attention and in good position to continue it's attacks the next day.
The 21st started early with Allied counter-attacks against Oudinot. This suited Napoleon's plan and he denied the hard-pressed Oudinot the reinforcements he requested.
Despite Oudinot's problems in the south mid-morning (10:00am) saw the French center marking time and Ney with a substantial force and more coming up established on and behind
the Allied left flank.
The Allies were in danger of being flanked and cut-off.
The question was what would Ney now try to do. He had three basic options. One, attack the rear flank of the Allied forces on the left. Two, move to cut the line of communications (and retreat) for
the entire Allied army. Three, attempt to split the difference and his forces and try to do both. Ney chose the third option.
Ney has been harshly critized for this ever since. He failed to cut the Allied communications and they managed to escape.
Ney certainly seems to have misinterpreted the spirit of the orders he recieved the morning of the 21st, but they were unclear and only the latest of a series of unclear and confused orders
he had received from Napoleon's headquarters. In the event seeing the Allied forces still apparently unengaged and defeated it was not unreasonable he should attack them.
Ney's attacks and those by the main French army forced an Allied retreat, but the Prussians in the north and the Russians in the south both managed to do so in good order. Ney was
not in place, not in time, to stop them.
Without adequate cavalry or the hard marching veterans of previous years, and without forces astride the Allied line of retreat, Napoleon could not stop them or turn their retreat into a rout.
Bautzen was French victory, but a costly and indecisive one.
The French lost about 20,000 men.
The Allies lost about 20,000 men.
Bautzen was a disappointment for both sides. Napoleon had failed to get the decisive battle of annihilation he believed he needed. Also the battle had revealed significant
weaknesses in French fighting power and organization. Napoleon's men were undertrained and exhausted. The Allies had escaped annihilation by a hair's breadth and taken terrible
losses of their own. The Russians in particular believed they needed time to rest and reorganize after the strains of the winter of 1812 and the spring of 1813, they wished to
fall back towards Poland. The Prussians wanted to defend both Silesia and Berlin. Contemporaries report that the Allied leadership laughed with joy when Napoleon agreed to an
armistice on the 2nd of June. Napoleon later admitted it was one of his worst mistakes.
|
Gross-Beeren ,
Dresden ,
Katzbach ,
Kulmn ,
Dennewitz ,
Wartenburg ,
Leipzig
23 August 1813
|
|
The French Army of Berlin under Marshall Oudinot
had about 66,000 men and 216 guns.
|
The Allied Army of the North under Bernadotte,
Bulow's and
Tauentzien's Corps with about 70,000 men and 112 guns actually engaged.
|
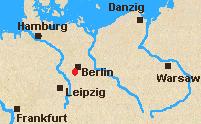
|
Napoleon had ordered Oudinot to take Berlin. He gave him three infantry corps and a cavalry corps for the task.
Both of the French commanders underestimated the task they faced. The Prussians were raw, the Swedes unblooded in battle, and Bernadotte was known for his caution,
but the French troops were themselves very green, and furthermore most of them not French at all but Italians, Wurttemburgers (2 of the 3 divisions in Bertrand's IV Corps),
Saxons (2 of the 3 divisions in Reynier's VII Corps), Bavarians, and Westphalians (2 of the divisions in Oudinots own XII Corps), and, therefore, of doubtful loyalty.
Moreover the Russians bolstered their allies with veteran artillery and light cavalry units. So quality wise there was little to chose and the Allies also had rough equivalence in numbers.
The French had the burden of taking the offensive. Additionally the terrain was difficult being heavily wooded and divided by swamps and water courses,
which would prevent easy support between forces taking different roads.
The record is skimpy, and far from free of bias, but Oudinot does not seem to have done much to address these problems.
His own attitude was definitely far from optimistic and there is no record of his having taken measures to improve the morale of his units or the coordination between them.
It is certain that his advance was ill-coordinated each of the Corps advancing by a separate road and out of each other's supporting range. Bertrands IV Corps took the easternmost
road on the French right, Reynier's VII Corps took the Center road, and Oudinot's XII Corps took the westernmost road on the French left (as did the cavalry and Oudinot himself).
Bertrand's Corps was the first to engage. He spent the most of the morning and early afternoon of the 23rd failing to push the outnumbered Tauenzien (13,000 men and 32 guns) out of Blankenfelde.
Reynier in the center managed to take Gross-Beeren against weak resistance in the early afternoon. It was raining heavily and his troops were making supper when Bulow counter-attacked
with his full Corps. After initially fighting hard the Saxons holding the town broke and ran taking a division coming up to their aid with them. Reynier covered his retreat with
his remaining division. Aid in the form of some cavalry from Oudinot's force arrived too late and the battle petered out with a cavalry skirmish.
Impressed by the numbers and fighting spirit of the Prussians, and doubtful of the reliablity of their Saxon troops, Reynier and Oudinot threw in the towel and retreated back to
Wittenburg on the Elbe.
The French lost about 3,000 men and 13 guns.
The Allies lost about 1,000 men.
The immediate consequence of Gross-Beeren was, of course, the collapse of Oudinot's attack on Berlin. It also left the other French forces advancing in
Northern Germany out on a limb. Davout managed to get back to Hamburg safely, but the reinforced division under Girard that had been advancing from Magdeberg received a
thorough mauling. Gross-Beeren was a major boost to the morale of the still mostly green Prussian soldiers. More broadly the loss of Berlin would have been a servere political set back to the Prussians,
and the chances of the Alliance holding together. It would have also been a signficant practical set-back to the Prussian ability to recruit and support armies.
Oudinot's troubles, along with those of MacDonald in Silesia, also distracted Napoleon at time when he should have managing the pursuit of the Army of Bohemia after his victory
at Dresden. It is likely Gross-Beeren contributed to the disaster that occurred at Kulm.
|
26-27 August 1813

|
French Grande Armee under Napoleon
had about 177,000 men.
|
The Allied Army of Bohemia under Schwartzenburg with 230,000 men.
|
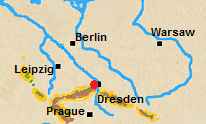
|
Dresden was the last major depot in Napoleon's line of communications and full of supplies. St.Cyr and his XIV Corps were charged with its defence
while Napoleon pursued Blucher's Army of Silesia.
This was not what the Allies had expected. They had launched the huge Army of Bohemia through the mountains north towards Leipzig thinking that
Napoleon would fall first on the Allied Army of the North, defending Berlin under the command of Bernadotte. They hoped to arrive in Napoleon's
rear as he was doing so.
When they learned that Napoleon was instead marching into Silesia they decided to convert the Army of Bohemia's attack into a short hook north eastward to Dresden.
The change of plan resulted in considerable disorganization. The Army of Bohemia had crossed into Saxony on the 22nd; its first elements reached Dresden on the 25th, but much
of the allied force remained behind, tangled in forests and on mountain roads far to the rear.
Short of their planned strength, facing an active defence from St. Cyr, and being unaware of how heavily they outnumbered him, the Allied leadership hesitated and argued.
Thinking Napoleon was still days away Schwartzenberg made the decision to delay his attack until the next day, the 26th.
Napoleon arrived with his Guard close behind early on the 26th.
While the Allied leadership argued more, their pre-planned attack went ahead. Napoleon doled out just enough support to St.Cyr's hard pressed troops to stop the Allied attack,
inflicting disproportionate casualities on them in the process. That done he counter-attacked with his carefully husbanded reserves. It was a bad day for the Allies.
During the night Napoleon received the corps of Victor and Marmont as reinforcements. Both sides planned attacks for the 27th, the Allies in the center, the French on both flanks.
In the event it was the French who prevailed. They crushed the Austrians on the Allied left, they pushed back the Russians and Prussians on the right, only in the center was
Napoleon frustrated. He expected another days fighting on the 28th would be necessary to reach his goals there.
Unbeknownst to him he had killed his former rival Moreau with a cannonball there, only narrowly missing the Czar in the process. This may have taken a lot of the heart out of the
the Allied resolve. The Allies broke contact and began to withdraw during the night.
The French lost about 10,000 men.
The Allies lost about 38,000 men and 26 guns.
Dresden was a severe blow to the main Allied army and the morale of the Allied leadership. Properly followed up it might had led to the Army of Bohemia's destruction.
It showed that the French under Napoleon even outnumbered were still a force to be feared.
|
26 August 1813
|
|
French Army of the Bober under MacDonald
with about 101,000 men.
|
The Allied Army of Silesia under Blucher with 105,000 men.
|
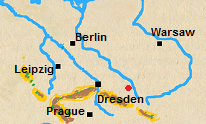
|
Napoleon having marched to the aid of Dresden, MacDonald was left in charge of the French forces in Silesia
Against orders he continued the pursuit of Blucher's Army of Silesia (made up of mainly Russians and Prussians).
MacDonald's forces were strung out and the weather was bad when Blucher turned back to attack.
Neither side expected the resulting encounter, but the French got by far the worse of it.
The XI Corps under Girard, the center of a broad and disconnected French advance, was caught alone and half way across the Katzbuch by Yorck's and Sacken's Allied Corps.
The heavy rain kept infantry muskets from firing giving full rein to the Allied superiority in cavalry and artillery. Their retreat impeded by the flooded
Katzbach the leading French units suffered heavily.
This nasty setback was turned into a disaster for the French Army of the Bober by an aggressive and efficient pursuit by the intact Allied left wing Corps under Langeron.
The French lost about 15,000 men.
The Allies lost maybe 4,000 men.
Katzbach gave the green and demoralized Army of Silesia a significant boost in morale and began a tradition of hard fighting that lasted until the end of the Napoleonic Wars.
It's counter factual history, of course, and therefore entirely speculative, but one has to wonder if without the ever aggressive Blucher and his Army on the battlefield of Leipzig later in 1813,
in France in 1814, and Belgium in 1815 whether Napoleon's descendants might still be ruling in France.
The immediate operational effect of the battle was the demoralization and retreat of MacDonald's Army of the Bober. Napoleon was distracted from following up after his victory at Dresden and
forced to come to MacDonald's aid.
|
29-30 August 1813
|
|
French I Corps under General Vandamme
had about 34,000 men.
|
The Allied Forces were in two parts, a holding force of mostly Russians under Ostermann-Tolstoy that started with about 15,000 men on
the 29th and ended with about 44,000 men on the 30th.
and a "flanking" force of Prussians under von Kliest with about 10,000 men.
|
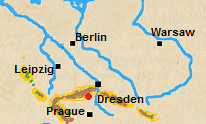
|
Vandamme's I Corps took the lead in the French pursuit of the Allies after Dresden. This retreat was south to Bohemia along narrow and constricted mountain roads.
As Napoleon's attention was elsewhere, the movements of the other French Corps under St.Cyr and Marmont were not well co-ordinated with Vandamme's.
Vandamme was heading for the vital road junction of Teplitz, if he reached it much of the Allied force would be trapped in the mountains to its north. Among them
Czar Alexander himself.
Just after the town of Kulm and at the last good defensive position before Teplitz the Allies mounted a defense of elite Russian troops under the command of Ostermann-Tolstoy.
The fighting began early on the 29th and at first Vandamme had the advantage of numbers, but the Russians died hard, and gradually throughout the day were reinforced. The 29th
ended with Vandamme having failed to dislodge the Allied defense and no longer having the advantage of numbers.
The loss of his numerical superiority did not discourage Vandamme and on the 30th he launched a full out attack on the Allied defenders. While he was engaged in this, an Allied
Corps of Prussians under von Kliest appeared in his undefended rear.
Half of Vandamme's Corps managed to fight their way out of the trap, but they left half of their number behind. Their losses included all their guns and Vandamme himself.
The French lost about 20,000 men and 82 guns in both days battles.
The Allies lost about 10,000 men again over both days.
The Allies defensive success at Kulm saved the Army of Bohemia. The trapping and near destruction of Vandamme's well trained Corps more than offset the Allied losses at Dresden.
Dresden might have been the victory that won the campaign for Napoleon, Kulm rendered it empty.
|
6 September 1813
|
|
The French Army of Berlin under Marshall Ney
had about 58,000 men.
|
The Allied Army of the North under Bernadotte with about 80,000 men.
|
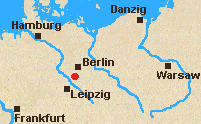
|
After Oudinot's failure Ney was appointed to command the Army of Berlin, mainly consisting as before of Oudinot's XII Corps, Reynier's VII Corps and Bertrand's IVth Corps.
Napoleon ordered Ney to attack Berlin and promised to be there in person with an additional Corps, in the event Napoleon had to put out fires to the south, and Ney had to attack on his
own with what he had.
Amazingly the French again underestimated their opponents, moved widely separated, and failed to support each other. This time they came up against Prussian resistance in the area of
Dennewitz some 65 kilometers south-west of Berlin in an open sandy area. They blamed heavy wind and blowing sand and dust for their being unable to see what was happening on the
whole battlefield.
It was Bertrand's IVth Corps and Tauentzien's Prussian Corps that clashed first near Dennewitz. Bertrand attacked around 11:00am.
Initially the French got the better of it, pushing the Prussians back north west to the
area around Nieder Gorsdorf, but then Bulow's Corps arrived.
Bulow arrived around 12:30 on Bertrand's left (southern) flank and by 2:00pm had all but beaten Bertrand when Reynier turned up with most of his Corps on Bulow's southern flank
At the cost of exhausting his own troops Reynier in his turn had almost beaten Bulow by between three and four in the afternoon. Oudinot was arriving in his rear and Reynier requested
his aid in finishing Bulow. Oudinot refused. This was because of his having received an order from Ney to reinforce Bertrand on the northern flank.
Ney was unaware of the situation on the southern end of the battlefield, but Oudinot, nevertheless, obeyed and
marched, rather slowly, north.
Most commentators believe this obediance was malicious motivated by Oudinot's resentment at having been replaced by Ney, and that he knew his action would cost the battle.
If Oudinot had been a British admiral rather than a French general he would have been shot.
Shortly after Oudinot had marched off an Allied attack broke Reynier's troops, neither did Oudinot reach Bertrand in time to save him from defeat. Oudinot's uncommitted troops were then carried
away by the retreating soldiers of the other two Corps. Pursued by newly arrived and therefore fresh Swedes and Russians the French Army of Berlin dissolved into rout sometime between five and six
in the evening.
The French lost about 10,000 men.
The Allies lost about 7,000 men.
The loss at Dennewitz put paid to Napoleon's hope of taking Berlin and defeating the Allied Army of the North, a smaller army than the Army of Bohemia, a less aggressively commanded one than
the Army of Silesia, and the Allied Army the least able to retreat because of the political imperative of holding Berlin. It also put paid to his hope of relieving his garrisons to the east.
The disproportionate losses further increased his disadvantage in resources, and of course, Allied morale improved while French morale suffered. So many green soldiers on
both sides meant morale was of critical importance as it often had to substitute for discipline and training.
|
3 October 1813
|
|
The French IV Corps under General Bertrand
had about 13,000 men and 32 guns.
|
Yorck's Corps, part of Blucher's Army of Silesia under General Yorck
with about 12,000 men.
|

|
The Allies were on the offensive in the North which meant they needed places they could safely cross the river Elbe.
Bernadotte with the systematic caution he was notorious for, had secured two crossings for his Army of the North downstream and north of the French garrison at Wittenberg.
Blucher took a more aggressive approach to seizing a crossing for his Army of Silesia which had moved north. He launched Yorck's Corps of Prussians straight across a Russian pontoon bridge at
the strongpoint of Wartenburg which lay on Elbe upstream and south of the French at Wittenberg.
Wartenburg was defended by Bertrand's IV Corps, which had three infantry divisions Morand's just north of Wartenburg, Fontanelli's in reserve just west of it, and Franquemont's
to the south in the village of Bleddin. Bertrand also had a cavalry brigade under Beaumont stationed south-west of Wertenburg in Globig.
Yorck attacked with four strong brigades, Prince Charles of Mecklenburg's, Steinmetz's, Horn's, and Hunerbein's.
Mecklenburg led off and having discovered the terrain made a direct assualt on the town impossible turned south and attacked Franquemont in Bleddin. Steinmetz came up behind and deployed
towards Wartenburg in order to keep Morand busy, a task accomplished at some cost.
While Mecklenburg was busy pushing Franquemont out of Bleddin, Horn arrived between him and Steinmetz and attacked Fontanelli's force which had taken up a strong position immediately south of
Wartenburg. This costly attack was a near run thing but the success of the Prussia assault decided the battle.
It left Mecklenburg, who had succeeded in taking Bleddin and beaten off an attack by Beaumont's cavalry, free to hook around to the French rear behind Wartenburg. Out flanked the French withdrew.
Hunerbein's brigade had crossed the river and was positioned in support of Horn's force, but was otherwise not involved in the fighting.
The French lost about 1600 men.
The Allies lost at least 1,000 men as prisoners as well as 11 guns and an unknown number of killed and wounded.
Although it was only a small battle Wartenburg was strategically significant. Bernadotte had promised to cross the Elbe if Blucher did, Blucher did so and Bernadotte followed.
The foxes were among the hens. The Allies had now significantly constrained the room Napoleon had for maneouver, and they were in position to threaten both his supply lines to
his depots on the Elbe and his communications back to France.
|
16-19 October 1813
|
|
The concentrated French Forces in Germany (minus the Corps of Davout in Hamburg, and St.Cyr and Lobau in Dresden) under Napoleon
about 177,000 men to start with and growing to a strength of about 195,000 men and 700 guns.
|
The converging Allied Armies, technically under the supreme command of Schwartzenburg,
Schwartzenburg's own Army of Bohemia,
Bernadotte's Army of the North,
Blucher's Army of Silesia, and
Bennigsen's Army of Poland.
The Allies started with about 257,000 men around Leipzig and this grew to 365,000 men and 1,500 guns.
|

|
On October 14th Napoleon ordered his forces to concentrate on Leipzig.
There were some exceptions, the main one being the two Corps, St.Cyr's XIVth and Lobau's Ist, he left to defend Dresden. This seems to have been a serious mistake; he could have used those Corps at Leipzig.
The Allies just masked Dresden with second rate troops and therefore did not lack in proportion.
The French position, both militarily and politically, had been getting steadily worse. The French soldiers were wasting away from fatigue and illness,
they were mostly young and unaccustomed to long marches in bad weather on poor rations. Napoleon's German Allies were deserting him and he was in danger of being cut off from France.
He needed a decisive victory. He had to catch one of the Allied armies and beat it throughly.
Napoleon had spent August and September based on Dresden trying to catch either Schwartzenberg's Army of Bohemia or Blucher's Army of Silesia. Both had eluded him.
Dresden had almost been the victory needed, but the defeats at Gross-Beeren and Katzbach had distracted him, and Kulm had saved the Allies.
The first half of October saw him turning north and trying to catch Blucher or Bernadotte, but they had, just barely, eluded him too, ignoring his threat to cut them off from Berlin.
Leipzig was Napoleon's last chance. His plan was for Ney to hold Leipzig and an area north and east of it, while he turned south with the balance of his forces and defeated
the Army of Bohemia. He would pin the Allies in their center around Wachau, flank them on their right, and then once the Allied reserves were committed defending their flank,
commit his own reserves to break through in the center. He expected to be able to draw troops from Ney's force for both the flank attack and the final center attack.
Napoleon was convinced that Bernadotte would not move at all and that Blucher was to the west of the city and could not threaten it from the north until the 17th.
He intended to win his decisive victory on the 16th. Ney ought to have troops to spare.
The Allied planning process was a little more complicated than that of the French. Schwartzenburg was in nominal command. His original plan was that Gyulai's Austrian Corps, and Blucher's
Prussians would launch a diversionary attack on Lindenau, the western exit from Leipzig. Most of the Austrian forces and the Allied reserves would attack between the rivers Elster and Pleisse due
south of Leipzig and Kliest's, Eugen's and Klenau's Corps would attack from a line east of the Pliesse centered on Wachau. This plan would have probably ended with Napoleon annihilating the eastern forces under
Kliest, Eugen and Klenau. The rest of the Austrians would likely have retreated in the face of such a disaster leaving Napoleon free to mop up Blucher and Bernadotte.
Leipzig might have gone down in history as the later day counterpart to Austerlitz, where an overstretched Napoleon baited his foe into a trap, and then inflicted a decisive defeat.
Of course, neither the French nor the Allies were the same as they'd been eight years earlier so perhaps the result would have been different. In any case, we'll never know because
Czar Alexander intervened and insisted that the forces east of the Pleisse be reinforced. In particular, he positioned his reserves to be able to help there.
Additionally Blucher got leave to attack Leipzig from the north rather than the west where he would have been easily contained.
The Allies attacked first, around 0800 on the 16th with Kliest's Prussians storming Markkleeberg on the left of their line, and Eugen's Russians Wachau in the center.
Gortschakoff's Russians on the center right were held up waiting for Klenau's large Corps of Austrians to get into place on the Allied far right.
An Austrian attack under Meerveldt across the Pleisse against the refused French right wing under Powiatowski took heavy losses for little gain.
Despite their initial success by 0930 Kliest and Eugen were stalled and taking heavy losses as Napoleon moved the corps of Mortier, Oudinot and Augereau forward to bolster his line.
He massed his artillery and pummeled the Allies, Eugen's troops in particular, without mercy.
If he'd had the spare troops Napoleon could have launched a counter attack at this point, but MacDonald's and Sebastiani's flanking force was slow arriving. He'd ordered Marmont's excellent corps
to his aid, but it counter marched in the north at Ney's orders to meet an attack by Yorck's Corps of Blucher's army at Mockern. This was the attack Napoleon had believed wouldn't happen until
the next day. Ney sent Bertrand's Corps instead, but it was diverted to Lindenau to help in holding off Guylai. Finally Souham commanding Ney's old III Corps was ordered south, but even Souham
didn't arrive in time to affect the battle around Wachau.
By mid-morning Eugen had lost Wauchau and Gortschakoff's Corps had been driven off. Alexander ordered his reserves up to support his flagging forces.
By 1100 Klenau had finally got into the act, but so had MacDonald and Sebastiani and it was the French who gained ground. Napoleon counterattacked all along the line.
The French pushed the Allies back, but the arrival of Allied reserves and the determination of the Allied infantry, especially Eugen's Russians who took two thirds losses but kept fighting, prevented their
victory from being decisive.
If Alexander hadn't positioned the Allied reserves to be available and then committed them when needed, or if one of Marmont's, Bertrand's, or Souham's Corps had been available when needed, or if either
of the two Corps at Dresden had been available, then maybe the French might have had the decisive victory they needed. But none of those things were so, and strategically Napoleon had failed.
All that remained was to see what he could salvage.
The 17th was a day of mostly inaction. The 18th saw great drama and savage fighting as the Allies now including the armies of Bernadotte and Bennigsen closed in concentrically on the French.
The 18th ended with Saxon's having deserted and the French pushed back, but with Bertrand's IVth Corps having opened a line of retreat west from Lindenau to Weissenfels. Napoleon was already
moving his trains and forces he could spare out of Leipzig through Lindenau.
During the night, a couple of hours into the 19th, the main French fighting formations started withdrawing.
Napoleon almost succeeded in extracting his army intact, but around 0700 a single bridge on the causeway to Lindenau was blown prematurely.
Its single line of retreat broken his rearguard was trapped. In excess of two entire Corps, including many senior officers, were taken prisoner.
The French lost about 73,000 men about 30,000 prisoners on last day, plus about 300 guns and most of their supply train.
The Allies lost about 54,000 men.
Leipzig marked the destruction of the second great French army in as many years. It sealed the loss of Germany, and left little for the defense of France itself.
A less self confident leader than Napoleon would have negotiated for the best peace he could get at this point.
|
Brienne ,
La Rothiere ,
Champaubert ,
Montmirail ,
Vauchamps ,
Craonne ,
Laon ,
Arcis-sur-Aube ,
29 January 1814
|
|
French Army under Napoleon
about 30,000 men mostly raw conscripts.
|
Prussians under Blucher with 25,000 men.
|
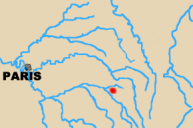
|
The battle at Brienne starting with Napoleon pinning Blucher's Prussians with Grouchy's
cavalry and horse artillery in the late morning at Brienne on the Aube.
The main attack with Ney's Corps and part of Victor's went in in the middle of the afternoon. The balance
of Napoleon's troops attempted to outflank the Allies to the south. Despite setbacks the
French succeeded in taking the town and chateau by evening. An Allied counter-attack failed
and fighting had ended by 10:00pm. The Allies fell back on Bar-sur-Aube and Schwarzenberg's
force during the night. The French followed the next day.
The French casualties were about 3,000 men.
The Allies lost 4,000 men.
Napoleon caught the advancing Allies dispersed and unprepared,
but was only able to bring his own forces up piecemeal.
His raw recruits inflicted greater casualities on the Allies, but not enough to
be a serious setback to them with their vastly superior numbers. Nor was Napoleon able
to follow up his success with a pursuit as Blucher fell back on Schwarztenburg's large and still
fresh army. The Allies were put on notice about the sort of fight Napoleon was going to
give them without having to pay a high price for the information.
|
1 February 1814
|
|
French Army under Napoleon
with 40,000 men mostly raw recruits.
|
Allied Army under the Blucher
with 53,000 men.
|

|
The battle took place in a snowstorm on ground south of Brienne.
The French were in the process of starting to withdraw when they were forced to deploy to meet
a counterattack by Blucher with reinforcments from Schwartzenburg's army. This attack went in
around 1:00pm and the battle raged all day. The French right and center held under heavy attack but
the situation on the left had to be restored by the commitment of the reserve Young Guard.
Napoleon was able to effect a withdrawal after dark.
The French casualties were 6,000 men total, 4,000 killed or wounded, 2,000 prisoners and 50 guns
The Allies lost 6,000 men.
The effect of this battle on both sides morale was disproportionate. The French morale fell and
desertions in the immediate aftermath of the battle reached 4,000 men. The Allies became actively
overconfident.
|
10 February 1814
|
|
French Army under Napoleon
had 30,000
men, tired and many of them
raw recruits with 120 guns.
|
Allied Army; Olssufiev's Russian detachment of 5,000 men which was part of Blucher's Army.
|

|
The French surprised the strung out forces of
Blucher's army. The corps of Marmont and Ney caught Olssufiev's
5,000 Russians by surprise and enjoyed a massive numerical advantage of
six to one. By 10:00 am Olssufiev's pickets were being driven in but
expecting support from the rest of Blucher's army Olssufiev stood and
fought. The support never came and by 3:00pm the Russians had been
driven back through Champaubert. The Russian retreat was cut off by
cavalry that flanked them on both sides.
The French casualties were about 200 men.
The Allies lost 4,000 men many of them taken prisoner including Olssufiev himself.
Another battle that had a disportionate effect on
morale this time in the French favor. This success placed Napoleon
between the two wings of Blucher's army and was the prelude to his
victories at Montmirail and Vauchamps.
|
11 February 1814
|
|
French Army, under Napoleon
had 30,000 men.
|
Allies consisting of Sacken's Corps of Blucher's Army
with 18,000 men and 90 guns.
|

|
Enjoying a position between the two wings of Blucher's army under Sacken and Yorck, Napoleon decided to march on Sacken's Russian Corps.
Delayed by mud and rain the French had only 6,800 infantry and 4,500 cavalry deployed against Sacken by mid-morning.
Furthermore Napoleon was forced to detach a division to hold off the approaching Yorck.
Fortunately for the French their reinforcements under Marmont arrived more quickly than the Allied ones under Yorck.
Launching an attack around 4:00pm with about 20,000 men they routed Sacken's troops pursuing them west until nightfall.
The need to stand off Yorck's force prevented a fuller exploitation of their success.
The French casualties were about 2,000 men.
The Allies lost 4,000 men killed and wounded.
Although a definite French victory Montmirail was not materially decisive. However, it did shake even the ever optimistic Blucher's faith in final
Allied victory.
|
14 February 1814
|
|
French Army under Napoleon
had 25,000 men.
|
Allied Army under Blucher with 20,000 men.
|
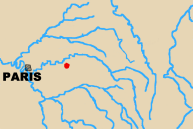
|
Following his successes at Montmirail and Chateau-Thierry Napoleon turned south to deal with Schwartzenburg's forces leaving
Marmont's corps to follow up Blucher's retreat. Blucher counter attacked on February 13th. Marmont slowly withdrew in the face of this.
Napoleon marched overnight to Marmonts assistance. On the morning of the 14th the arrival of French cavalry under Grouchy helped Marmont
repel Blucher's attacks with Ziethen's allied division being severely mauled. Realizing Napoleon was arriving with reinforcements Blucher
disengaged and retreated. This retreat was successful despite the efforts of French cavalry at least partly because the French guns
became bogged down in the prevailing mud.
The French casualties were about 600 men.
The Allies lost 7,000 men killed and wounded and 16 guns.
Napoleon managed to inflict severe material loses on Blucher's forces and freed himself to turn south and deal with Schwarzenburg's
Army of Bohemia. By the same token he'd failed to deal a death blow or force surrender upon Blucher.
|
7 March 1814
|
|
French Army under Napoleon
with 37,000 men.
|
Allied Army of Silesia under Blucher with 85,000 men.
|
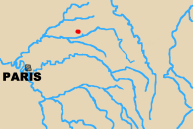
|
Both sides had plans to trap the other. Blucher hoped to pin Napoleon on the plateau at Croanne and then turn his right flank with
a cavalry heavy force. Napoleon unaware of Blucher's plan nevertheless managed to disrupt it with the speed of his advance gaining
a foot hold on the plateau before all of Blucher's forces had arrived on March 6th. He then made plans for a pincer attack on the
Allied forces on the next day. On March the 7th then both sides launched plans of envelopment. The Allied flanking force
under Winzingrode bogged down in marshy terrain. Ney launched the northern french pincer attack early with inadequate artillery
support and was beaten off with heavy losses. Blucher then ordered a withdrawal towards Laon.
The French casualties were about 5,400 men.
The Allies casualties were about 5,000 men.
Croanne was tactically inconclusive. Stategically Napoleon was misled into thinking Blucher more badly beaten than he was
and overstretched himself pursuing the Allied retreat to Laon.
|
9-10 March 1814
|
|
French Army under Napoleon
had about 47,000 men.
|
Allied Army of Silesia under Blucher with 85,000 men and 150 guns.
|

|
Napoleon thought he had Blucher's army on the retreat and wanted to damage it badly enough to at least keep it out of
the fight for a period. Blucher drew his forces up in a strong defensive position in front of Laon and frontal attacks
proved indecisive so Napoleon sent Marmont's VI Corps with 10,000 men on a wide manoeuvre around the Allied
left flank. On March 9th Marmont was surprised by General von Wartenburg and routed. Napoleon held his ground before
Laon during March the 10th before marching south to deal with Schwartzenburg.
The French casualties were about 6,000 men.
The Allies lost 4,000 men killed and wounded.
Neither the Allies nor Napoleon got the results from the battle of Laon they had hoped for. Napoleon had managed to
first impose upon a much larger force than his own then successfully disenage despite a severe tactical setback.
He had needed though a decisive enough victory to remove Blucher's Army of Silesia as a threat to Paris.
The Allies for their part had successfully beaten Napoleon off and went on to claim Laon as a great victory.
In the end this turned out to be strategically true, but at the time there was great bitterness and division over
the failure to follow up the defensive success and severely maul or destroy Napoleon's forces.
|
20-21 March 1814
|
|
The French Army under Napoleon
had 28,000 men.
|
Allied Army of Bohemia under Schwartzenburg with 80,000 men.
|
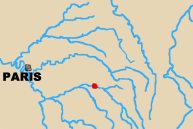
|
Napoleon was attempting an attack on the Allied Army of Bohemia's communication when his cavalry encountered Allied forces under
General Wrede at Arcis-sur-Aube on the 20th. A to and fro cavalry action ensued with the French eventually prevailing. During the
night Schwartzenburg deployed 80,000 troops while the French were reinforced to a strength of 28,000. Napoleon had thought
he was facing a rearguard action when the truth was revealed on the 21st he immediately withdrew. Schwartzenburg failed to
harass him by attacking.
The French casualties were about 3,000 men.
The Allies lost 4,000 men.
Although tactically the French won this battle, strategically it marks the failure of Napoleon's attempt to bluff the
Allies into retreating or halting. Superior manoeuvring could not make up for the lack of strength on the battlefield.
|
Ligny ,
Quatre Bras ,
Waterloo ,
Wavre ,
16 June 1815
|
French Army under Napoleon with about 80,000 men with 210 guns.
|
Prussian Army under Blucher with 84,000 Prussians with 224 guns.
|
| |
Napoleon surprised the Allies in mid-June of 1815 successfully moving across the
French frontier at Charleroi to place himself between the British-Allied and Prussian armies.
The ever aggressive Blucher attempted to concentrate his corps around Ligny to the north-east of
Charleroi and Fleurus. He met the balance of the French army there on the afternoon of June 16th
with the 32,000 troops of Zeithen's corps. The corps of Pirch and Thielmann managed to reinforce
him during the day, but Bulow's corps was too far away and failed to appear for the battle.
The French managed to force the Prussians out of their positions inflicting a punishing but not
lethal defeat upon them. An attempted flanking manouever by Drouet's corps might have made the
battle a decisive one but the unit was recalled by Ney to help at Quatre Bras and failed to
intervene.
The French lost about 12,000 men.
The Prussians likely lost about 16,000 men,.
Against a less aggressive and determined opponent than Blucher the battle of Ligny might have
determined the campaign in the French favor. If the Prussians had retreated on their lines of
communication or even simply sat and licked their wounds Wellington would have left to face
Napoleon alone at Waterloo. This would have almost certainly have meant defeat for him.
|
16 June 1815
|
French Army under Ney with about 22,000 men.
|
Anglo-Allied Army under Wellington with eventually 36,000 men and 70 guns.
|
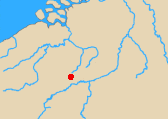 |
Wellington initially left the vital crossroads of Quatre Bras undefended.
Initiative on the part of subordinates that were initially badly outnumbered by Ney's
forces allowed him to rush in reinforcements and eventually win the day. Not before a
number of units had been badly mauled though.
The French lost about 4,000 men.
The Anglo-Allied lost about 4,800 men.
The failure of Ney to seize Quatre Bras and send forces against the flank of the
Prussians at Ligny kept that battle from being a decisive French victory. It also allowed
the British-Allied forces to retreat to a tenable defensive position at Waterloo where they
would be joined by the regrouped Prussians.
|
18 June 1815
|
French Army under Napoleon with about 72,000 men of which 15,750 cavalry. 246 guns.
|
Anglo-Allied Army under Wellington with 67,500 British and Allied troops.
including 12,400 cavalry, with 156 guns.
Prussian Army under Blucher with eventually 45,000 men, with 30,000 Prussians in Bulow's Corps,
the remaining roughly 15,000 men from Pirch's.
|
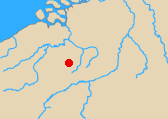 |
Waterloo was the last major battle of the Napoleonic Wars and of Napoleon's career.
It was a defensive battle fought on the Brussels road only a little short of the city
itself. The weather having been wet the battle didn't start until almost noon despite
elements of both armies having camped on the battlefield the night before. The wet ground
also reduced the effectiveness of the superior French artillery. So did Wellington's now
renowned tactics of deploying his formations on reverse slopes. A set of forward positions
at Hougoumont, La Haie Sainte, and Papelotte had to be reduced before the main assaults
could go forward and by the time that had been achieved the Prussian forces were appearing
on Napoleon's left flank. A major infantry assault was broken at the expense of the destruction
of much of the British cavalry. Later French cavalry attacks failed to break the Allied squares.
The Imperial Guard made a last ditch attack as the French flank was crumbling under Prussian
pressure at Plancenoit. The Guard having been repulsed the French army broke and except for the
Guard itself fled. An effective pursuit was launched by arriving Prussian cavalry.
The French lost about 25,000 men in battle, another 16,000 afterward, and 220 guns.
The Anglo-Allies likely lost about 15,000 men.
The Prussians lost about 7,000 men.
Waterloo marked the end of Napoleon's career and determined the shape of the 19th century.
|
18 June 1815
|
French Army under Grouchy with about 33,000 men and 80 guns.
|
Prussian Army under Thielmann with 17,000 Prussians and 46 guns.
|
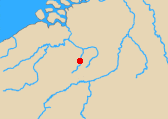 |
While the balance of Blucher's forces moved to the assistance of Wellington at Waterloo,
Thielmann's corps at Wavre held off the French right wing under Grouchy. Although tactically
defeated in this engagement Thielmann achieved his strategic objective. Grouchy failed to
detain the balance of the Prussian army and failed to intervene at Waterloo himself.
The French lost about 2,500 men.
The Prussians lost about 2,500 men,.
Holding Grouchy at Wavre was a necessary part of the eventual victory at Waterloo.
The decisive conclusion of the campaign in the Allied favor.
|
Home