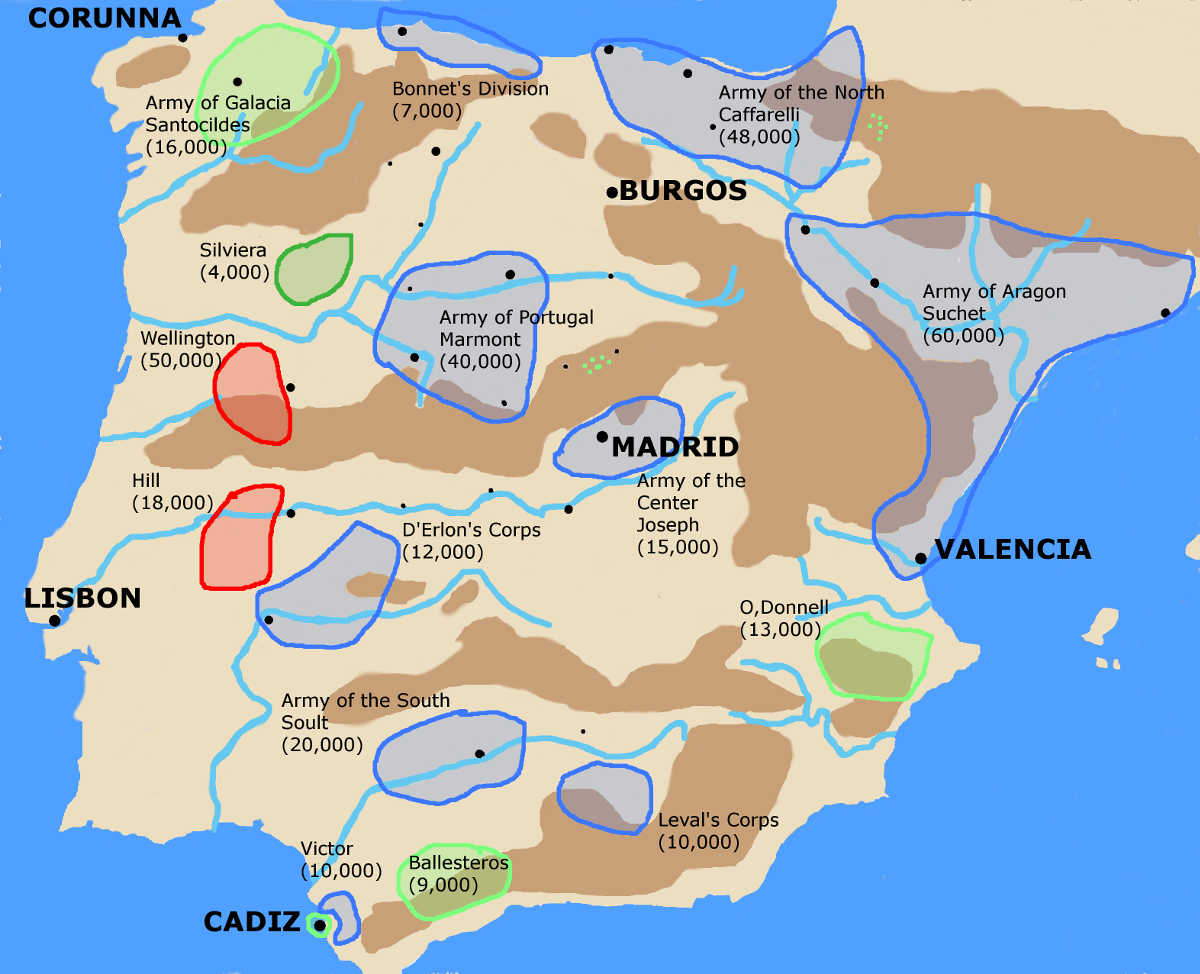
A Map showing forces the strategic situation in the Peninsula at the end of May 1812. Numbers are approximate number of effectives.
Essentially the french were organized into five armies. These armies were:
The French forces were mostly dispersed into garrisons to both hold down territory against active popular resistance and so that they could live off of the land. They could only field their nominal strengths at the cost of losing territorial control and of creating serious logistical problems.
Wellington had the choice of attacking either Marmont or Soult.
The Allies had succeeded in breaking the bridges on the Tagus between Soult and Marmont so even if they wished they could not aid each other except by a long march via Madrid.
Wellington was depending on the Spanish armies and guerillas to help keep the French commanders from releasing forces to reinforce which ever Marshall he attacked.
Wellington was also relying on British seabourne forces in the Bay of Biscay and the Mediterrean to distract Caffarelli and Suchet respectively.
Wellington also knew that Marmont was under orders from Napoleon to leave Bonnet's division in Asturias and expected Marmont would obey those orders.
In the event Wellington attacked Marmont and Marmont got precious little support from the rest of the french forces. Marmont did recall Bonnet despite his orders and the arrival of that division on July 7th encouraged him to take the offensive. A cavalry brigade from the Army of the North and the Army of the Center under Joseph did set off to reinforce him but belatedly and did not arrive in time for the battle of Salamanca.
Wellington had a mixed force immediately to hand which consisted of seven Anglo-Portuguese infantry divisions, a Spainish division, two Portuguese infantry brigades, four brigades of cavalry, and nine batteries of artillery for 54 guns. He had a striking force of 48,000 men.
Marmont's forces were dispersed, once concentrated they amounted to about 40,000 men, not counting Bonnet's division.
Marmont also had an eighth infantry division, Bonnet's, holding Asturias two to three weeks of marches to the north that was about 6,500 men strong.
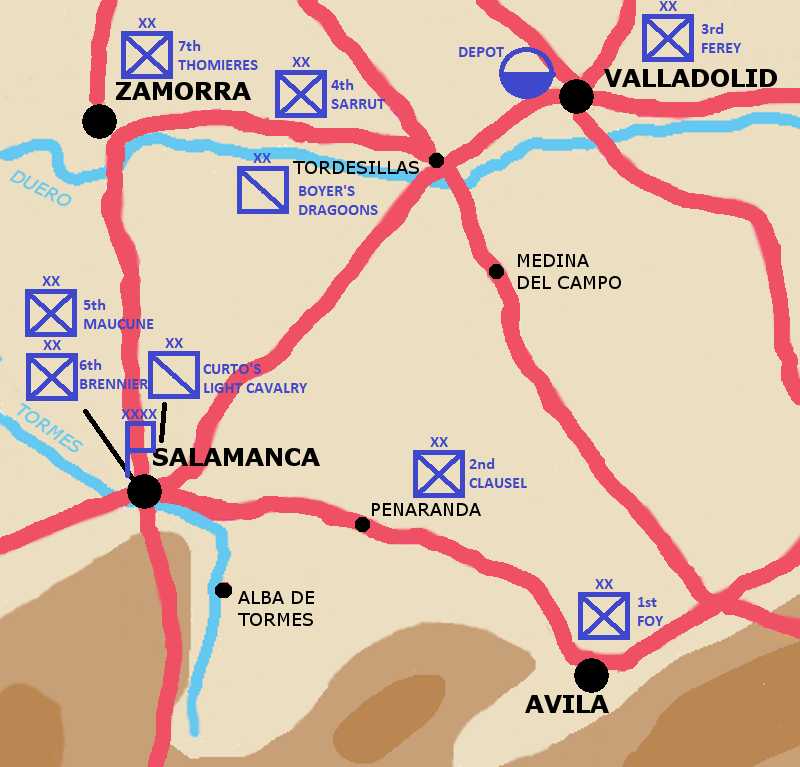
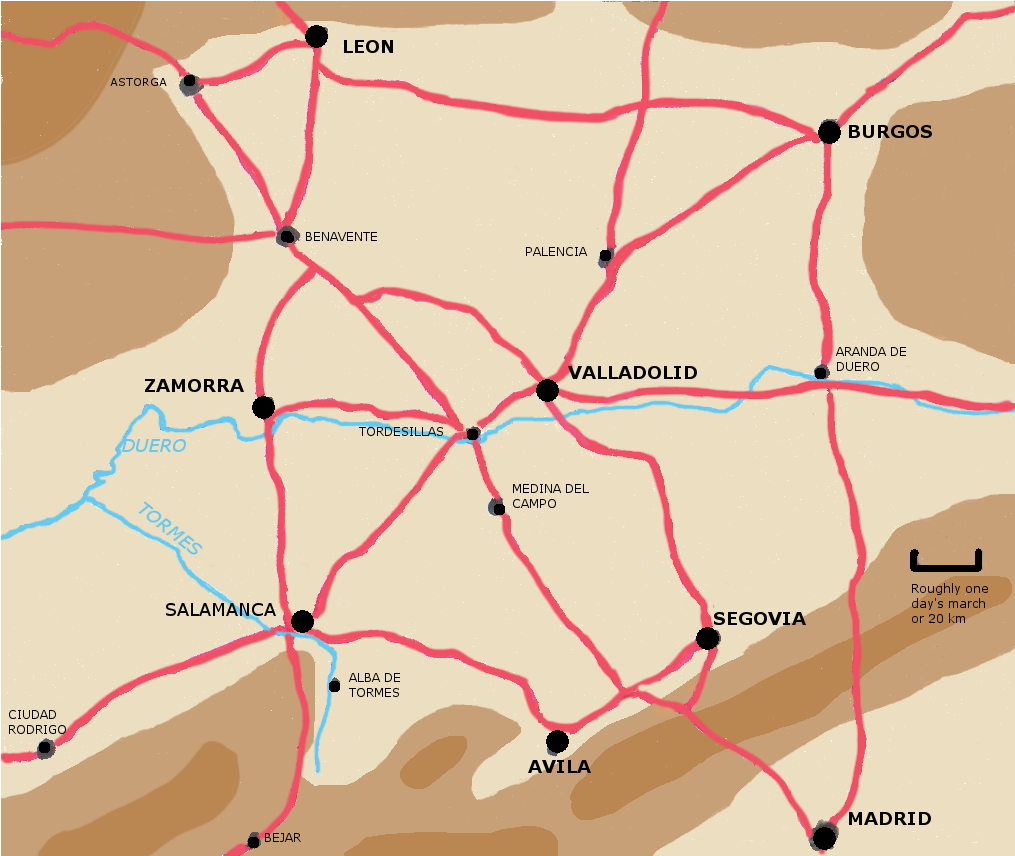
On June 13th 1812 Wellington begins his march from the region of Cuidad Rodrigo towards Salamanca. Wellington's advance guard reaches the area of Salamanca on June 16th. Marmont has evacuated Salamanca except for a garrison of 800 men in a set of heavily fortified buildings that dominate the only intact bridge over the Tormes. Mormont has ordered his dispersed divisions to concentrate in the area of Fuente Sauco north of Salamanca on the Toros road.
Wellington attempts to obtain full control of Salamanca and its crossing over the river Tormes. Mormont finishes his intial concentration.
June 19th Situation Map area around Salamanca north towards Duero
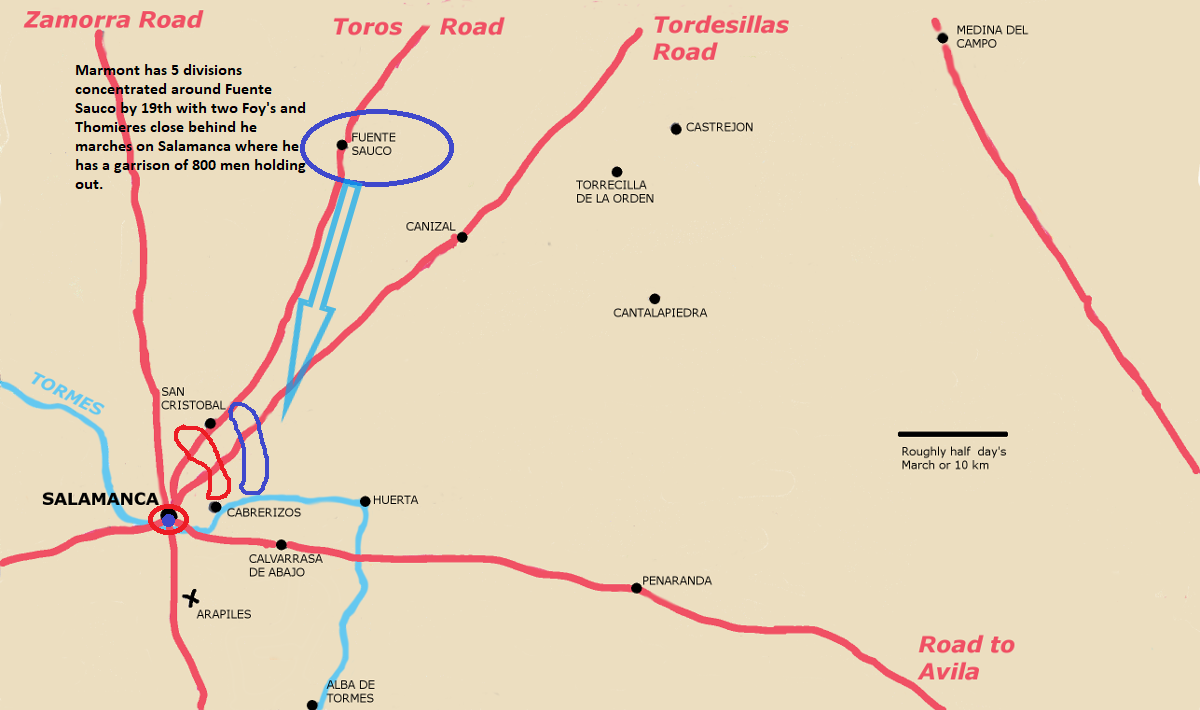
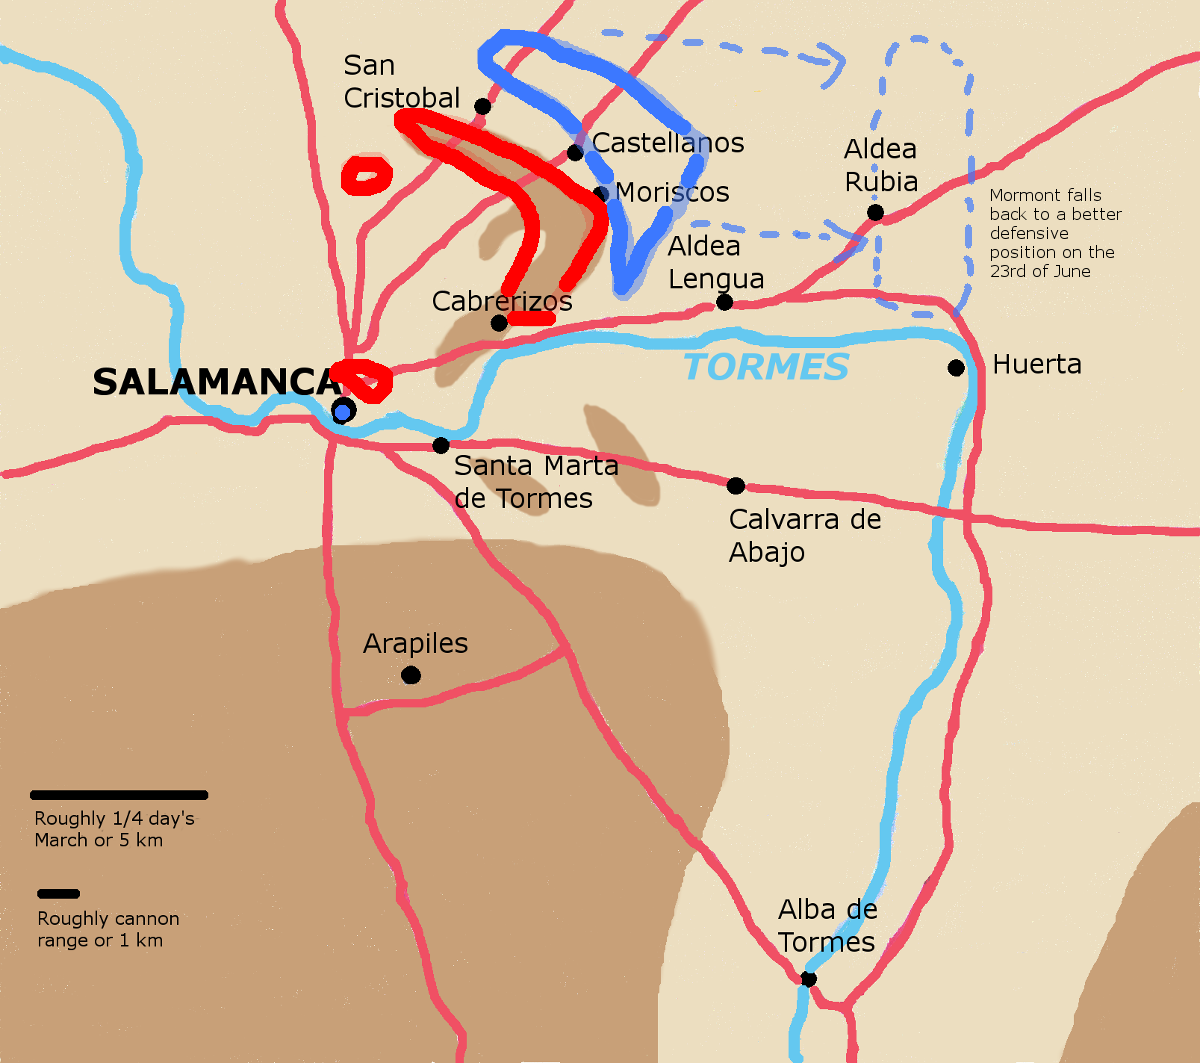
Wellington marchs on Salamanca. Mormont retreats and concentrates dispersed forces around Fuente Sauco. On the 20th Mormont then moves to challenge Wellington who draws up his army on the San Cristobal ridge north-east of Salamanca. The morning of the 21st of June sees the two armies in close proximity, both commanders contemplate attack but in the end neither does. Foy and Thomieres divisions arrive during day losing Wellington an initial advantage in numbers.
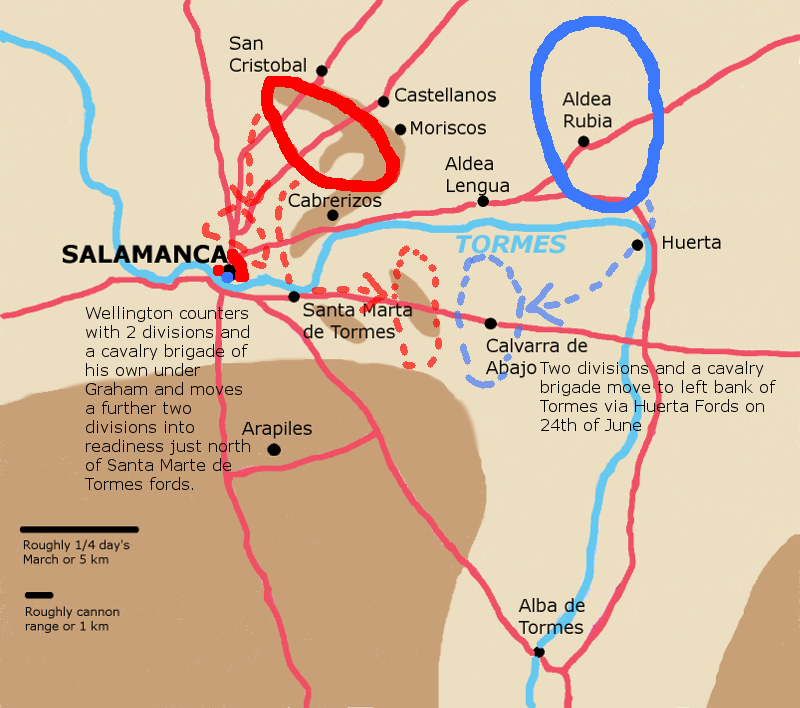
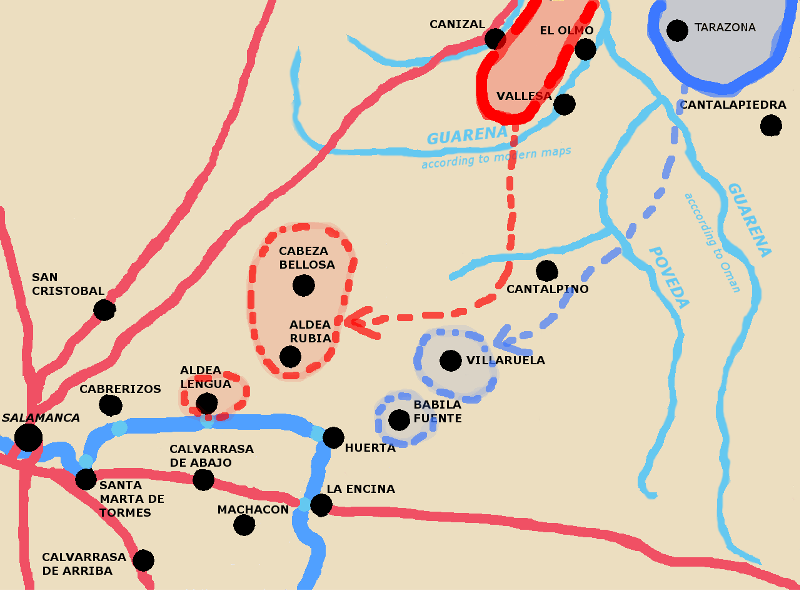
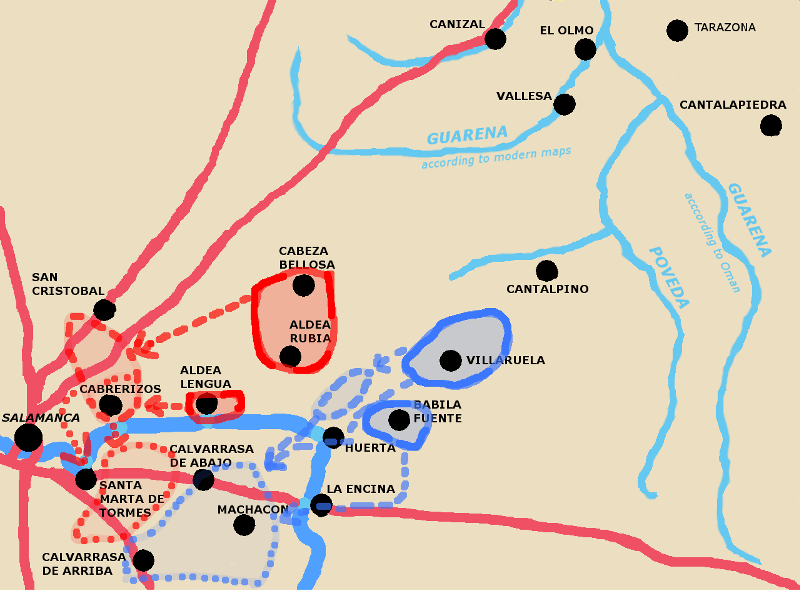
June 20th to 23rd Situation Map set showing area around Salamanca
On the 23rd Marmont falls back to a defensive position around Aldea Rubio. On the 24th he sends two divisions and a cavalry brigade across the Tormes at the Huerta fords, but Wellington counters with two divisions and a cavalry brigade under Graham. The French retrace their steps.
The 25th of June passes without major action, on the 26th the seige of the Salamanca forts resume. Mormont remains inactive.
On the morning of the 27th of June the forts in Salamanca fall, and there no longer being a reason to remain in the vicinity of Salamanca Mormont falls back on the Duero.
June 28th to 30th Situation Map set shows area between Salamanca and Valladolid
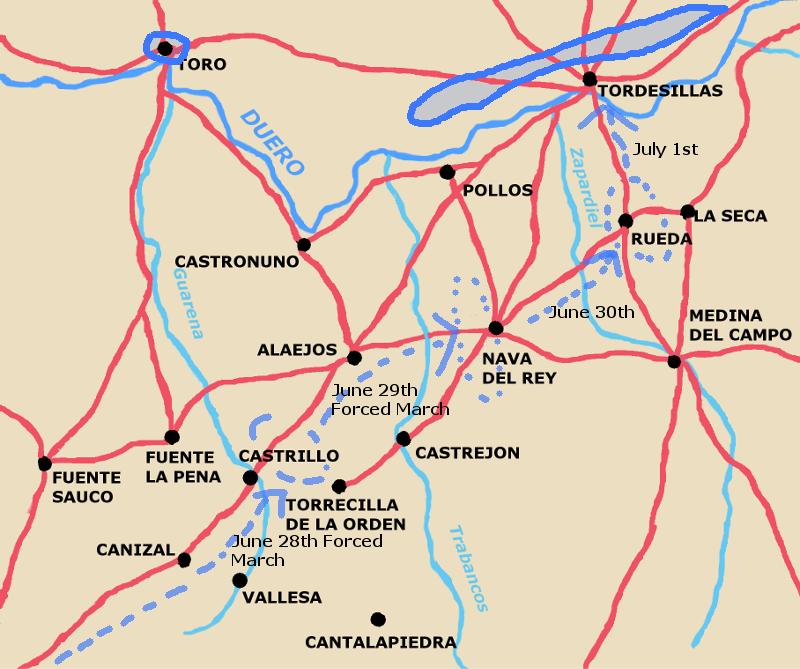
Mormont disengages with two forced marchs on 28th and 29th, rests his troops, and then via Rueda on 30th of June, crosses to the north of the Duero on July 1st.
July 1st to 14th Situation Map - face down on the Duero.
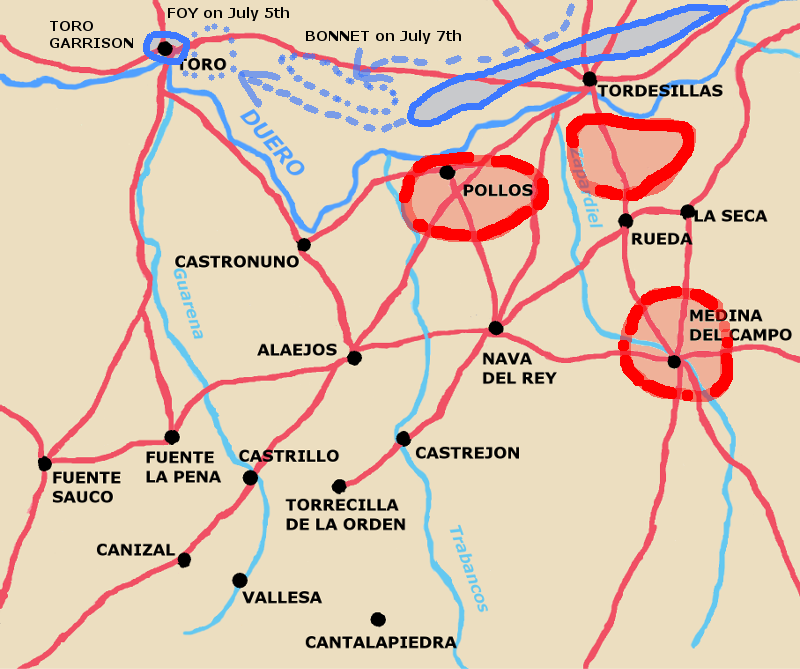
Mormont mostly remained concentrated around Tordesillas. On the July 5th he sent Foy's division to cover the area around Toro, this left a gap between Foy and his main force which he filled with Bonnet's division when it arrived on July 7th. Wellington deployed in three main groups south of the Douro. Covering the Pollos fords on his left he placed his 3rd division, Pack and Bradford's independent brigades, Espana's division, and the dragoon brigades of La Marchant and von Bock. On his right opposite Tordesillas he placed the Light division, the 4th, 5th and 6th divisions, and Alton's cavalry brigade. The 1st and 7th divisions formed a reserve around Medina del Campo.
July 15th to 17th Situation Map set shows area between Toro and Tordesillas
Marmonts feints on his right through Toro and Wellington shifts to cover Toro road to Salamanca.
Wellington gave the following orders on the evening of the 16th of July:
Wellington's army reached these positions on the 17th of July, only to discover the Marmont had counter marched during the night of the 16th/17th, crossed the Duero at Tordesillas and the fords of Pollos and was now concentrated around Nava del Rey.
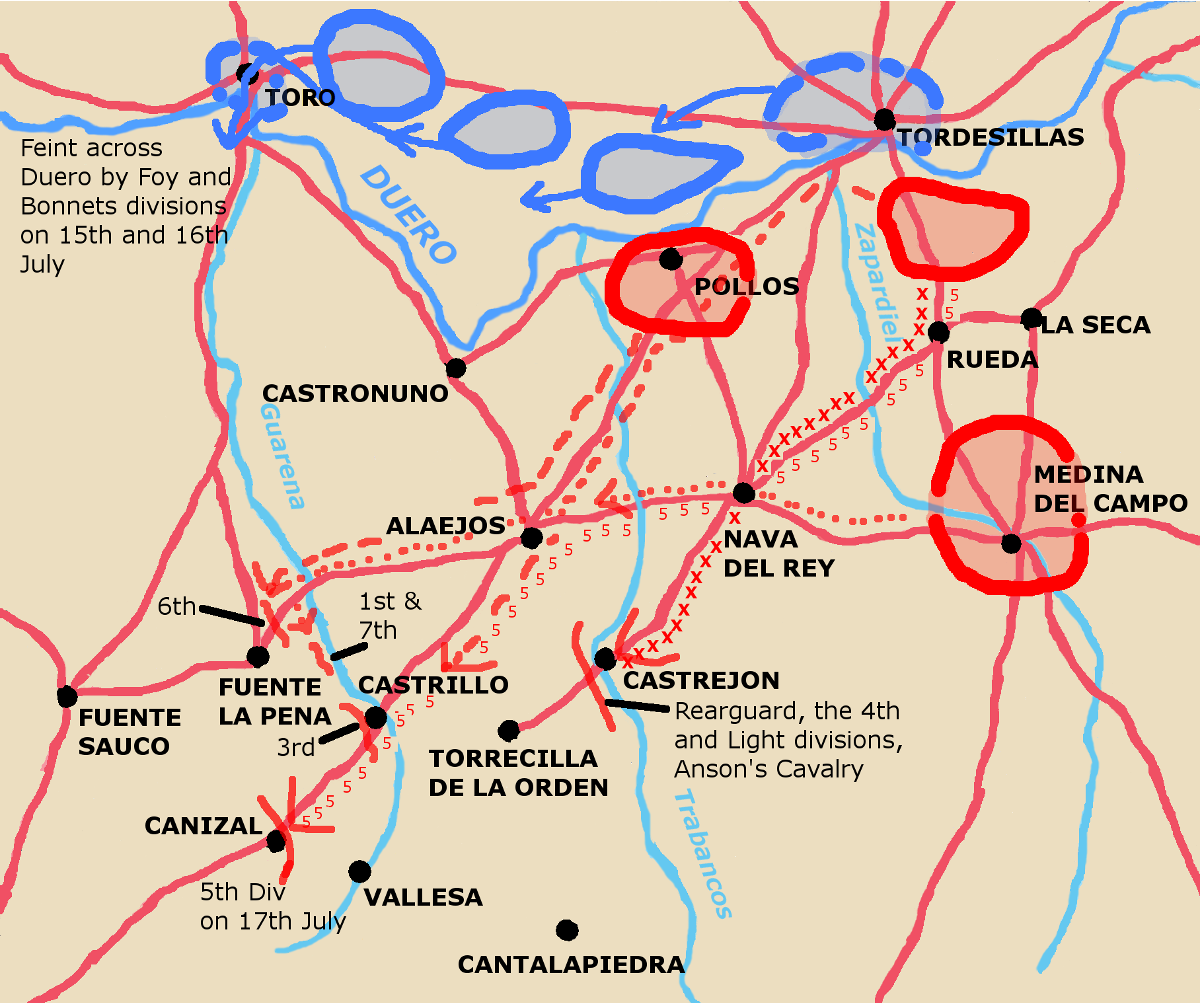
Night July 17th Situation Map shows area between Fuente la Pena and Nava del Rey.
By the 17th Marmont had his entire army concentrated around Nava del Rey. Foy and Bonnet had marched via the Pollo fords, the bulk of the army had crossed the Duero on the bridge at Tordesillas.
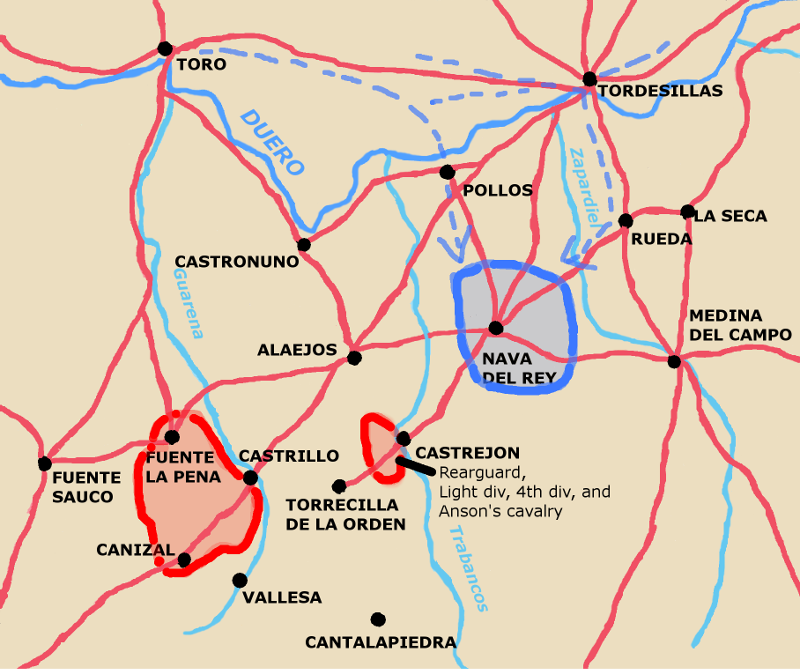
Morning July 18th Situation Map, Wellington supports his right now rearguard.
On the morning of the 18th July Wellington supports his rearguard at Castrejon with two brigades of heavy cavalry under Bock and La Marchant. He also sends the 5th division to Torecilla de la Orden.
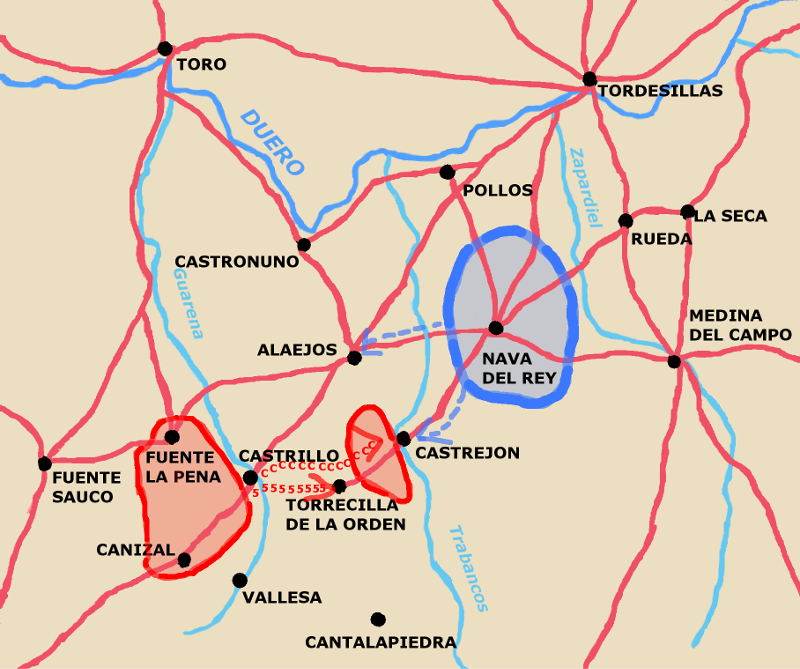
Afternoon and Evening of July 18th Situation Map Marmont trys to catch Wellington's rearguard.
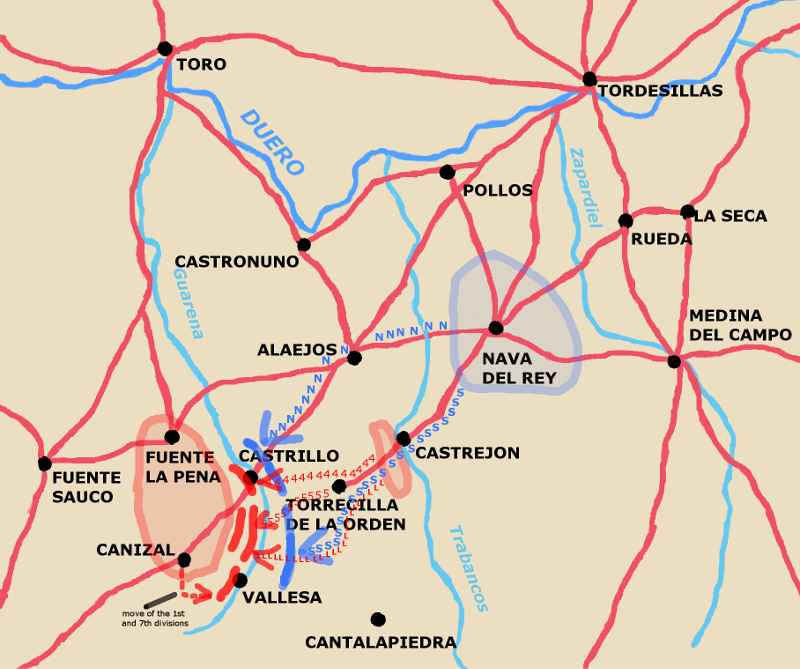
The French advance in two columns. The northern one under Clausel via Alaejos to Castrillo. The sourthern one under Marmont in direct pursuit of Wellington's rearguard through Castrejon, then Torrecilla del la Orden eventually drawing up opposite Wellington's forces behind the Guarena. Despite some sharp actions and the threat of being outflanked by Clausel's northern column the Allies manage to retreat in good order and draw up in good defensive positions behind the Guarena. Clausel initiates an attack on the 4th division at Castrillo that fails and which Marmont declines to follow up on.
July 19th to 20th Situation Map set shows Parallel March in battle ready order south towards Tormes.
July 21st Situation Map the armies cross the Tormes.
July 22nd Situation Map set showing battleground south east of Salamanca
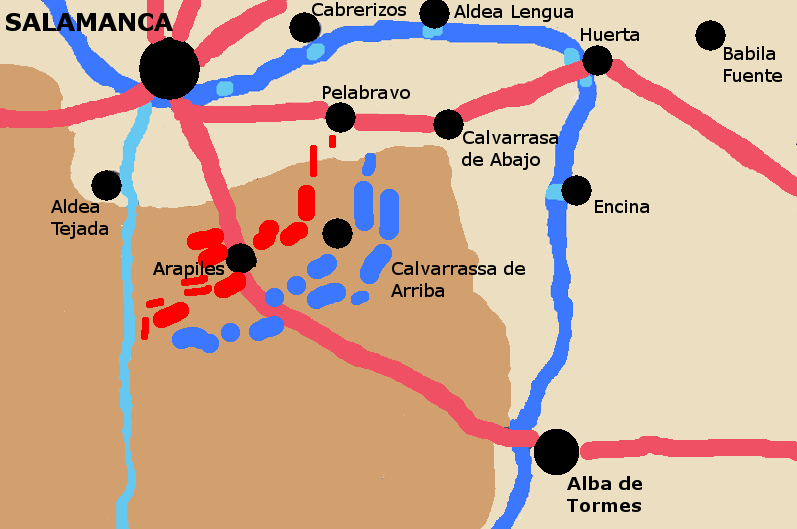
Marmont continues to try to flank Wellington to the south and west and Wellington continues to match him, but Marmont gets careless and Wellington strikes.
See account on Battles page entry for Salamanca.
July 23rd to 30th Situation Map
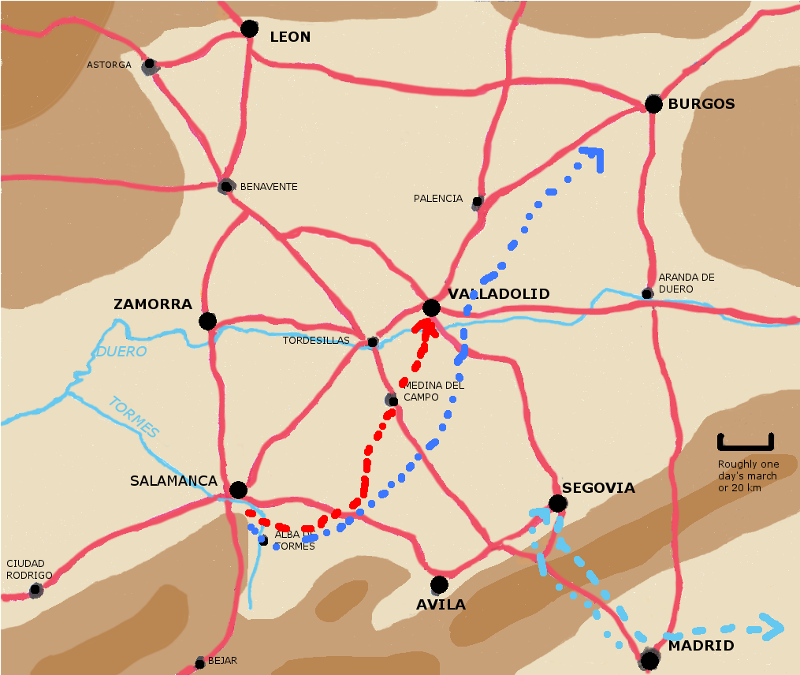
The French (now under Clausel) retreating. After a sharp action at Gracia Hernandez they manage to break contact and retreat on Burgos, followed as far as Valladolid by Wellington. Joseph was across the mountains from Madrid but hearing of Wellington's victory retreats back through Madrid to Valencia.